Showing posts with label masculine card. Show all posts

Sunday, January 15, 2017

Papertrey Ink Make It Monday #271: 2016 A La Carte

This week at Papertrey Ink we are looking back at all the various video techniques shared throughout 2016. We are to choose one technique and use that for this week's challenge. There are soo many great ones to choose from in fact it's hard to choose just one. You can see what I mean by checking out Nicole's blog HERE.  I ultimately decided to do the technique I use almost every time I sit down to make a card. Make It Monday #267: Assembly Line Card Making.  Laurie shared some fabulous  tips to use when making multiple cards of the same design.  I very rarely just make one card when I craft.  It really doesn't take that much more time to make several since you already have the supplies out.  The MISTI makes the process even quicker.  It's truly a great way to build up a stash so you don't have to rush and make cards at the last minute.

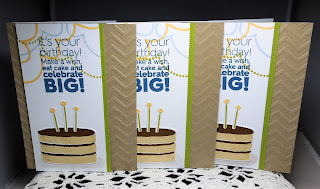
I needed to make some masculine birthday cards.   I have to admit this is a topic I often struggle with.  Give me a good floral set and I could make cards all day but I'm often at a loss when it comes to making cards for the men in my life.  So I decided to seek out some inspiration.  I found a wonderful card by Lizzie Jones.  You can see it HERE.   I had to change things up a little bit since I didn't have all the supplies Lizzie used but I do like how mine turned out.

I actually made 4 of these but I had to send one out already!    Here is a closer look at the individual card:
I didn't have the streamers Lizzie used so I just stamped streamers from PTI's birthday style.  I stamped the cake from PTI's just desserts with a solid ink but then added some shading to the edges  with Prismacolor pencils and Gamsol in order to give the cake a more rounded appearance.  I used a chevron embossing folder on the kraft card base.  I often forget to use these folders but am always pleasantly amazed at how much interest it adds to a card.  I used a stitched border die in place of Lizzie's pinking edge border.   I also didn't have the grounding circle stamp Lizzie used so I tried to make due by drawing a circle with the colored pencils and blending it out with Gamsol. 

I did use Lizzie's tip for leaving the candles in the negative space of the die cut while stamping to help things line up better but I still had difficulty.  My candles definitely aren't perfect but I'm okay with that!  It's the imperfections that give the card character and makes it look "handmade".   I do have a tip for adhering the candles to the top of the cake.  Once again peel in stick comes in handy.  I simply left the candles in the negative space of the die cut applied peel and stick over the top and pressed down.  The candles stick to the peel and stick wrap and can be turned over to apply glue.  Then they can be placed all three at once onto the cake,  I let the candles sit on the cake for a few mintues to allow the glue to set up before removing the peel and stick.

I have one more tip for mass producing cards.  I found these little bowls at the Dollar Tree.  I believe you get 12 for $1.00!  They are great for holding your die cut pieces before assembling your card.  I will have more about these bowls later but here is a photo of how I used them on a card that had many pieces to keep track of.

Supplies are listed and linked below:
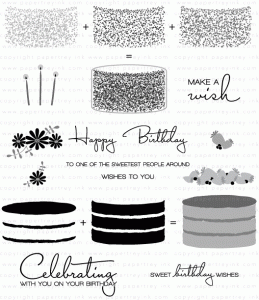

PTI Just Desserts Stamp Set

PTI Birthday Style Stamp Set

PTI Ombre Sentiments: Birthday

Momento Nautical Blue Dye Ink

PTI Harvest Gold Dye Ink

PTI Spring Rain Dye Ink

PTI Simply Chartreuse Dye Ink

PTI Cocoa Bean Dye Ink

PTI Fine Linen

Lawn Fawn Stitched Border Dies

Prismacolor Pencils

Inky Antics Gamsol Coloring Kit
Thanks for stopping by!  Please come back again!


Share:

Monday, July 06, 2015

Color Throwdown #349

Okay I missed the deadline for the latest color throwdown challenge.  It's not that I didn't have the card done I just didn't realize the  deadline was 6 PM!  Oh well I am going to share my creation  with you anyway.

This card is very similar to the one I posted yesterday....click here in case you missed it.    I remember seeing  Laura Bassen's awesome rainbow card using this very same Papertrey Ink Text Block:  Birthday die that I used but with a wonderful rainbow background.  You can see Laura's amazing card here.   She cut two cover plates one white and the other rainbow.  She pieced the rainbow pieces around the white lettering.  I really liked the way this looks.  So I thought I'd give it a try...ending up with two cards with minimal effort.  Boy was I wrong!  Laura must oodles of patience!  There are a ton of pieces to save in that background!  I tried using the dryer sheet method as seen in this video to contain all the pieces which helped some but it truly was a pain piecing everything back in.  I glued the worded frame down first then went through the process of adding the colored background in but I had to move my words around a bit to get all the pieces to fit in.  It probably would have been better to scotch tape everything together and then glue the whole completed frame down.   So I bow down to Laura and will probably never try this again!

Thanks for looking!  Please come by again!


Share:

Sunday, March 22, 2015

Make It Monday #205 Confetti Cluster Stamping

This weeks Make it Monday features using those tiny stamps that often get neglected to make a cluster of images in any shape you choose.  Check out the awesome video tutorial by Lizzie Jones here.   I just love how this techniques puts those little stamps in the limelight for once.

I absolutely loved Michelle's card featuring a big round cluster stamped balloon.  Check it out here.  But I needed a masculine birthday card and I didn't want to copy her card exactly so thus the card/card set above was born.

I used the following Papertrey Ink stamps:
Spots and Dots (vault)
Paper Tray (vault)-small patterned dots and straight line shaped into balloon string
Mehndi Medallion Mini Stamp Set
Honey Bees
Think Big Favorites #12
Balloon bow ??

I also used Quick kutz dies and I designed the "happy" cutting file.  I cut it in two layers and glued them together for some dimension.    It was soo hard not to add some bling to these cards!  I knew the minute I did that though they wouldn't be masculine cards anymore. 

Before I go I'd like to mention that I finally got some matte medium that Jennifer McGuire has been raving about and I put it in one of the Fineline applicator bottles from Amazon.  I really loved how the glue gave me a little time to slide and position my "happy" letters on top of each other perfectly.  The fine tip made a great thin line too.  The glue gives a very strong hold. A little goes a long way so it's worth the money spent.  I definitely prefer this over the glue pen or Xyron.  If you'd like to see more info about these products...Jennifer just did a great video.  Check it out here

I discovered one more thing (while doing the MIM technique) that is so great about the Misti stamping tool and I must share it with you.

In this MIM video they suggest drawing a pencil line to guide you where you wanted to stamp your tiny stamps.  I used the image sheet from my stamp-a-ma-jig and traced my oval guide on there.  I know it's a little hard to see in the photo (click on it to view it larger).  I positioned the sheet in the left hand L corner the same way I did with my cards.  That way I could position the sheet here each time before positioning my stamp.  I made  this whole set of cards in minutes with no pencil lines to erase.  I also stamped my tail and bow onto the image sheet just to make sure I like the position of these items before committing them to the card. A quick wipe with a baby wipe cleaned all this off the image sheet.   Thanks to the Misti.. I definitely see more card sets in my future!  I have sold a few here and there too so the more I make..the more likely I'll have some to sell or at the very least add to my stash!  My goal this summer to is make some to send to the soldiers for operation write home. 

Thanks for stopping by!  Please come back again!


Share:

Sunday, January 11, 2015

Chalkboard Birthday

Hello everyone!
I have a whole bunch of birthdays to remember to send cards to in January.  I depleted my stash so the first place I turn is card challenges.  I came across Fusion's Card Challenge first and didn't need to go any further.
The challenge involved using the gorgeous photo and/or the sketch for inspiration.  I was so excited to see the chalkboard sign.  I have long been wanting to incorporate the chalkboard technique into my crafting projects but never really looked up how to create the look.  I was pressed for time and had to get that card in the mail.  So I looked up chalkboard printables and came across this amazing birthday signs from Nest of Posies.  Thanks Kellie!  Click here to see them yourself.  I sought out my Card Base 6 file and in minutes I had a wonderful card!


I had have a horrible time creating masculine cards so I hope this passes for one!  I wasn't too sure about the balloon background.  Do you think it's too busy?  It is festive that is for sure!  The chalkboard sentiment was the perfect focal point of this card.  I can't wait to use more of these in the future!


http://www.cutandcreate.com/store/index.php?main_page=product_info&cPath=43_105&products_id=938

If you haven't given chalkboard sentiments a try..I encourage you to do so!  If you would like you can click here or on the preview above to purchase this file.  I printed 3 sentiments on a sheet of white card stock.  Honestly, it didn't even take as much ink as I thought it would.

It's time for supper and my belly is rumbling!  My wonderful hubby made turkey meatloaf, rice and brussel sprouts...yummy!

Thanks for stopping by and please come back again!

Share:

Monday, February 10, 2014

New Files Added and a Few Papertrey Ink Cards

http://www.cutandcreate.com/store/index.php?main_page=index&cPath=43_105

My Valentine sale continues. If you get a chance please stop by my store.  Click the Ad above or here to go shopping.  I don't have many files in just yet but am working on putting many more files in before my sale is over.  If you need something but don't see it..please ask! I have added a few new files today.  Click on the previews to be taken directly to them in my store.  But before you go please check out my cards below.

http://www.cutandcreate.com/store/index.php?main_page=product_info&cPath=43_105&products_id=885
http://www.cutandcreate.com/store/index.php?main_page=product_info&cPath=43_105&products_id=884

Papertrey Ink's anniversary celebration continues.  Check out all the fun on Nicole's blog here.  This challenge involved making the sentiment your focal point.  I loved this card from Ally so I decided to copy it.


I really needed a masculine card in my stash so that is why I chose this color combo.  I would love it to try it with flowers and feminine colors though.  I used PTI's Everyday Classics anniversary set for the stars using tone on tone stamping and the sentiment is from PTI's Think Big Favorites #12.    I stamped a zebra patterned stamp from Oriental Trading on the strips of paper.  Sequins finish off the card.

I absolutely loved this card by Nicole.  So once again I duplicated it.


I used PTI's stamp set Rosie Posie for the background images.  The sentiment came from  PTI's Think Big Favorites #2 Some zig zag stitching finishes up the card.

I decided to try another color version of the card I showed in this post.


I ran out of PTI's lovely craft cardstock so I had to use some I got from Oriental Trading.  I was amazed at the difference in stamping this card versus the PTI cardstock.  I believe this OT one was more porous so the ink soaked in more muting the colors.  I used PTI's Rosie Posie and Turning a New Leaf stamp sets.  I added  berries from PTI's bells and boughs stamp set.  The sentiment came from PTI's signature series: dress form. The butterflies were from a Sizzix die I borrowed at the crop.  The doily is a 4" paper one from the cake decorating section.  Some yellow twine and rhinestone butterfly bodies finishes the card.

Thanks for stopping by!  Please come back again!


Share:

Monday, October 22, 2012

Play Date Cafe and Color Throwdown Challenges

Hi everyone,
I went to a crop this weekend.  It was soo much fun!  I actually got a few cards done for two color challenges.


Here is what I came up with for this challenge.

I wasn't sure I liked these colors at first but once I put them on paper I think they look great!  I copied an amazing card from Betsy Veldman.  You can see it here.  I just love the layout of the card.  I'd like to try it with Christmas colors and a poinsettia in place of the rose.  So you may just see that in future.

supplies:
Stamps:  PTI Rosie Posie, PTI Everyday Classics (sentiment), PTI Happy Hexagons, PTI Spot and Dots (bottom border)
Ink:  all Momento Potter's Clay, Sweet Plum and Grape Jelly
Copic markers used to shade rose but sorry can't remember what color

I had to make a birthday card for my uncle.  So I decided to mimic a card I had done previously but just make it more masculine and use the colors above.  I still like the feminine one better.  You can find it here.   But I am terrible at making masculine cards...flowers and fru fru are so ME!  Anyway, it will go in the mail regardless!

supplies:
Stamps: PTI Happy Hexagons, PTI Honey Bees (sentiment)
Ribbon:  from my stash
Die cuts:  Card Base 11..stamped hexagons over the overlay frame and then removed.   Birthday designed by me cut on my KNK

I hope to participate in a few more challenges this week so stay tuned!  Thanks for stopping by!  Please come back again!
Share:

Friday, May 25, 2012

Papertrey Ink May 2012 blog hop and a Sale

First off let me just say I'm sorry for not blogging much lately!  I have been super busy in May and I will share photos of some what has been keeping me busy later but not today or this blog post will be huge!  I promise to blog more frequently in June!  In order to make up for not being in touch..I am having a sale on my entire section of the store (Shelly's Art).  My files are all 30% off now through May 28th.  Click here to see my store.


Isn't that photo just gorgeous!  The challenge today on Nichole's blog at Papertrey ink is to design something with this photo being the inspiration.  I must say I did struggle with this a bit.  I have never worked with only two colors and I never use black as a focal point ever!  So here goes...

I do like the way it turned out but I still can't get used to only two colors.  If I were to make another one similar to this I'd probably add a pop of red to the berries at least.  I embossed a white piece of card stock with the retro diamond embossing folder.  I swiped the raised area with black to mimic the plate in the inspiration photo.  I used my Card Base 7:  Pleats file for the card base. The directions and score lines for the pleats are in the file making it very easy to do this pleated border.  I sponged  parts of the pleats with white ink to make them stand out a little.  The focal image is from Paper Trey Inks anniversary file Round and Round.  I used MIM#45 Coloring embossed images with Copics technique.  I absolutely love this technique!  It's great when you don't have the right ink color or want to color sections of a stamp different colors.  It really makes the image pop on black card stock in real life!   I used a scallop circle and the PTI mat stack 2 die to enhance the focal image.  I also added some bead caps and metal studs.  Oh and the paper is from Echo Park's Victoria Gardens digital collection.  I love this collection!  Many of the patterns are tone on tone and the color can be changed easily to match your theme.  I only printed the width I needed for the border strip to save on ink.

If you would like to purchase the file I used for the card base and pleats please click on the preview below.

 I have another card to share with you today.  I made this for a close friend of ours that treats our kids like they are her own.  She does many grandmotherly things with  them so I figured she deserved a card for Mom's day. 
I used my Card Base 11:  Hexagons file for the starting point of this card.  I covered the flourish from my flourish set file in sparkly white glitter.  However, I remembered why I use glitter glue most of the time because the loose glitter stuck to everything!  I decided to cover the flourish in glossy accents to seal the glitter in so the recipient didn't have it all over her house too!  I used the same papers in my card to make flowers using my Loopy Flowers file.  The sentiment is from Papertrey Ink's Everyday Classics anniversary set.  I did use glitter glue to enhance the sentiment.

If you would like to purchase any of the files used in this card please click on the previews below:

  Before you leave I need to share an amazing Father's Day card made by my CDT member Johanne.

She also used my Card Base 11 file mentioned above.  (Psst..it's on sale until the end of May)  Here is what Johanne has to say about her creative card:

"For this card I used the Card Base 11: Hexagon (SS00240) and Paint Brush Can (SS00012) both from Shelly Sweigart.  The paper were bought at Costco a long time ago and I do not have the name.  I cut the Paint Brush and Can pieces twice to manually embossed them to give a 3D effect.  I made the no sign and the tag for the paint can and printed the last one.  I Print and Cut the sentiment and decorated it with Martha Stewart Punch Drippy Goo.  The font for the sentiment is Pieces NFI.  I covered all the paint with Glossy Accent to give it a wet look."

I love the drippy paint accents and the way she cut slits in the brush to make it more realistic!  I'm soo jealous she has a card done for Father's Day already!

Before I bid you ado, I'd like to explain something about my hexagon file.  It doesn't involve piecing a whole bunch of single hexagons.  It involves a series of overlays that go together in a matter of minutes..it just looks like it took you hours.  Shh.... I won't tell!

 You can see what I mean in the instructions above.  I am soo in love with this file!  It makes a quilted looking card in a matter of minutes.  I have used the single hexagons cuts that are left to make some wonderful cards too and I will share that with you soon.  If you'd like to play with hexagons yourself hurry on over to my store to purchase this file while it's still on sale here


I am going to try and make up a card for the most recent make it monday challenge at Papertrey ink before the challenge is over.  So..I hope to be seeing you again really soon but in case I don't get around to it...I'd like to wish you a wonderful holiday weekend!  Thanks for stopping by!  Come back again!


Share: