Hello!
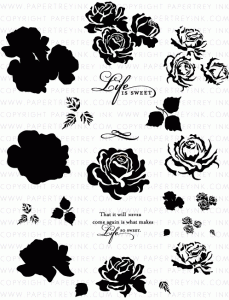
A while ago I posted a card I did for Papertrey Ink's blog hop using The Sweet Life Stamp Set. It was similar to the card below. You can see the original by clicking HERE.
 I promised a tutorial on how I did the stamp layering on the die cuts using the MISTI. So here it goes... Please note this is not my original idea! Cindy O mentioned this technique on the Papertrey Ink forum and I thought it was simply BRILLIANT so I just had to try it. Thanks soo much Cindy! Also Understanding Blue posted a video tutorial using acetate for layering in this video. I just thought I would give you a picture tutorial of how I combine both of these methods to get beautifully stamped rose die cuts.
I will provide you with a collage of key instructions then elaborate below the photo. I figured this will give you a quick overview in case you don't want all the chatter! :) Oh and you will notice many different colors used in this tutorial. I stamped several roses and took the best photos out of the numerous ones I took for the tutorial. You may click on any of the photo collages to enlarge them.
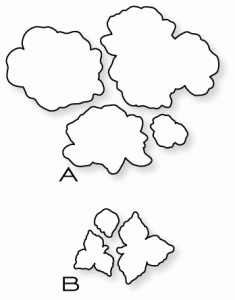
 I realize with the invention of hollow dies this part of the tutorial might not be necessary but the Sweet Life stamp set contains solid dies and I have many more solid dies then hollow in my stash.
1. I look at the size of my die and cut a piece of cardboard larger than the die. This gives me a place to use the magnets in the MISTI to hold on to the negative space of the die cut. I use cereal boxes and other boxes I normally throw in the burn trash. This cardboard is just the perfect thickness and you don't have to waste your good cardstock plus it give me a contrasting color. You can of course just save the negative space of the die cut you intend to stamp on to use as your template. (Note: Since there are three layers to this flower I cut 3 identical cardboard pieces..one for each layer...well actually 4 but the 4th is optional..explained later!)
2. Take a piece of copy paper and stamp your first layer onto it. I use scrap paper that has writing on the one side. DO NOT use cardstock it will be too thick. Be sure to use a darker color of ink. The darker ink will help you line up the image in step 5.
3. Now take the stamped image and center it in the negative space of the die cut making sure there is equal spaces all around. Stick a piece of micropore or washi tape to keep it in place on the front.
4. Turn it to the back and tape the copy paper in place. Remove front tape. This template will be used over and over again.

5. Now take the template you made in steps 1-4 and position it into the left hand corner of the MISTI. Be sure it is snug up against that L corner shape of the MISTI. Place your stamp on top of the template lining up the stamped image with the stamp. (Note: The wrong side of the stamp should be facing up.) Close the lid of your MISTI to pick up the stamp.
6. Die cut your die from the cardstock you would like to stamp on. Keeping the template snug up against the L shape of the MISTI position die cut into negative space on the template.
7. Stamp your image (1st layer) onto the die cut. You should have a perfectly stamped die cut with an even border all around the edge! The next time you use this stamp you can simply start at step 5 since this template is reusable.
You can also use the steps above to add a second layer stamp to the die cut.
 Repeat steps 1-7 for the second layer. Since the second layer is centered on your template it should stamp perfectly over the 1st layer on your die cut. After stamping, keep this die cut in the template as you will need it for the 3rd layer of stamping.

You can try to do the exact same steps as aove for the third layer of stamping but honeslty I didn't have much luck doing that. There is too much room between the negative space and edges of the stamp to center well. It took me several attempts but this is the method I have found to work best for the 3rd layer. If you know of an easier way. Please..please...please share it with me!
Below are the instructions for the third layer of stamping and this corresponds to the photo above:
1. First take a piece of acetate large enough to cover the template made in the second layer of stamping. Tear off a piece of removable tape and attach it to the side of the acetate making a hinge. (Note: I used the Stamp-a-ma-jig sheet and wide painter's tape). Position the third layer stamp towards the middle of the MISTI lid. Stamp in black on your acetate. Stamp as many times as you need to make sure you get a good dark image. Now take the template you made in step two with the die cut still tucked in the negative space. Slide it under your stamped acetate aligning it up so the roses look perfect. DO NOT move the actual stamp. Place magnets or tape on top to hold the template in place. Use the hinge to pivot the acetate out of the way and apply magnets to the bottom of your template. I prefer the side hinge versus the top hinge but do whatever you like the best..eithr will work. The hinge is explained in Understand Blue's wonderful video Here. (Note: The hinge isn't absolutely necessary here but it does help to keep the acetate in place wonderfully and prevents you from moving the template accidentally when you remove the acetate)
2. Stamp the 3rd layer on top of the 2nd layer. Viola! A perfectly aligned beautiful rose! Now you could stop here and just use the acetate every time you use the third layer. However, I wanted a template I could use time and time again like in the other steps.
3. I kept the 2nd layer template in place after stamping my rose. I then die cut a copy paper die and placed it into the template. DO NOT use cardstock it will be too thick. Stamped the 3rd layer on this. Remove the copy paper die cut. Now take a blank negative space die cut and position the stamped copy paper die cut into this negative space. Add tape to the front to hold it in place.
4. Tape the die cut in place on the back of the negative space die cut. Now remove the front tape. You can use this template for the third layer by positioning the stamp wrong side up and aligning it over the stamped image just as in step 5 above. (Note: I glued together two cardboard pieces for this layer so I have a bigger "lip" on the negative space to hold my die cut in. This isn't necessary but I found it is helpful in keeping the cardstock die cut from slipping out of the negative space)
Goodness I sure do hope this doesn't all sound Greek to you! This really is much easier than I am making it sound! Please just give it a try and if you have any trouble just contact me at shellysart at verizon dot com. I'll try my best to explain things better.
Below are the other cards I created:
 Here are the colors I used for my roses and leaves. I will not be linking these products because I don't want to make this post even longer!
Red Roses:
All PTI Berry Sorbet, Pure Poppy, Winter Wisteria (didn't like this color) stamped over with Scarlet Jewel
Leaves: Memento Pistachio
Purple Roses:
PTI Lulu lavender, PTIWinter Wisteria, Momento Elderberry
Leaves: Momento Pistachio
Yellow Roses:
PTI Lemon Tart, Meomento Dandelion, Momento Cantaloupe
Leaves: PTI Green Parakeet
Sentiment is from PTI's Think Big Favorites #2
I hope you enjoyed the tutorial! Thanks for stopping by! Please come back again!

A while ago I posted a card I did for Papertrey Ink's blog hop using The Sweet Life Stamp Set. It was similar to the card below. You can see the original by clicking HERE.

I will provide you with a collage of key instructions then elaborate below the photo. I figured this will give you a quick overview in case you don't want all the chatter! :) Oh and you will notice many different colors used in this tutorial. I stamped several roses and took the best photos out of the numerous ones I took for the tutorial. You may click on any of the photo collages to enlarge them.

1. I look at the size of my die and cut a piece of cardboard larger than the die. This gives me a place to use the magnets in the MISTI to hold on to the negative space of the die cut. I use cereal boxes and other boxes I normally throw in the burn trash. This cardboard is just the perfect thickness and you don't have to waste your good cardstock plus it give me a contrasting color. You can of course just save the negative space of the die cut you intend to stamp on to use as your template. (Note: Since there are three layers to this flower I cut 3 identical cardboard pieces..one for each layer...well actually 4 but the 4th is optional..explained later!)
2. Take a piece of copy paper and stamp your first layer onto it. I use scrap paper that has writing on the one side. DO NOT use cardstock it will be too thick. Be sure to use a darker color of ink. The darker ink will help you line up the image in step 5.
3. Now take the stamped image and center it in the negative space of the die cut making sure there is equal spaces all around. Stick a piece of micropore or washi tape to keep it in place on the front.
4. Turn it to the back and tape the copy paper in place. Remove front tape. This template will be used over and over again.

5. Now take the template you made in steps 1-4 and position it into the left hand corner of the MISTI. Be sure it is snug up against that L corner shape of the MISTI. Place your stamp on top of the template lining up the stamped image with the stamp. (Note: The wrong side of the stamp should be facing up.) Close the lid of your MISTI to pick up the stamp.
6. Die cut your die from the cardstock you would like to stamp on. Keeping the template snug up against the L shape of the MISTI position die cut into negative space on the template.
7. Stamp your image (1st layer) onto the die cut. You should have a perfectly stamped die cut with an even border all around the edge! The next time you use this stamp you can simply start at step 5 since this template is reusable.
You can also use the steps above to add a second layer stamp to the die cut.


You can try to do the exact same steps as aove for the third layer of stamping but honeslty I didn't have much luck doing that. There is too much room between the negative space and edges of the stamp to center well. It took me several attempts but this is the method I have found to work best for the 3rd layer. If you know of an easier way. Please..please...please share it with me!
Below are the instructions for the third layer of stamping and this corresponds to the photo above:
1. First take a piece of acetate large enough to cover the template made in the second layer of stamping. Tear off a piece of removable tape and attach it to the side of the acetate making a hinge. (Note: I used the Stamp-a-ma-jig sheet and wide painter's tape). Position the third layer stamp towards the middle of the MISTI lid. Stamp in black on your acetate. Stamp as many times as you need to make sure you get a good dark image. Now take the template you made in step two with the die cut still tucked in the negative space. Slide it under your stamped acetate aligning it up so the roses look perfect. DO NOT move the actual stamp. Place magnets or tape on top to hold the template in place. Use the hinge to pivot the acetate out of the way and apply magnets to the bottom of your template. I prefer the side hinge versus the top hinge but do whatever you like the best..eithr will work. The hinge is explained in Understand Blue's wonderful video Here. (Note: The hinge isn't absolutely necessary here but it does help to keep the acetate in place wonderfully and prevents you from moving the template accidentally when you remove the acetate)
2. Stamp the 3rd layer on top of the 2nd layer. Viola! A perfectly aligned beautiful rose! Now you could stop here and just use the acetate every time you use the third layer. However, I wanted a template I could use time and time again like in the other steps.
3. I kept the 2nd layer template in place after stamping my rose. I then die cut a copy paper die and placed it into the template. DO NOT use cardstock it will be too thick. Stamped the 3rd layer on this. Remove the copy paper die cut. Now take a blank negative space die cut and position the stamped copy paper die cut into this negative space. Add tape to the front to hold it in place.
4. Tape the die cut in place on the back of the negative space die cut. Now remove the front tape. You can use this template for the third layer by positioning the stamp wrong side up and aligning it over the stamped image just as in step 5 above. (Note: I glued together two cardboard pieces for this layer so I have a bigger "lip" on the negative space to hold my die cut in. This isn't necessary but I found it is helpful in keeping the cardstock die cut from slipping out of the negative space)
Goodness I sure do hope this doesn't all sound Greek to you! This really is much easier than I am making it sound! Please just give it a try and if you have any trouble just contact me at shellysart at verizon dot com. I'll try my best to explain things better.
Below are the other cards I created:

Red Roses:
All PTI Berry Sorbet, Pure Poppy, Winter Wisteria (didn't like this color) stamped over with Scarlet Jewel
Leaves: Memento Pistachio
Purple Roses:
PTI Lulu lavender, PTIWinter Wisteria, Momento Elderberry
Leaves: Momento Pistachio
Yellow Roses:
PTI Lemon Tart, Meomento Dandelion, Momento Cantaloupe
Leaves: PTI Green Parakeet
Sentiment is from PTI's Think Big Favorites #2
I hope you enjoyed the tutorial! Thanks for stopping by! Please come back again!