

Hi everyone,
I don't know about you but there is something about the start of the new year that makes me want to get organized and make the most of my crafting time. Are you tired of searching and searching and searching some more for that perfect embellishment you just know you have...somewhere?! Are you tired of pushing things and stacking things so you can have some room to craft? Are you tired of buying things and coming home to find you already have several of those items in your stash? If you answered yes to any of these questions then come and join me in my mission to get organized. I am not a professional organizer but I have been crafting for over 12 years and am an organizational idea collector. I will share with you my systems for organizing specific items. I realize your space and paper crafting style may differ from my so I will also share with you other systems I have found on the internet (giving proper credit of course). I will also post a In Linkz tool near the comment section of these posts so you too can share your systems. So hopefully with all these options you will find a system that works for you.
Before we begin though. You need to do some thinking and looking around your craft space. I am lucky enough to have one large room on our third floor which I share with the kids. It is my craft space and their crafting and play area. Prior to this I had a dining room table to craft at and had my items store throughout the dining room, bedroom, and living room. Prior to this before child number 2 was born I had a small bedroom as a craft space. So my storage methods have evolved depending on the space that I had. So you need to look around your space...albeit a closet, corner, or a cottage. How much space you have will greatly influence what method of storage works for you.
Also, while you are looking around the room look at what systems are working and DON'T MESS with them! If it's not broke don't fix it! Sure a new method make look nicer but why make all the effort if your system is working for you. Make a note of what ISN'T working and why. That way when you are looking for a new system you can figure out if it will indeed work better than the old system.
Am I boring you yet? I bet you never thought organizing would involve soo much thinking and effort huh?! I promise it will all be worth it. You will be able step into your craft room without getting frustrated.. You will be able to create wonderful projects in half the time it takes you now. You will love your newly organized haven!
One more thing you need to think about before you start organizing is how do you go about making projects. What is your starting point? For me when I do paper crafting I start with color. I pick a color combo I want to try. The colors may come from the internet, a photo or a piece of patterned paper. Sooo....my items are organized by color for the most part. When I want a purple flower...I know to go to the purple box. If you are someone who buys complete collections of products...you may not want to break things up by color. For instance, if you buy Basic Grey's new Kissing Booth collection which includes wooden button, trims and brads. You may want to keep these items together since they all coordinate. However, later on after you make some items from the kit and perhaps have moved on to a new favorite collection then you can break up the kit and sort by color. By breaking up the kit...you get more use out of some of the products at least. For instance the BG Kissing Booth wooden buttons would work well for just about any project.
Okay I'm done with talking now on with the organizing! I am starting with ribbon. I am a ribbon addict! I'm not sure why but there is something that just draws me to ribbon. I love all the colors, textures and patterns. Ribbon is one thing I had problems storing...spools take up soo much space and honestly, I have never ever used a full spool of ribbon for paper crafting. It has taken me several years and several methods but I do believe I have found the perfect system for me!
 So above is my ribbon storage. I store it in jars on this wall unit. I sort by color using the rainbow system. I have red and pink together in a slightly larger jar since I could only fit 4 jars across. The top jars were purchased at Wal-mart. The 3 smaller jars are old canning jars given to me. I needed a larger jar for multi colored ribbons (TIP..these are a great starting point for a card...you can choose your papers by pulling colors from the multi-colored ribbon). I found this lightning closure jar at the Good Will store. As you will come to discover... I love to shop the Good Will store for organizing goodies...you never know what you will find and it is soo cheap! All you need to make these used items good is a wipe down with an antibacterial wipe. I use Lysol on anything that is fabric. Oh and my neutral colors such as black, brown, etc are stored differently since I can't fit any more jars in this unit.
Okay after looking at these jars you might think..huh...she's not a ribbon addict..there is hardly any ribbon there! There is even space for tons more. My secret is this little tool called the ribbon spooler. It's an amazing little gadget that aids in rolling the ribbon into tiny little rolls. I purchased it a Paperthreads here. Check out the video of how it works by lafrie below.
 I wanted to show you how much space rolling the ribbon saves. It depends on how thick the ribbon is and what material it is made of how much can be rolled using the ribbon spooler. The thin sheer ribbon I rolled up was 10 yards in length. I have it sitting on top of the spool it was purchased on. As you can see that little roll takes up much less space then the paper spool. The light green ribbon is made out of yummy velvet so I was only able to get 1.5 yards out of it..but not to worry I was able to spooled up the rest in another roll. I figure this ribbon will be perfect for leaves so I will definitely be using it a lot. The stitched grosgrain ribbon I was able to roll up about 3 yards. Most of the time I keep 3 yards of ribbon in my jars. The rest gets stored in another container for when I host another ribbon swap on Paperthreads (I'm thinking maybe in March once you guys have all your ribbon organized...I will host another ribbon swap..whaddya think?) Those little pins...I got in an ornament kit involving sequins. Well I knew I wasn't going to make the ornament but...these short pins work great for pinning ribbon not only rolled but also on the spool since they aren't too long. You can find some on Amazon here or look for sequin pins at your local store. Oh and the ribbon above was purchased by my Secret Sister at Christmas this past year. Thanks for feeding my ribbon addiction Kylee! I do still have several rolls of ribbon I need to roll but it's nice knowing that little tool will make the process go quickly and I know exactly where they will go when I'm done rolling.
Oh and I forgot to mention..the ribbon spooler comes with these plastic compartments that you can store your ribbons in...you can see it sitting on the very top left hand side of my wall unit (on the right is netting). I have my word ribbons in there like "happy birthday, happy anniversary" etc. But I like my jars better than those plastic compartments. Oh and the old spindles hold twine.
Okay so I am thrilled with this system but maybe you aren't so here are some other options for you:
My idol Patter Cross (organizational queen) uses the ribbon spooler for not only ribbon but also lace as shown below.
 She then stores the rolled lace and ribbons in small clear plastic boxes and places them in a drawer. Read more about her system here. If I had a larger space I would soo do this!
 Cathe Holden came up with a wonderful system using drapery rings, cup hooks and a yard stick. You could even add an extra cup hook for a pair of scissors to cut instantly. This looks sooo pretty just like a work of art... but I think my cats would have a field day with this! Read more about her method here.
 Maria Zuid-Holland has a great little systems that wraps ribbon around wooden boards (found at Etsy here)and suspended from S hooks. Read more about her system here.
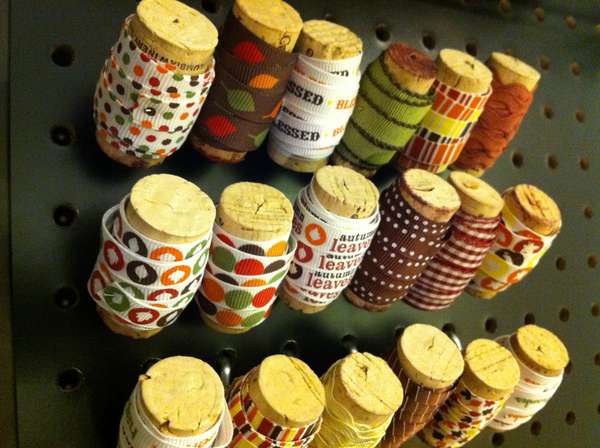
 I just had to share with you this really unique way. Beth R used corks to wrap the ribbon around and inserted peg board hooks. This may not work if you have a lot of ribbon. But if you have some ribbon you want to put front and center so you can use it..this may be the ticket. Beth said she went to a wine tasting place and they just gave the corks to her. If you scroll down to the comments section she gives you more hints on how to create this here.
 If you want to keep your ribbon on the spool and are handy person. I have an excellent cabinet you can build yourself. Nicole Heady posted a tut on how to make the awesome storage below. Check it out here.
 Okay let's say you want to store your ribbon on the spool but don't have a lot of space. Never fear this solution is for you. It used tension curtain rods wedged in a cabinet. Read more about Karen's great system here.
 If you want something that stores your rolls but also ribbon scraps then the Clip It Up Ribbon Organizer is for you. There is even a place to store your scissors. You can purchase it for over 50% off at Paperthreads here.
 There are soo many other ways to store ribbon that I can't possibly cover them all. I just figured I'd highlight a few. You can find more on my Pinterest board here. If you aren't a member I'd be happy to invite you. Just send me an e-mail with your e-mail address at shellys art @ verizon. net (no spaces please).
Whew this has been a super long post! I hope this encourages you to get organized. I would love it if you would share your ribbon organizational system even if they are similar to any of the above. Add your link using the Inlinkz tool below. Take your time. Even if it takes you a year to organize your ribbon I still want you to come back here and share.
There are soo many other ways to store ribbon that I can't possibly cover them all. I just figured I'd highlight a few. You can find more on my Pinterest board here. If you aren't a member I'd be happy to invite you. Just send me an e-mail with your e-mail address at shellys art @ verizon. net (no spaces please).
Whew this has been a super long post! I hope this encourages you to get organized. I would love it if you would share your ribbon organizational system even if they are similar to any of the above. Add your link using the Inlinkz tool below. Take your time. Even if it takes you a year to organize your ribbon I still want you to come back here and share.
Thanks for stopping by and dealing with my gabbiness! If you aren't a follower of my blog then please subscribe so you don't miss any of my organizational posts. I will post a different item every Monday. Have a great week!

I don't know about you but there is something about the start of the new year that makes me want to get organized and make the most of my crafting time. Are you tired of searching and searching and searching some more for that perfect embellishment you just know you have...somewhere?! Are you tired of pushing things and stacking things so you can have some room to craft? Are you tired of buying things and coming home to find you already have several of those items in your stash? If you answered yes to any of these questions then come and join me in my mission to get organized. I am not a professional organizer but I have been crafting for over 12 years and am an organizational idea collector. I will share with you my systems for organizing specific items. I realize your space and paper crafting style may differ from my so I will also share with you other systems I have found on the internet (giving proper credit of course). I will also post a In Linkz tool near the comment section of these posts so you too can share your systems. So hopefully with all these options you will find a system that works for you.
Before we begin though. You need to do some thinking and looking around your craft space. I am lucky enough to have one large room on our third floor which I share with the kids. It is my craft space and their crafting and play area. Prior to this I had a dining room table to craft at and had my items store throughout the dining room, bedroom, and living room. Prior to this before child number 2 was born I had a small bedroom as a craft space. So my storage methods have evolved depending on the space that I had. So you need to look around your space...albeit a closet, corner, or a cottage. How much space you have will greatly influence what method of storage works for you.
Also, while you are looking around the room look at what systems are working and DON'T MESS with them! If it's not broke don't fix it! Sure a new method make look nicer but why make all the effort if your system is working for you. Make a note of what ISN'T working and why. That way when you are looking for a new system you can figure out if it will indeed work better than the old system.
Am I boring you yet? I bet you never thought organizing would involve soo much thinking and effort huh?! I promise it will all be worth it. You will be able step into your craft room without getting frustrated.. You will be able to create wonderful projects in half the time it takes you now. You will love your newly organized haven!
One more thing you need to think about before you start organizing is how do you go about making projects. What is your starting point? For me when I do paper crafting I start with color. I pick a color combo I want to try. The colors may come from the internet, a photo or a piece of patterned paper. Sooo....my items are organized by color for the most part. When I want a purple flower...I know to go to the purple box. If you are someone who buys complete collections of products...you may not want to break things up by color. For instance, if you buy Basic Grey's new Kissing Booth collection which includes wooden button, trims and brads. You may want to keep these items together since they all coordinate. However, later on after you make some items from the kit and perhaps have moved on to a new favorite collection then you can break up the kit and sort by color. By breaking up the kit...you get more use out of some of the products at least. For instance the BG Kissing Booth wooden buttons would work well for just about any project.
Okay I'm done with talking now on with the organizing! I am starting with ribbon. I am a ribbon addict! I'm not sure why but there is something that just draws me to ribbon. I love all the colors, textures and patterns. Ribbon is one thing I had problems storing...spools take up soo much space and honestly, I have never ever used a full spool of ribbon for paper crafting. It has taken me several years and several methods but I do believe I have found the perfect system for me!

Okay after looking at these jars you might think..huh...she's not a ribbon addict..there is hardly any ribbon there! There is even space for tons more. My secret is this little tool called the ribbon spooler. It's an amazing little gadget that aids in rolling the ribbon into tiny little rolls. I purchased it a Paperthreads here. Check out the video of how it works by lafrie below.

Oh and I forgot to mention..the ribbon spooler comes with these plastic compartments that you can store your ribbons in...you can see it sitting on the very top left hand side of my wall unit (on the right is netting). I have my word ribbons in there like "happy birthday, happy anniversary" etc. But I like my jars better than those plastic compartments. Oh and the old spindles hold twine.
Supplies needed for my ribbon storage system:
Straight pins..Purchase the shorter sequin ones here.
Jars (any with a wide enough mouth will do)
Shelf, cabinet or counter to store the jars
Okay so I am thrilled with this system but maybe you aren't so here are some other options for you:
My idol Patter Cross (organizational queen) uses the ribbon spooler for not only ribbon but also lace as shown below.
Thanks for stopping by and dealing with my gabbiness! If you aren't a follower of my blog then please subscribe so you don't miss any of my organizational posts. I will post a different item every Monday. Have a great week!


