
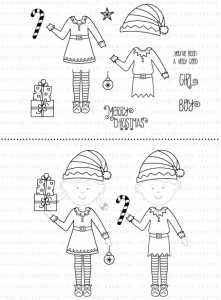
Do you ever see a card by one of the fabulous Papertrey Ink designers and think I've gotta make a card just like that now!? But then you realize you don't have all the supplies the designer used? Well that happened to me recently. I sat down to make some Christmas cards. I immediately thought of Betsy's amazing card using the PTI Dress Up Dolls: Elves stamp set. I couldn't wait to start making this:
 Isn't it wonderfully cute!? (You can see more details on Betsy's blog here) I was soo happy my daughter had the PTI dress up doll basic set because it gave me an excuse to buy the Elf set and thus I could recreate this card. Or so I thought....I didn't have that rustic wreath stamp set. So I got to thinking what I could replace the wreath with. This is my finished card...see what you think?!

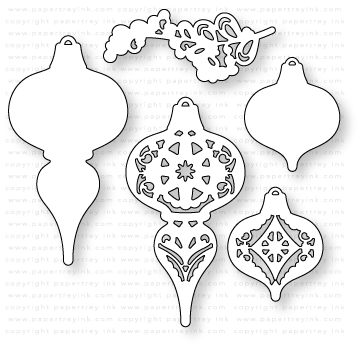
Can you guess what I used for my wreath? I used the vine included with PTI's What the Doodle: Ornament stamp and die set. I had to do some snipping though to make it work. Here let me show you.
 First you stamp and die cut or fussy cut several of the vines. (I wanted a hollow wreath for the elves to pop out of so I cut a circle out of my card front and the size of that determined how many vines I needed) Next you will snip apart the vine as indicated above. Then begin layering your cut peices around the circle. I lay the middle black part of the vine directly along the edge of the circle so half the vine is on the cardstock and the other half is hanging out of the circle. As indicated in the photo you will want to flip the top half of the snipped vine so it is facing the wrong way. You will also want to overlap the vine pieces slightly when you glue them around the circle.

Above is a picture of the completed wreath. The red showing through is mat on my table. I decided make another card using just the open wreath since it's so pretty on it's own.

I colored the wreath and bow with Prismacolors an used a sparkle gel pen to color the tiny berries. The bow and sentiments were all from PTI's Bells and Boughs stamp set.
Supplies are listed and linked below:
Thanks for stopping by! Please come back again! Happy Holidays!


Above is a picture of the completed wreath. The red showing through is mat on my table. I decided make another card using just the open wreath since it's so pretty on it's own.

Supplies are listed and linked below:
 PTI Dress Up Dolls: Basics Stamp Set |
 PTI Dress Up Dolls: Elves Stamp Set |
 PTI Bells and Boughs Stamp Set |
 PTI Stylish Sentiments: Holiday |
 PTI What the Doodle Ornament |


