Showing posts with label baby. Show all posts

Friday, February 04, 2011

Frugal Friday special: Today only $1.00 tags and CDT projects

Hi everyone,
Now that my sale is over that means Frugal Friday specials are back.  Today's special is perfect for Valentine's Day!
That little love tag is a perfect addition to cards and layouts.  The pieces all cut separately so you could easily add any die cut or stamps to these tags.  This makes them them very versatile and soo worth $1.00.  So hurry on over to my store and pick these up.  Click here.  The price magically disappears at midnight EST today (2/4/2011).  (Look Gina...I got the date right..tee hee!).  Before you leave please check out these great projects from my very talented CDT.


Take a look at the tag/card by Shelly M!  Wouldn't this be a very cute Valentine!  Let's see she used my Clothes Line Baby Girl Card.  I just love those mini clothes pins!  (Edited to add:  Shelly used a cut/emboss die from Stampin' Up for the butterfly) but you could easily shrink my 3-D Butterflies to baby size and added it to a heart.   Simply adorable!  I'm not sure what she used for the tab...but you could use my Hinged Tabs and not cut the window for the same effect.  I'm also not sure what Shelly used for the card base but you could use my Pocket Card file to make something similar. 
Click the words above the previews if you'd like to purchase any of these files.
Pocket Card


Hinged Tabs
Next up we Caz helped my owl from my Loving Owl Tag file fly off the tag onto a card.  I love where Mr. Owl landed!  Her card is great...take a look for yourself!

See I told you it was a Hoot!  Sorry I couldn't resist!  I think the mixture of different patterns makes Mr. Owl look wonderfully whimsical.  Take a look at the card base...Caz created that herself!  It's it amazing!  Click on the words above the preview if you'd like Mr. Owl to come visit you!
Loving Owl Tag
 I do have a few more CDT projects to share with you but it's almost lunch time and I must get to some housework before that.  I did get some layouts done at a recent crop so I'll try and take some photos of those and share them with you too soon.   I am also looking at ways to organize my acrylic, unmounted, and wood stamps so if I figure things out I will post my system.  Meanwhile if you have any tips for me..please send them my way!  I could use all the help I can get!

Have a fabulous weekend!  Stay warm!


Share:

Monday, January 31, 2011

Last day 30% off my designs, CDT projects and chaninmail jewelry.

Today is the last to cash in on my store wide sale.  Hurry on over to get 30% off all my designs.  Click here. 
I do apologize for not getting any new files in the store.  I'm not sure where all my time went.  I guess all the 2 hour delays, snow days and the kids and I getting sick..it got the best of me!  I'm hoping February will prove more productive.  I do  have two files just about complete...so keeping my fingers crossed nothing prevents me from getting these and more files into the store.


Bless my creative design team members...even when I fail to produce they still crank out lots of great stuff using my older files in creative ways!  Check out their projects below!


First up check out what Shelly did to my Winter Tic Tac Holders.  She gave them a makeover and now they are all ready for Valentine's Day!  She simply added the heart button from my buttons galore file to show how much love these friendly characters can give!  Wasn't that brilliant of her!  Kids will love this!

If you would like to make your own Valentine Tic Tac holders click on the words above the previews below.

Winter Tic Tac Holders

Buttons Galore
Oh and in case you need a tic tac holder that is more traditional..never fear I have that too!

I Love You Tic Tac Holder

Next up I have an adorable layout by CDT Lisa Lindesmith.  I used to shy away from one photo layouts thinking one photo could never depict my story.  However, in this photo it's easy to see the love and how precious this little one is.  Any more photos would be distracting.  Great job Lisa!  Lisa too used my heart button from my Buttons Galore file and enhanced it with a tiny bow and charm.  The title came from my Clothes Line Baby Boy Card.

See I told you this layout was adorable!  I have to be honest when I designed this card file...I never ever thought to use it in a layout.  I'm glad you guys did because its perfect!  If you need a baby card or layout title click on the words above the previews below.

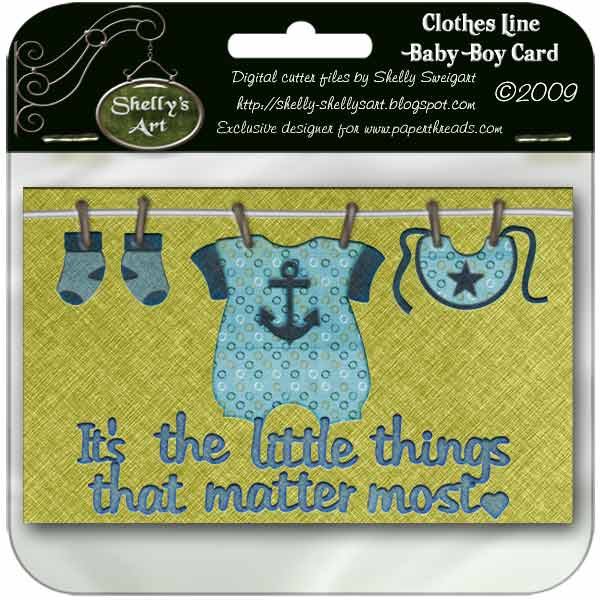
Clothes Line Baby Boy Card

Clothes Line Baby Girl Card


I was looking for the perfect gift for a friend of ours that has been like a mother to my children.  Since our family doesn't live around here she often helped watched our kids when we truly needed her to.  I don't know what we would do without her!  So I knew I wanted a handmade gift for her.  She is a jewelry lover and I had planned on making her some jewelry.  I discovered a wonderful shop that sold chainmaille jewelry kits.  Yes....it is similar to the vest and such they used to make way back when but some much more sophisticated. I have made jewelry in the past but nothing like this...it is made of tiny rings positioned in various ways.   I did take a quick photo before giving her the gift.  Sorry it's not that great...might want to put your sunglasses on because of the glare!


I got the kits for the jewelry from the UnkamenSupplies.  They have the most amazing color and variety of rings.  The rings are all handmade and coated to prevent tarnishing.  I chose navy and silver that way I figured my friend could wear this anytime she wears denim.  (BTW..she loved this gift and said it looked too complicated to be handmade...really it's not that hard!) Let's see the bracelet is a kit found here.  The pendant is found here.  I made the earrings using leftovers from the two kits.  The best thing about these earrings is that I can take off the navy/silver decoration and put a different one on to match a different necklace or outfit.  You can find these interchangeable leverbacks here.  This is a family owned business and they truly do care about their customers.  The kits come nicely packaged in tins with screw on caps..perfect for gift giving!  Being new to chainmaille I did have a few problems with the instructions but they remedied the situation wonderfully and even sent me a FREE bracelet kit for my troubles!  I have not put this together yet but when I do I will be sure to share it.  I am waiting to save up some money to get their professional pliers.  These are sooo worth the money!  I used what I had on hand to make the pictured set and by the time I was done my hands were numb.  The ones you can buy from Unkamen are professionally prepped so they don't scratch the rings.  I have very large hands and so I need the larger pliers.  I love making chainmaille jewelry and intend to buy more things off of Unkamen!

Tyler gets out of school early today too so I'd better get some things done before he gets home.  Oh just curious..do your kids fight constantly?  Adoree gives Tyler a hug when he gets home from school and says she missed him but from then on all they do is fight!  I hope someday they figure out how to get along!

Have a great week!  Stay warm!  Say it with me...NO MORE SNOW...NO MORE SNOW!
Share:

Thursday, October 28, 2010

Babies, airplanes, corn stalk dolls, rock climbing and Halloween???

Howdy,
I had sooo many great projects come to my email box lately that I just couldn't wait to share them with you!  So let's get started!

First up we have Karen's fabulous Prop Plane boxes.  She made them for her grandson's 5th birthday party.  They were a big hit filled with treats!

Karen is such a great MiMi (spelling?) for making sooo many boxes!  Here is what Karen had to say about her boxes.

"I cut the planes from brown/tan cardstock and then inked them with brown and green.  We added a few sticker stars too.  I cut the bottoms out of cardstock and then I created little triangles that I cut camo pp out and glued to the cardstock.  I also inked the clouds."

I just love the inking...great way to make the planes look similar to camouflage.  The little stars are the perfect touch!  I can definitely tell a lot of love went into these boxes! :)

Karen used my Prop Plane Box file.  If you'd like to purchase it...click on the words above the preview below.

Prop Plane Box

Next up CDT member Lisa had a lot of fun with my Clothes Line Baby cards.  


This last one was modeled after Aussie Caz's sketch for this month's sketch challenge on the Paperthreads Forum.  I just love the sentiment on the inside!  It's soooo true!  Click on the photo to make it larger if you can't read the sentiment.


I am absolutely terrible at figuring out which pattern papers will look good together.  Lisa is a pro at it...I just love the papers she chose!  The little buttons are such a cute accent too.  Yep..Lisa did wonders with my file.  I'm thinking if I get some time I should copy her cards so  I have one on hand when I need it. 


There is a boy and girl version of these cards in my store so click on the words above the cards to purchase them. (a cutting file is included for the clothespins)


Clothes Line Baby Boy Card


Clothes Line Baby Girl Card 


Are you ready for Halloween?  I'm not quite ready but am hoping to get some things done today and tomorrow.  I will have some Halloween projects to share with you tomorrow too.    I did manage to get one more Halloween file done and it will be in the store soon.  See a sneak peek of it below.


I love how it acts as an embellishment but also a title for scrapbook pages.  I have the 2009 version in the store already here.  In case you are like me and behind in your scrappin'!  This was inspired by the movie Charlotte's Web.  I just love that movie..my kids have never seen it so I think we'll be renting it soon!

We had a blast at Shaver's Creek last weekend.  The weather was warmer than ever so the Halloween trail sold out even though it never has in previous years.  We were disappointed we couldn't go on the trail but there were many other activities going on.  So much that they were kicking us out...we didn't even have time to carve our pumpkins!  I won't bore you with tons of photos but I just have to share a few.


Above is Tyler with his corn husk doll.  I had never made one of these before and it was pretty neat how they went together.  Tyler made a boy and Adoree made the girl version.  Tyler even learned a lesson in that these were what people considered toys when there wasn't things like video games and TV.  


They have a rock climbing wall at Shaver's Creek that in the past when we went it was always inaccessible.  This time they had it available.  Daddy got into the act and my adventurous child Adoree got in on the action!

There was a horn on top you had to honk.  Hubby did it even though he is afraid of heights.  Yeah!


There you can see my dare devil climbing the wall!  She showed no fear what so ever!  They had an easier wall on the left but she wanted to climb the one Daddy did so that is why Daddy is helping her.  Tyler is afraid of heights but I don't think Adoree is!

Okay I don't know why but I always start working on these blog posts and by the time I am done my belly is rumbling!  So I must say goodbye!  Thanks for stopping by and check back tomorrow for some fun Halloween projects...I also need an opinion on a layout too...can't seem to figure out how to finish it.  


Share:

Friday, July 09, 2010

Frugal Friday Special: Christmas In July..$1.00 Jingle Bells file, projects and 4th of July pics

Hi everyone,
I hope you had a wonderful 4th of July and had a grand time celebrating your independence! We had fun with our families and then saw an incredible fireworks show. Hubby was lucky enough to get some VIP passes so we had excellent seats. I forgot my tripod but luckily had the stroller to rest my camera on. I got some pretty good photos of the fireworks and have shared a few with you in the slideshow at the end of this post.

Now on to the Frugal Friday special. It's been mega hot this week so much so that it's best to stay inside in the air conditioning. So...I figured now would be a good time to think cool thoughts and get ready for Christmas. The holiday season will be here before you know it. So to help you get a head start on your Christmas projects this year I am featuring Christmas specials all this month. I hope to have a freebie at some point too. This Fridays's special is my Jingle Bells file. You can get it for $1.00 today only. Hurry the price disappears at midnight EST today 7/9/2010.  This would look great on the front of a Christmas card.  Cut out multiples and assembly in front of the TV before you know it you'll have all your Christmas cards done early this year! Woo HOO!  Click on the words b below to purchase. But before you go please check out the projects by my creative CDT. 

Jingle Bells


If you like variety I have many Christmas cards in the store.  Elizabeth Charleton did a great job creating one recently.  She used my Snow Angel Card.  I love how she embossed the card background with snowflakes and the glitter glue is also a nice touch!  (If you can't see the glitz click on the photo to make it larger) Click the words below if you'd like to purchase the card.

Snow Angel Card


CDT member Kelly Stone is also in a festive mood so she created a Christmas pinwheel.  She too used snowflakes in her background paper.  I love it!   Kelly actually made her own double sided paper for this project by gluing two papers together.  They were just thin papers not cardstock but it still held up well!  Attach a  dowel rod and this makes a great decor item or forget the dowel and adhere the pinwheel to a package.  Click words below to purchase the pinwheel.  This works for all seasons and holidays just change the paper.  It's a steal at 30% off all this month. 

Pinwheel


Kelly also shared an amazing project with me so I must share it with you all now!  She took my Clothes Line Baby Girl Card and transformed it into this adorable layout.  She is giving it as a gift so she put it in a frame now all the family has to do is add a photo of their darling baby girl and a work of wall art is born!  Isn't this just darling!  I love the mini clothespins!   I would never have guessed it was a card file at one time!  Here is what Kelly had to say about her wonderful project.

"For this project I have used Shelly's Clothes Line Baby Girl Card file (SS00063) and made it into a scrapbook page. I used 2 different papers from K & Company's BW Small Wonders paper pad and used a creme colored ribbon to hide the seam. The clothesline is made from twisted raffia and the clothes pins are real wooden mini clothes pins. The clothing is attached with pop-dots. The white pieces on the jumper have been embossed with the swiss dots cuttlebug folder. I added some stitching on the socks and bib with a white pen. The title is cut from vinyl. Then I made a spot for a matted 4x6 photo to go."


click on the words below if you'd like to purchase this file.

Clothes Line Baby Girl Card


I simply can not believe how hot it is outside! It's close to 100 here!  We only go outside long enough to water the flowers and the vegetables.  The kids are going stir crazy!  It looks so nice outside...they don't understand why they can't go out to play.  Now I kinda wish we had the bigger pool again so I could get in!  Naw...on second thought....I don't want to put a swim suit on!  LOL!  We are suppose to get some much needed rain this weekend and it's suppose to be a little cooler before the hot weather hits again next week.
I also don't want to see the electric bill this month!  Poor air conditioners need a break!


Tyler finally let me pull out his tooth the other day.  I took some photo and yes..the tooth fairy did leave something.  But...for now I'll keep you in suspense.  Meanwhile I do want to share with you my 4th of July photos in the slideshow below.  Sorry slideshow removed as I didn't save it and wanted to remove the music but wasn't sure how to edit it.

Thanks for stopping by!  Stay cool!
Shelly


Share:

Tuesday, February 23, 2010

Technique Tuesday: Circle Flowers and a freebie

Howdy,
Have you guys seen the latest issue of Scrapbooks Etc magazine?  The April 2010 issue contains some amazing flower making techniques.  I can't wait to try them all out.  I so wanted to share one of the techniques with you.  However, I don't want to infringe on any copyrights.  So I can't do any step by step photos or anything but I will tell you the basics and show you my examples.  Here is a circle flower I made using the digital cutter file I have provided you with as a freebie further down in this post.


Isn't it great!  As you can see it's completely made of circles!  Okay so get yourself some paper mixing various solids and patterns is fine.  This is a great time to use up your scraps...you'd be amazed what you can mix together and still get a great looking flower!  Cut out all your circles..now for the fun part!   Take out your stress on these little circles.  Crinkle them up, abuse them..they can take it!   If desired ink the edges of each circle or distress the edges with scissors or sanding block.  Layer them together on top of one another with the largest being at the bottom.  Perfectly center each circle or misalign...either is perfectly fine!  Now attach your embellishment of choice to the center.  That's it you are done!  Here are some of the examples I made..these are smaller because I used my circle punches for these.


These are just a few of the possibilities.   You could use crocheted flowers, glitter glue dots, letters, butterflies, charms, etc.    You could even use scallop circles to make these as well.  It's also fun to spray the whole completed flower with glimmer mist or apply glitter to the edges of each circle. You could also add some flocking to the flowers for a totally different look.

Below is a card I made for my daughter's Valentine.   The base is done digitally using Aussie Caz's layered PSD file she graciously donated for signing up for my sketch challenge on the PT forum.   The little girl is a digital stamp by Pixie Dust Studios.  Isn't it the cutest!  I did use some glitter glue on her...click on the photo to make it larger.   I also sprayed some gold glitter completely on my flower.  I used green netting for the leaves.  


My printer turned the middle purple square pink...UGH..hate when what I see on the screen doesn't match my printout.  I used my Copic markers to color the image.  Getting better but still don't know how to do hair!  My daughter did like it...so that is all that matters right!

Oh and I wanted to share with you all a baby card Ginger did using my Clothes Line Baby Boy Card .  I love how she used a real string for the line and carried through to the inside so she could decorate the inside with the onesie too.  Check it out below.  If you'd like to purchase this file click here.  

  
 Okay now that you made it this far..you deserve a freebie!  Here is the circle flower file.  I gave you leaves and a small flower to put in the center of your flower in case you don't have any other embellishment.  The zip contains the AI, GSD, KNK, SVG, and WPC files.  This link will expire in 24 hours.  I ask that you do not share this file with anyone.  Please send them here to download the file themselves.  Click on preview to download freebie.  Thanks!
Sorry link expired!

Gotta go....little one needs lunch!  Thanks for stopping by and if you try this technique...please show me your results at shellysart@verizon.net.

Shelly


Share:

Wednesday, January 06, 2010

Technique Tuesdays??? Adding Color to Embossing and a Freebie

Hello!  I do hope everyone enjoyed their Christmas and New Year breaks.  I also hope the work week wasn't too tough to come back too!  I know it's Wednesday and I'm just now posting my technique.  Oh well better late than never is the motto I'm following! 

Okay now on the the technique.  I just think Jennifer McGuire is one of the most talented people on this little planet we live on.  I marvel at how she has such a knack for knowing the perfect placement of embellishments and what textures and shapes to combine to create fabulous paper crafting projects.  Well I could go on and on about her but there is one video she did that captured my eye one day.  It is an older video but still a very good technique.  You can see the video on her blog here.  She used a Cuttlebug embossing folder on white core cardstock sanded the embossed part to reveal the white then used markers to color the embossed dots.  So simple yet so effective I just had to try it!  So see my examples below.

This card is based on a sketch by Di Hickman.  I am featuring it on my sketch challenge I host on the Paperthreads forum.  It's not too late to sign up.  You get a free file from me just for signing up and if you submit a card to the gallery by the end of  Jan you get a chance to win another great file.   Click here if you are interested.   Note: you do have to register but it's FREE!

I used my 3-D butterflies file but replaced the body with grey gemstones and copper wire antennae.  Click below to see the file in my store.  I used my Copic markers to color the dots in three colors randomly.  You could use just about any type of marker though.  I know you are thinking this will take forever to do.  It goes quite fast as all you need a quick dab or two of the brush tip and it's colored.  When you are done it looks almost as if your card is illuminated with tons of tiny dots of light!  I would love to try it with the Copic Glitter Makers.


I had so much fun with that I just had to try embossing, sanding and coloring some more.  So this time I decided to do a Valentine and get a head start on that holiday!


This is based on a sketch by Mojo Mondays.  I used the floral fantasy Cuttlebug embossing folder along with white core burgundy cardstock.  I used just two colors of Copic markers...and left some images uncolored.   I love how some of the burgundy cardstock still shows through the colored images.  Makes the hot pink pop without being too overbearing and almost makes the paper look like I bought it that way!  All the other embellishments were cut from the ivory cardstock I also used as my cardbase.  I simply used the markers same markers to color them to match my background.  The gold hearts were embossed using my turning paper into metal technique found here.  The picture just does not do it justice..this technique is best seen in person for sure!  I used my Valentine Set available only in my quarterly membership.  There are still a few days to purchase it so don't miss out...click on the preview below.  (Oh and if you want to see all the files I have in membership so far check out the pink camera slideshow to the right).


I almost forgot.  The cute little bow was made using Michelle's wonderful bow template.  Click here to see how to make your own. 

I had a thought that you could do so much more with the Cuttlebug Swiss Dots folder.  As you can see below instead of coloring randomly I colored in diagonal lines.   I can also see this done in diamonds, zig zags, chevrons...you could even do shapes like an arrow to point to something on a layout or card.   Yep...I'll be seeing colored dots in my sleep!  LOL!  Oh and sorry about the poor photo but I think you can still get the idea!


My CDT has been busy too.  Let me share with you a few things they did.

Check out this awesome calendar page created by Sandra.  She used my Monogram Birthday file available through my quarterly membership.  You can see the file in the pink camera slideshow  to the right.


Brett Robinson has been busy too making this adorable card using my Clothes Line Baby Boy Card file.


I'd also like to show you the newest file added to my membership.  It is a stencil designed to decorate the inside of a greeting card. 


The entire stencil will fit inside of a standard 5 x 6.5 inch card but you may be able to use just the greeting on an A2 card depending on which orientation you use.

In my example I sprayed a little temporary adhesive on the stencil. Then I used Michelle's wonderful air brushing technique done with Copic markers to color the stencil in purple and pink colors. (This looks much better, softer in person....I so want the Copic airbrush system now!) You can use glimmer mist, ink, chalks or whatever you'd like to color your stencil.

Click here if you'd like to purchase my membership so you can download this stencil file.  The membership will be removed from the store soon but I will continue to upload file and you will be able to download them until the end of  Jan. 

Okay now on to your freebie!  As a thank you for stopping by and letting me share a fabulous technique by Jennifer with you I'd like to give you a parting gift.  It is the love title with mat I used on my card.  It is small since I had to fit it into that little space but you can definitely resize it larger if need be.  The zip contains AI, WPC, GSD, KNK, and SVG formats.  My TOU still applies.  I ask that you do not share this file but send them to my blog to download it themselves.  This file will only be available for 24 hours then poof the link disappears! Click on preview to download. 


Happy 2010!
Shelly
Share:

Friday, November 06, 2009

Frugal Fridays

Howdy!
I know we are all cutting back on our spending with the economy being bad. So I have started a new series on my blog called Frugal Fridays where I will offer a file currently in my store for $1.00 on that Friday only. This Fridays special is:

My Clothes Line Baby cards. There is a both a girl and boy version. At only a $1.00 it pays to get both then you are ready no matter if the baby is pink or blue! Plus don't forget you can enlarge these to any size you need making them good for scrapbook pages or even home decor items. I think the bib and socks would look great decorating a lampshade. Click on the previews below to purchase the cards. Hurry though as this sale will end tonight midnight CST.

Clothes Line Baby Boy Card


Below is a card a wonderfully creative member of my CDT, Kelly created. She is known for her love of Cuttlebug embossing folders. Here she used the argyle on the baby onsies, bib and socks....too cute!

Clothes Line Baby Girl Card

Below is a card a former member of my creative team Laury Vaden created. I miss her as a team member but she now has a spot of her own at Paperthreads as a designer. She has some amazing designs...see her store here!


While we are on the subject of being frugal...I thought I'd share the above photo of my kids in their Halloween costumes. I know once again they aren't cooperating with the camerawoman! Anyway, Tyler was so proud of his pumpkin. He picked out a face from my build a jack-o-lantern file and he used it to poke holes into his pumpkin then he carved the eyes and nose his self...he asked me to do the mouth. I was quite impressed with how well he did. Yes sir I think in a couple years he'll be coordinated enough to poke holes in paper for me to do some paper embroidery! Well I can only hope!

We got his race car driver costume at the Good Will store for only $2.00 and the hat was on clearance at Wal-mart for $1.00 I think. Doesn't it match perfectly! I was so thrilled we didn't have to spend a lot on costumes this year! However, Tyler had a growth spurt so I had to figure out how to make his costume longer and I am not a sewer! I found some red and white tape and fashioned them to mimic his stripes on his sleeves....this worked Yeah!

We got my daughter's costume on clearance and my Mom was nice enough to fancy it up by adding the little flower sequins and pearl paint. She is definitely not an angel in mannerisms...but she did look awfully cute!

Thanks for stopping by and I hope you'll join me here next Friday for another $1.00 file!
Share: