Hello,
Welcome to the 3rd installment of my mission organization series. I do hope you are enjoying these post and are inspired to get your space organized. Next up we will discuss embossing folders. I am always amazed at how much depth and interest embossing can add to a project. However, before I had my folders organized I did not use them. I saw Christie Hund's idea for hanging the embossing folders up on a clip it up system and fell in love! I knew this system was for me! You can see Christie's post
here.
For those of you who have been following this series you may be experiencing deja vu! Well this metal shelving unit holds lots of stuff so you will be seeing it many times. I have marked with an arrow where my embossing folders are hanging.
Edited to Add; Forgot to show my close up photo of my folders
Now I got the idea for making a horizontal clip it up from Nat she calls hers a sticker gripper and you can find how she made hers
here. I used curtain clips instead of the clothespins and paper clips. Hubby thought a metal rod would be more sturdy plus it fits perfectly in the holes in the support posts of my metal shelving unit. (I also put one of these sticker grippers under my ribbon storage jars...I'll show you that later though)

Above you can see the embossing folder contained in the paper folder I made (I have provided you with a freebie cutting file so you can cut your own paper folders at the end of this post). I used white core card stock and embossed the front of each paper folder then sanded to make the embossing more apparent. It is great being able to see what sort of design each folder makes at a glance. I didn't have a labeler when I organized these so I just cut out the name of the folder from the box or wrote it with pen on the tab if I didn't still have the box. You can also see the curtain clip attached. The curtain clips I used had a huge wooden circle attached to it so I swapped them out for the washer so they would slide on my rod better. You may be able to find curtain clips with a smaller ring similar to the washer already attached though.
Above you can see how the embossing folder slips onto the paper folder. I am sooo glad Christie developed this system as I just love it!
Materials needed for my embossing folder storage system:
Clip It Up or homemade one (rod, curtain clips, screw hooks, rubber grommets (optional))
White Core Paper folders (cutting file provided at the end of this post)
Sand Paper
Oh and if you don't have any white core card stock and you don't want to buy any you can also use colored core card stock and my tutorial
here to make your own sandable paper.
Okay so maybe you don't have the room for a clip it up. NO problem these folders also work stored in a box just as Cat did. See her photo below and read more about her system
here.
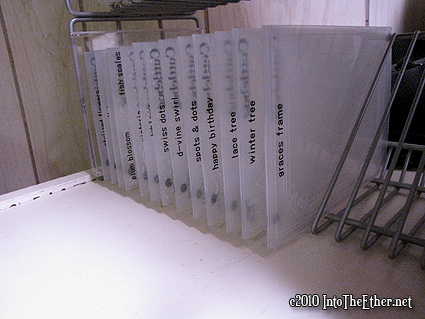
If you have any spare CD storage racks then you can store your embossing folders as Jeannie did below. Read more about her system and see more of her craft room
here.
Teressa used sewing to turn a page protector into a great storage system. She says you can also use super sticky tape to achieve the same results. Check our her photos below and get a complete tut on how to make this yourself
here.
Linda had a simply brilliant idea...she took a simple paper scrapbook and glued two pages together to form a pocket to store her embossing folders in. Check out her photo below and see more at her blog
here.
Okay I do hope one of these systems will help you to organize your embossing folders. I hope you will get more use out of this wonderful product!
As promised I am sharing with you the cutter file I used to make up my paper folders to hold my plastic embossing folders.
The zip file contains AI, GSD, KNK, MTC SVG, Studio, and WPC formats. I have included files for the smaller A2 ebmossing folders and also the larger 5" x 7" ones. Click on the preview to download or click
HERE. Enjoy!
Please share your embossing folder storage system even if it's similar to those listed here. Simply click on the Inlinkz tool below:
Thanks for stopping by. If you aren't a follower of my blog please sign up so you don't miss any of my organizational posts. Oh and I'm sorry I am soo late in posting this. I haven't been feeling very well and went to bed on Sunday night instead of working on this post and then this morning my son had a 2 hour delay which just threw my whole day off. Well....better late then never right?!


7 comments:
I am having a terrible time figuring out how to organize my embossing folders, mostly because there is so many sizes that not 1 idea works for all. Everything I own is organized in notebooks, so going to try the sewing of the pages idea.
Thanks for the great tips!
circlebenterprises.com
Awesome ideas ladies! Thanks for sharing them with us.
thank you for sharing all of these organizing options and thanks for the file folder
ty!
Thanks for sharing your wonderful embossing folder file as I am continually working on getting my craft room organized. Great ideas shared also.
Thanks for the mention! So far the cd racks are still working out for me in storing my embossing folders and also holding DVD cases that I have my spellbinders die cuts mounted inside. Great blog! Have a great day!
How do you emboss just the cover for the 5x7 sleeves? Can you provide the link to the SVG cut file?
Post a Comment