
First up we have a wonderful home decor item using yesterdays freebie flower from CDT member Lisa Lindesmith. Lisa can turn just about anything into something elegant looking! Check out her stunningly decorated candle below.

Here is what Lisa had to say about her flower:
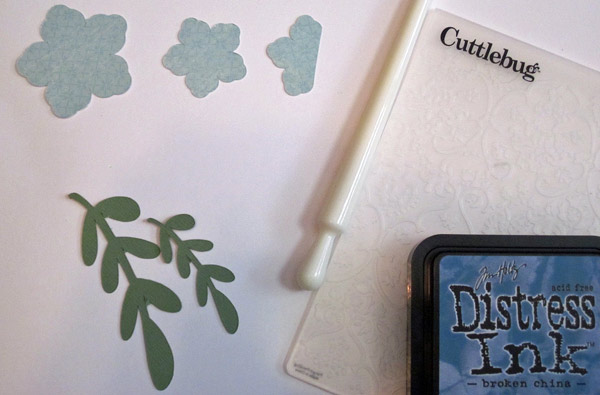
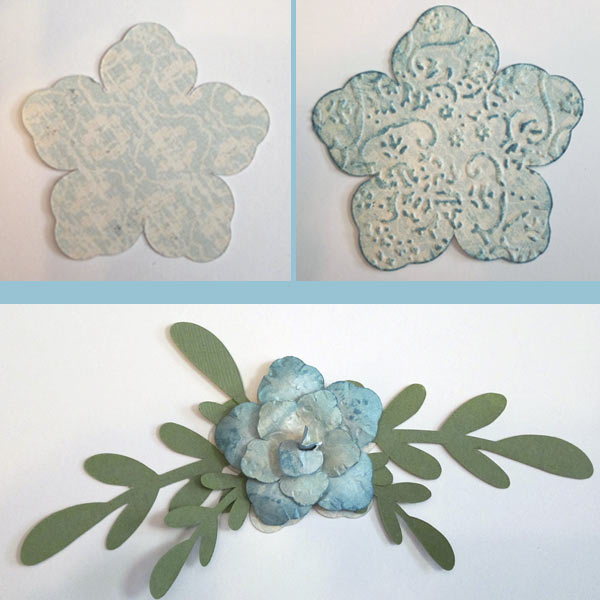
"For finished flower need one big, and two smaller flowers. Cut one of the smaller into just 3 petals. Use shaper to mold large and small flower petals back and centers in. Curl 3 petals tightly to look like flower center. Glue together and assemble with large and smaller sized leaves. Candle is dollar store find wrapped with a ribbon from a xmas gift and the flower glued to the front."
Lisa also mentioned to me that she embossed the flowers with a Cuttlebug embossing folder and inked the edges prior to using the flower shaper. The white item in Lisa's supplies is the flower shaping tool. It is used to shape the petals and "soften the cardstock to allow it to bend and curve more easily. I am adding this tool to my wish list!
Next up we have another project by Shelly M. This time Shelly used fabric for her flower. I have always wanted to try cutting fabric. I even have the fabric blade for my KNK but have yet to do it. Shelly's project is soo inspiring though I think she may just have convinced me to try fabric soon! I'm sure you'll agree her card is fab..check it out below.


"Fabric card - I used fabric bond to stiffen the fabric before I cut the flower. I then cut two more flowers, one slightly larger than the original flower. The smaller flower was "crumpled" to add dimension under the fabric flower. I also added a button (PTI) to the center and finished it off with some ribbon and feathers. The circle was also cut out of fabric (using nesties). I used Nesties and QK for the layers on this one."
If you don't have any fabric stiffener you can iron the fabric onto freezer paper, interfacing or adhere to cardstock with spray adhesive before cutting.
Next up we have a great acetate flower from Aussie Caz. I just love these clear flowers! Check them out in her card below:

I love the glistening gold centers too. That sentiment is wonderful! Amazing card Caz! Check out Caz's supply list below and see what she had to say about how she transformed her flowers.


"I reduced the size of the flower a little although I left the centres at the same size. These were cut out of acetate. The flower backs were then run through the Cuttlebug machine using the "Swiss Dots" folder. I then painted the flowers using Jo Sonja "orange" folk art paint. I then rubbed this off with paper towel. The flower centres were stamped with gold ink and clear embossed using Ultra thick embossing enamel. This proved to be a problem as everytime I touched them, the embossing just lifted off the acetate.... the acetate needs to be sanded first to roughen the surface so that the UTEE will stick.
The leaves were cut from card and then had the edges inked.
I created a Card Template which I then cut out of card, inked the edges of and stamped a sentiment on the front using Stampin' Up Pumpkin Pie ink. The flowers were layered and attached to the card front using mini brads and then the whole front was attached to the card base using my Scotch ATG 700."
My design team is ultra talented! I'm sooo lucky they want to design for me! Be sure to stop by my blog tomorrow to see more fabulous projects using the freebie flower. Oh in case you missed the flower file you can still get it in yesterdays post. Many of the freebies from the other designers are still available too so be sure to go blog hoping if you missed out on the fun yesterday.

Some of the Paperthreads forum members inquired about the store not having a quarterly membership currently running. I love making people happy and so by request I will start a quarterly membership club beginning next month. It really is a great deal as you get at least 20 files (I will most likely throw in a few extra) for only $10.00. That is a fraction of the price if you were to buy them individually. Plus you get the files before they anyone else sees them. How cool is that! So hurry on over to my store and purchase my membership by clicking here. I just know you won't regret you did. Also, if there is anything in particular you would like me to design for the membership please let me know.
I'm sorry I was busy yesterday running the daffodil hunt game on the Paperthreads forum so I didn't have time to package up the blog candy. I will have it ready tomorrow so please check back tomorrow.
Enjoy the rest of your weekend! Thanks for being such great customers!

9 comments:
Wonderful projects! Love the clear flowers!
awesome projects
awesome flowers
Great projects!!! Just awesome!!! And thanks so much for doing the Quarterly Membership Club!!! Makes me so happy :)
awesome cards
love, love, love all the flower variations. What creativity!!!!! Can't wait to try some of these out! Gina
cool projects, amazing how differently one file can be used :)
OH MY WORD!!! All the cards are AWESOME!!! Ladies you are so creative!!! I got several ideas now if I can just remember them later - lol.
Love the clear flower card. What a cool technique.
Post a Comment