Showing posts with label copics. Show all posts

Monday, February 20, 2012

Mission Organization: Markers

Hello!  I hope you all had a wonderful weekend!  The weather was really nice for Winter and that got me itching for Spring so thus the change of blog design.  I'm soo ready for warmer and longer days!   Now on to the next installment in my mission organization series.  Today I will talk about markers.  I have Copics but I do believe many of the systems I will show you will work for lots of writing/coloring utensils including pencils and pens too. 

First up, I'd like to show you my OLD system.  I did feature it on my blog briefly before.

This is simply a tote I purchased at Wal-mart. The Ciao markers are stored in the cases they came in. I loved this system for a while. I liked that the basket was portable for crops or just for coloring images while watching TV downstairs. However, I didn't like how all the markers were grouped together and there wasn't any way to separate color families. Also, as I started acquiring sketch markers I had to just squeeze them in along side the Ciao cases. So that is why I changed to a different system.
Sorry I know you are tired of seeing this metal shelving unit but I have changed things around a bit this week to accommodate for my markers so I have noted their location in the photo.

Note:  Click on photo to enlarge
I copied this idea off of Tangi. You can see her much prettier storage here.   This is simply vinyl drain spout cut into 5 1/2" inch pieces by darling hubby.  It does take some elbow grease to sand off the rough edges but it's worth it!   The drain spout is very cheap too and available at your local home improvement store.  Hubby used a hack saw to cut it.  Tangi spray painted hers and I will mostly likely do that when I figure out what color I want.  I'm thinking I might try and get that spray paint that makes things look like bronzed metal.  I just used high temp hot glue to glue them together.  (Contact cement like Tangi used does give you a more permanent bond but hot glue sticks pretty well and gives me the option to pry them apart if I want to stack them differently...ask me how I know this...tee...hee...yep I had them arranged differently at first....typical woman...can't make up her mind!  LOL! ).  Now these are open in the back and I couldn't figure out how to glue a backing on them since the surface area is soo thin.  Therefore, I just nested them in these wooden tangerine boxes.  It seems to work well and gives them a little more stability.  I love that each color family has it's  own cubby.   I even had room for my Creative Memories journaling markers, gel pens, and glitter pens.  My Copic journal and water colored pencils are sandwiched between the two boxes.   The purple item on the top left of the markers is a small clipboard I use to place the items on before coloring.  I only have one ink refill for the blender but I do have it sandwiched between the drain spot and box.  I'm pretty sure these would fit in the cubbies too if need be.  This system if great no matter how many markers you have.  If you have less than me then don't cut as many cubbies...if you have more than make a few more.  You can stack as many as you want...it's totally customizable for your supplies and space!  Now my only dilemma is how to to transport them for crops.  I think I'd rather have a box with a lid...so I guess I need to measure and see what I can find. 

Items needed for my marker storage:
sandpaper
High temp hot glue (semi-permanent) or contact cement (permanent)
(optional) container to serve as a backing for drain spout cubbies 

I have seen similar things done with PVC pipe which is slightly cheaper but since it is round it doesn't sit as nicely when stacked.  Also, it is heavier to transport if you like to travel with your markers.  

There are many wonderful holders made specifically for marker storage but most of them are quite pricey.  So I thought I'd share with you some marker storage solutions made with supplies that aren't really for marker storage but can be adapted into wonderful economical holders.  
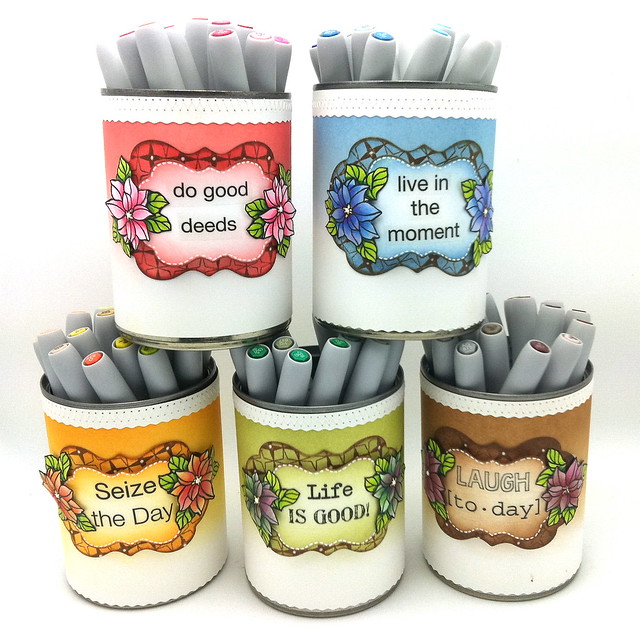
Can you guess what these holders are? These are decorated Progresso soup cans. Kathy brilliantly recycled these cans into absolutely gorgeous storage containers. Check our more info on Kathy's blog here.

This has got to be the ultimate in recycling and frugality! Toilet paper rolls hold the markers in a wonderfully decorated cardboard box. Click here for more info here.

I love how Lisa used canning jars and a plastic 7 up crate to store her markers. Check out more info here.

Etha used her digital paper cutter to cut all these boxes and bound them together in an excellent little holder.  This is great since you can cut as many boxes as you need for your marker inventory.   Check out more info here.
Norma used a simple CD holder and let the markers rest on the jewel cases. With the invention of mp3 players and phones that store music..you may just have something like this lying around that you can repurpose. Check our more info here.

The next two storage options are ones I absolutely love for the portability nature. If I went to crops more often then I would definitely invest in one of these marker storage solutions.

Vicky Pass did an excellent job arranging both Copics and Pro markers plus accessories in this CD holder.  I love that there is even a spot to put the color chart.   Check out more info here.

Above you can see both the open and closed version of Fitter Twit's marker storage. She transformed a deep art bin satchel, ceiling lighting grids, and hardware into this wonderful portable marker storage unit.  I love how each and every marker has it's own slot so even if you drive over a huge pot hole you can be sure your markers are safe!  LOL!  Check out more info here.

There are many more marker storage solutions.  I just tried to highlight a few that were good but didn't break the bank.  You can find a few more on my Pinterest board here.  If you aren't a member of Pinterest let me know and I'd be happy to invite you.

Did you know Copic markers are available in 358 colors now!  My goodness I don't even come close to having all the colors!  I remember when these markers first came out...I just couldn't justify the expense.  Many of my friends told me how wonderful they were soo eventually I got to try them out and immediately was hooked and wanted more!  My collection grew and grew!  I can't justify buying more now though so I'm hoping by having my markers organized I can use them more and finally figure out what colors I use most.  I really want to order a few refills but I haven't a clue what my fav colors are.

Oh and I just realized I need to print out a new color chart since Copic introduced new colors this year.  I found a great one from Sharon Harnist here.  It even includes space for the glitter markers. Thanks Sharon!

Okay that concludes my marker storage post.  I do hope you found some ideas that may work for your space.  Be sure to become a follower of my blog so you don't miss any future organizational posts.

Thanks for stopping by!  Come back again!

Share:

Monday, August 08, 2011

Meet my nemesis and a wonderful CDT project

Howdy,
I hope everyone is well and enjoying what remains of Summer.  I am not ready for Winter, putting coats on and freezing our butts off but I am ready for slightly cooler temps.   How is the weather in your neck of the woods?

Before I introduce you to my nemisis....I'd like to show you an amazing project by CDT member Johanne.

Johanne used my card base 6 file to create this stunning card.  I just love this card as at first glance it looks like a tag but opens to reveal a sentiment inside.  Here is what Johanne had to say about her wonderful card/tag. 

Cutting File: 
                Card Base 6 from Shelly's Art
Paper: Bo-Bunny Jazmyne Effloresce
Stamp:
                Magnolia Wish Granted Tilda
                On the circle: Delicate Pattern from Hot Off the Press
                Sentiment: Juste pour toi (Just for you) from the collection Merci from Bonnidée
Colored with Copic Markers
Inside card translation:
                 ...To make you smile and brighten your day
                ... To encourage you and make you grow
                ... To remind you that  people who love you are around and are thinking about you
                Have courage!

I love that Magnolia image and Johanne colored it sooo well.   That sentiment is great too! 

If you would like to purchase the file Johanne used to make your own tag card please click on the photo to be taken directly to my store.  It's a steal at 30% off this month.


I just thought I'd show you how you can easily add a photo (using my folded photo corners file)  to the inside top of the tag as I did in this card I made.

Okay I have mentioned how we decided to remodel our porch.  We started working on it July 5th I believe..and we are still working on it.  Is that nuts or what!?!  Seriously, I am not slacking we truly are still working on it.  I hope to be able to paint on the primer this weekend.  I thought I'd share some photos with you of what I have been doing all this time.


This is our porch as it stands today.   As you can see it is quite large.   Normally, I love having a big porch and it sure did come in handy when it rained during Adoree's birthday party and we had everyone huddled on it.  But....


...the porch is covered in the crackle paint you see above.  It is very hard to remove and can't be done with just a traditional scraper.    We tried a paint stripper but didn't have much luck with that.  Finally I took out my crafting heat gun and realized the paint could be removed by heating it first and then scraping it off.   We bought a heat gun designed for paint removal and that is what hubby and I have been working on for ages now. 

It's a very slow process since you have to hold the gun in place until the paint is hot enough to scrape off but as you can see in the above photo it works great!  The above peice was scraped and then sanded.   There are a few places we couldn't get completely clean but primer should help with that. 

Okay now meet my nemisis........

I have been working on this wall of windows forever now!  I do believe this little wall is taking longer than the whole rest of the porch because of all the nooks and crannies.   I can't wait to tackle this beast!  I am still having a few problems with my foot so I can't stand on the ladder a long time and must take frequent breaks plus the kids always seem to need my attention.   This is one instance where I wish we lived closer to family who could watch the kids while we work.  I worked on this wall a good bit this weekend and have most of it done except for right up against the window.  I could not take this down to bare wood..just this grey stuff but at least now it's paintable!  My goal is to finish this up today and start sanding it.  Then I will celebrate because that will mean we have scraped all that darn crackle paint off the porch and can move on to sanding then pressure washing and finally priming!  We've had to return two heat guns soo far because of the switch breaking and the store we got it from is about 2 hours away.  So I'm hoping the heat gun hold out until we finish.   Also, there is this weird substance coming out of the wood when I heat it...almost like a sap consistency.   Very weird and I'm hoping this won't cause the new paint to crackle or flake off.  

So....I haven't been slacking.  I do have new files I want to get into my store and more projects to share with you on here but we must get this porch done before we leave on vacation. We are in the home stretch now though.   After we get the painting done hubby is going to put two more posts on either side of the front steps and vinyl railings around the perimeter.   He also is going to put sofet on the ceiling.  Thanks goodness as that look even worse then the crackled photos I showed you.   I will share with you  an after photo once we complete it.  I'm thinking it will look awesome and really boost the appearance of the house!

Okay well I've gotta eat lunch and get back to the porch!  Thanks for stopping by and have a good week!


Share:

Friday, March 26, 2010

Frugal Fridays: $1.00 Easter treat, new CDT member, and Easter digi stamps.

Hello everyone,
It's Friday yet again! So that means it's time for my Frugal Friday special. For today only you get my Easter Candy Bar wrapper for $1.00. The price will expire at midnight today Friday, March 26, 2010. So hurry and click below to purchase the wrapper and give someone a sweet treat for Easter! But...please before you go scroll down check out what else I have to share with you below.


I'm proud to announce a new member to my Creative Design Team. Caroline Stedman has agreed to be a part of my team.  Yeah!  Those of you who are familiar with Paperthreads and the forum are probably thinking Caroline..who is that!?!  Well she is better known as Aussie Caz!  I'm sooo happy to have this talented lady from down under on my team!  As I told her  she is "well-rounded" dibbling in all types of papercrafts and also digital scrapbooking including hybrid techniques.   So I'm sure she will be a great asset to my very talented team!  Caz shared a small bio about herself along with a photo check it out below.


"I am a SAHM to one very adorable boy, 14yo, and a Mum to four fantastic girls who are not living at home, 26yo, 25yo, 23yo and 21yo. I am married to my soul mate, Gary. We live in a rented farmhouse in rural New South Wales, Australia.

I have been scrapping since I was a kid, but recently discovered Digital Scrapbooking about 4 years ago. Then, about 2 years ago, a new world opened up for me. I purchased a Craft Robo and ventured into the world of Personal Cutters. 12 months ago a new Cutter hit the market and I traded in my Craft Robo for a 15inch KNK Maxx. Now I am broke through purchasing all the gorgeous files created by talented Designers that I just have to have, but the fun I am having overrides the expense . I love that this area of creativity joins together all the things I love, Scrapping, my KNK Maxx, Photography and my Computer (without which I am lost). I use PSCS3 and am learning about KNK Studio. "

It's only been a few days since Caz joined the team but she already has a project to share.   She took my Cupcake Card cutter file and turned it into a digitally created whimsically wonderful  card.    I love the little gems on the cupcake icing!  Psst..the sketch this card was based on is designed by Caz too and will be used for my April card sketch challenge on the Paperthreads forum.  I can't wait to try out the sketch myself..it's a great one!  Oh and Caz does designing of digital scrapbooking kits so if you'd like to get a glimpse of her work you can pick up a wonderful floral kit with awesome colors here on her blog. 


 I did manage to make a few cards myself.   Here is one using birthday monkey from Bugaboo Stamps.  I just think this little monkey is soo cute!  I wish I had a sewing machine or time to hand stitch but I had to get this card in the mail quick before it was late.  (One of these days I'll make up some birthday cards ahead of time!)
I used paper paint on the icing to give it more dimension.  Glitter glue was used on the hat, candle and platter.  Silver fabric paint was used on the fork.  Copics were used to color the image as well as the clear dew drops. The paper I used came from Transparent Touches kit #3 for March.  I just love this paper line and this kit!  To see another card made from the kit and more info on how to get your own kits delivered right to your door refer to this previous post. 
I finally got my Easter Tree digital stamp in the store.  I am pretty happy with the way it turned out!  I even drew up a title to match.  Check out the card I made with it below.  I experimented with my new Copic airbrush system for the stamp backgrounds.  I should have chosen more contrasting colors...oh well live and learn!  I do love the soft look it creates and if you used the brush end...it makes wonderful little dots!  I'm looking forward to using it again!

 I just love this stamp mostly because it's so easy to embellish with glitter glue, flocking or flower soft.   I used glitter glue on the eggs but I bet crackle paint would look awesome too!  Can you tell I love my embellishing tools!   This is a based on a Mojo Monday's sketch.
Click on the image below if you'd like to purchase the Easter Tree digital stamp.   


 I have another Easter digi stamp just about ready.  I just am working on some sentiments to go with him/her.  See a sneak peek of it below.  


Okay I think this post is getting too long so I'll be back next week with some layouts to share.  Thanks for stopping by!  Have a fabulous weekend!  
Shelly
Share:

Friday, March 05, 2010

Frugal Fridays: $1.00 Bracket Fun and Spring is coming!


Hello everyone,
      First I'll tell you about my Frugal Friday special then scroll down to see what else I'm excited about!  For today only you can get my Bracket Fun file for merely $1.00.   It's a very versatile file perfect for scrapbookers and cardmakers alike.   Hurry though this wonderfully frugal price disappears at midnight EST today...March 5, 2010.  Here is a fabulous Christmas card Kelly sent me.  I just love those trees and they match perfectly with that paper.  The tree files were designed by Chris Durnan and you can find them here.  I bet you could easily change this card design up and make this card more suited for Spring by adding flowers to the trees and using floral paper.


Click on the preview below if you'd like to purchase my brackets.  


Okay take a close look at the photo above! Do you see it!   Do you see that wonderful site that I see?!  Yep my tulips and daffodils are poking their leaves out of the dirt promising me that Spring is coming!  I can't wait!  I'm sooo tired of  the Winter snow and cold.   I absolutely love flowers and can not wait to see the blooms that these leaves are promising!  There is something about the birds chirping and flowers blooming that makes me happy!

Well since Spring hasn't officially arrived yet..I decided to create my own Spring by drawing my first digital stamp.  I showed you a preview last week.  I'm excited to say it is now in the store.   I colored it and sent the card off to my Mom.  Here is the preview of the card.   I do like how it turned out...but I've got to say it was hard for me to leave it be!  I don't do simple...I kept slapping my hands and closing my eyes because I so wanted to add something else but knew deep down that is was perfect just the way it is.  So ....what do you think..did I do good?  Oh and the scallop border on the card came from Penny Duncan's wonderful nesting files.  You can find it here

 
If you'd like to color a watering can of your own and bring a little Spring into your world today...click on the preview below to purchase the stamp in my store.
Okay I've gotta go clean my house!  In laws are coming!  I hope you all have a fabulous weekend!  Thanks for stopping by!
Shelly
Share:

Friday, February 05, 2010

Frugal Fridays: $1.00 Valentine Candy Bar Wrapper today only.

Goodness would you believe I completely forgot it was Friday!   I ate breakfast, exercised and such...sat down a the computer to start working on a Valentine box file and realized that UGH I need to tell you all about my frugal Friday special!  I can't believe I forgot all about Friday!  Maybe it's the pending snow storm we are getting that got in the way.  I think we are suppose to get 4 to 8 inches.  I hope it doesn't start until Tyler is home from school and Toby is home from work.  I know the kids will love it if they get to play in that much snow!  It's kinda nice when it occurs on the weekend and we don't HAVE to go anywhere!  If we get a lot of snow I'll post photos for those of you who are in wonderfully warm and sunny climates to enjoy!  LOL!

Okay now on to the Frugal Friday special.  For today only my Be Mine Candy Bar Wrapper will be $1.00.  This price will be poof...disappear at midnight CST....to find out what time it is in the store see the watch to the right of my blog.  Click on the preview to purchase.  It's a great file that will quickly get you ready for Valentine's Day. 

I am hosting a sketch challenge on the Paperthreads forum.   It's great fun!  We are using a sketch from our very own Aussie Caz.  Here let me show you! 


Isn't it great!  If you sign up to play along with us you get the cutter file of this card along with the layered PSD file courtesy of Caz...wasn't that sweet of her!  By participating you even have a chance to win a free file of your choice from my store.   So go to the PT forum and check out the details here.  You do have to be a registered member of Paperthreads but its' FREE and easy to register and you'll reap many benefits for doing so.  


Here is my example.  I made it quite a while ago!   Let me just say I hate coloring hair!  Any good online tuts anyone can share with me would be appreciated!   I know...I know it doesn't exactly look like Caz's sketch but...that's the beauty of a sketch.  You can use it for inspiration but if you sway from the sketch it's OKAY!  (Thanks Caz for reminding me of this!;)) 
The image is called Swiss Pixies: Gretel by C.C. Designs. You can find it in the Paperthreads store here.  The wings actually have glitter on them but it's hard to tell in the photo. Those little pearls are actually Tulip brand paint made for fabric but they work wonderfully on paper!  (Got them for $1.99 for 3 bottles at Ollies..can't beat that!)    The scallop circles came from my humming bird card.  Click the preview below to purchase!
 
 
Oh well I'd better go!  My daughter is getting containers out of the refrigerator...think that's a hint she hungry?!  I'm pretty sure it is!  I'd better feed her before she tries to cook something herself!  Thanks for stopping by!  Those of you who are getting snow...please stay safe and warm!

Have a wonderful weekend!
Shelly

Share:

Tuesday, January 12, 2010

Paperthreads is back up! Last chance to purchase my membership!

YIPEEE!  Paperthreads is back in action and better than ever!  I love the new look of the store.  It is soo easy to navigate and the pages load super fast now!  If you haven't been there to check it out...I highly suggest you head on over by clicking here!

I'd like to share with you the latest addition to my membership club.


Many of you have been hit very hard by old man Winter this year and that is what inspired me to design this file.  It is sure to please snow lovers and snow haters alike!  I am soo undecided about snow.  I love looking at it glistening on the trees and I love anything snowflake die cut, clipart, sticker etc but....I hate to see it's effect on the roads and am always so worried when  someone I care about goes driving in the snow.   I do know one thing for sure I DO NOT like the cold weather that comes with the snow!  Now if the sun could shine and the snow would stay contained only to the grass then I would be a happy camper!  LOL!

I finally did it!  I have been wanting to make a rolodex important date reminder forever now.  Well my membership club motivated me to just do it.  Check it out below.  I am quite pleased with it and can't wait to finalize the conversions so I can give it to my membership club.


The photo just doesn't look as good as the real thing.  Click on the preview to watch is sparkle!  I added glitter Copic markers to some of the tabs and embellishments.  The letters are cut from shimmery incandescent (color Candido) paper from the Paper Temptress.  This paper cut soo well and is simply stunning!  I highly recommend it to anyone.  Patricia will send you a sample...just head on over to her site here to request one or better yet order the Valentine packet on sale for 40% off and see more of her gorgeous papers. 

So if you'd like to make a rolodex file too hurry on over to my store and purchase my membership club here.  This is the last day as it will be pulled from the store on Thursday. 

I sold off a lot of my stamps when I got my first digital cutter.  I swore I would never ever buy stamps again.  But...some people from PT persuaded me to get a set of Copic markers and now I see stamps in a whole new light.  I love to color and when I see a terrific blog candy offering free stamps  I am definitely going to enter.   So check out the photos below!


Jodi and Inked Inspirations is offering this fabulous blog candy just in time for Valentine's Day.  If you'd like a chance to win it click here to get to her blog and see the details..hurry offer ends Jan 25. 

Don't go yet!  Jessica of Jess' Obsession is celebration a year of blogging by offering another wonderful blog candy.  Check out the picture below.  Then click here to see how you can win.  Better hurry again this one ends Jan 15th.

Thanks Jessica and Jodi for a chance to win some awesome goodies!  You guys are just too generous!

Oh and I apologize but I won't have a technique for you this week.  I have a few prior commitments to take care of but I hope to be back on schedule next week.  Please don't forget to join me Friday for a $1.00 sale good that day only.

Stay warm and be happy!
Shelly


Share:

Wednesday, December 23, 2009

Technique Tuesdays??: ribbon wreath, tree, 50% off SALE, and freebie


Ho Ho Ho  Merry Christmas!  Well it will soon be time for Santa to arrive.  Are you ready?  If you need a few last minute gifts I do have a sale going on in my store.  You can save money and create an awesome handmade gift in minutes!  Just remember the glue does have to dry!  LOL!  Click on the preview to purchase files in AI, GSD, KNK, SVG, and WPC formats.  If there is a file not available in SVG in my store please purchase it in any format and e-mail me the proof of purchase.  I will then e-mail you the SVG file ASAP!   I also have a few digital scrapbooking kits and a few commercial use items in my store.  Thanks for stopping by!  Close the door on your way out! LOL!


I have been very busy getting ready for Santa.  Actually, I still have Christmas cards to make.  So when the Scal-hints yahoo group shared this video for making a woven ribbon wreath I just had to try it.  I absolutely love it!  Thanks guys and En-May!    It looks more complicated then it really is.  After you get the hang of it..it goes very quickly!


Below is the card I made with a wreath I made on my first try! I was in a hurry once again as this was a teacher's card. My son's last day was Tuesday and we were invited to the party so I was running out the door with this card. Thank goodness I didn't need any envy!


I used iridescent jewels on the wreath and bow but they don't show up very well in the photo.  The holly leaves is an actual metal charm.  However, I tried to mimic the look of the metal charm in the Peace charm.  I cut it out of paper then used my turning paper into metal tut from previous technique Tuesdays posts.  You can find it here if you missed it.  I used my Christmas Word Charms file.  Click on the preview below if you still have Christmas cards to make too!  LOL!    It's a steal at the special price of  $1.15!   Oh I almost forgot for the background paper  I also used my tut for making colored core cardstock found here.


As I mentioned I still have quite a few cards to make!  So I made another card using this technique. This card is based on a great sketch by Mojo Mondays....week 115.


Look closely.  Can you tell this ribbon was the same ivory ribbon I used in my first card example?  I bet you can't!  Want to know how I magically made this green ribbon.  See photo below.


You can use your Copic markers (and possibly Sharpies or Bic) to color white or ivory ribbon.  Use the broad tip of the marker and color slowly.  The ink will absorb into the ribbon and saturate completely even coloring the other side.  It may look a little splotchy at first but it will soak in and even out your color in a few minutes.  (Hmm I think I'll be stocking up on white or ivory ribbon the next time I go to the store!)  The Dew Drops started out clear too and I colored them to be ruby red jems with the Copics.  I just love these markers but I love them even more when I can find other uses for them!

I used the tag from my Tags Galore file.  You can click on the preview in case you need to add it to your stash!  It's a steal at 50% off!


The scallop circle came from my cookie time file.  Click preview below to purchase it at 50% off.


The bow on the green wreath was made using Michelle Hessler's wonderful bow templates.  You can see the video tut on how to make templates and how to use them here.  

Since we are taking about ribbon.  I wanted to share with you a wonderful card my fabulously creative design team member Lisa made for me!  I just love how the ribbon makes the tree!  You can add the trunk and star from my previous "ribbon tree freebie" to make your own ribbon tree. Add some brads for ornaments and you are done!  Super quick but looks great!


I have one more item to share with you then I'll get to your freebie.  Elizabeth a talented member of my creative design team made my airplane box for her son.  He loves anything military related!  She plans on giving this to him filled with some sweet treats at the airport.  What a wonderful tasty surprise!  If you'd like to make your own airplane box you can only get it through my membership club.  You can purchase it by clicking on the photo below.  If you'd like to see what files will have been entered into the membership so far see the pink camera slideshow to the right.


Whew!  I bet you thought I'd never stop jabbering!  Now on to the important stuff..your freebie!  This an old file I dug up and revamped a little.  I hope you enjoy it!  The zip file contains AI, GSD, KNK, SVG and WPC formats.  I will leave this file up at least until the 26th so if you are busy celebrating you can still get it.  I do ask that you please do not share this file but instead direct them to my blog to download it themselves.  Even though this file is free my TOU still applies.  Click on the preview to download the file.  You also get a plain mat without the ornament hook (not pictured). 


Merry Christmas to all and to all a Goodnight!
Shelly


Share: