Hello everyone,
So do you keep all the scraps of paper that are left over after completing a project? Do you hate to throw away that 1 x 1 inch square just in case you might need it for something? Are you scraps in such disarray that is takes too much time to sort through them so you just grab a new piece of paper instead. Well then listen up because this is one thing in my craft room that is totally organized and I am totally happy with!
I have shared with you my methods for storing scraps before but I am going to cover it again here just in case you are new to my blog or "gasp" you have forgotten! LOL!
First up let's talk about solid card stock scraps. I love saving card stock scraps. I do a lot of paper peicing. In fact a card I made yesterday involved using that 1 x 1 inch square of red. So it is very practicle for me to save even little pieces of card stock. But...how to store such small pieces without them getting lost and still make them accessible....
 I don't remember where I saw this idea originally but I have seen many people put it to use since I first started using this method. These are simply Sterlite plastic storage organizers. I got mine at Wal-mart but I think just about any department store carries them. I labeled them with scalloped circles, two colors of cardstock (light and dark) and a stamped image from Stampin' Up Circled Circus set in rainbow colored order. These drawers are great for pieces around 8.5 x 11" or less. Perfect for scraps. I just toss the srap in the appropriate colored drawer after creating. When I need a scrap of a certain color it is easy for me to find the size of scrap I need. Oh and that black box you see is where all the paper goes after I finish up a project. When it gets full like it is now then I trim down the scraps and store them away.
Next up is the patterned paper. This has got to be the hardest type of scrap to store. Many papers are multi-colored making it hard to sort. So...when I came across Jennifer's brilliant idea I knew it was for me!

 What Jennifer's suggested to do is to cut your scraps to the closest inch. Yes that means you could be cutting off a 1/2" strip that could be used. This was hard for me to do but I gave the trimmed off pieces to the kids and they loved making use of them! Now stack all the pieces of the same size together putting the longest pieces in the back and the shortest in the front. Keep it all together with a binder clip. (Similar to a wallpaper swatch book) This makes it easy to flip through the papers and see which one (s) you need. I keep mine in a larger plastic storage drawer unit under my desk so it's easily accessible. But you could put the tines of the binder clip in the up position and hang them on a hook on a wall too. I absolutely love this method! The other day I was making some origami boxes and needed a 4 inch x 4 inch sheet of paper. So I pulled out my 4" scrap pile and found the perfect pieces already trimmed! 2" was the smallest I went anything smaller went to the kids. When I started trimming my scraps I soon realized all scraps could be cut into only 6 sizes. Now I did have more than one stack of certain sizes like the 2" ones. I also love that this system doesn't take a lot of space to store!
Here is what you need for my scraps storage:

Scrapfreak.com uses an over the door shoe rack to store scraps of paper. This would work hanging on a wall too I would think.

Rachel uses labeled magazine holders to store both patterned paper and solid scraps. Her sons have access to this too. This would be a great way for my kids to store their scrap papers. It would even help my daughter prep for Kindergarten. Right now we have all their papers in a big bin. Check out more of Rachel's wonderful scrap room on her blog here.
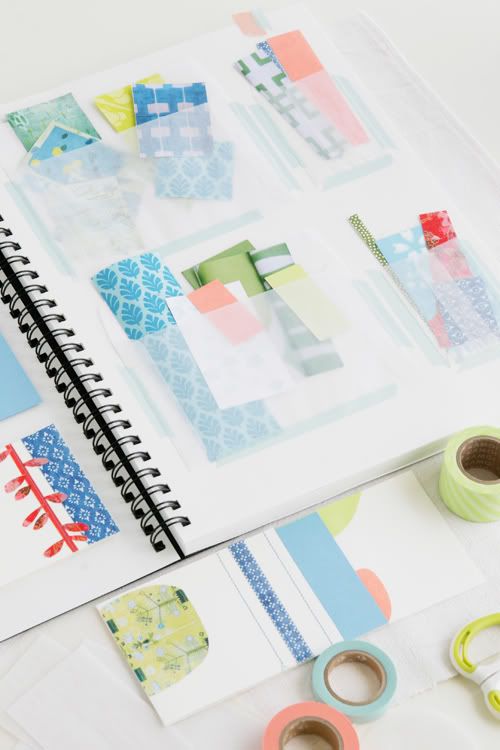
 Leslie uses glassine bags attached to journal pages to store her small paper scraps. Check out more amazing storage ideas along with some beautiful floral photos on her blog here.

Denise made her own as she puts it "El Cheapo Clip It Up" using badge ID clips, page protectors, a dowel rod and cup hooks. It costs her less than $2.00! Amazing! Check out more info on her blog here.
 Barbara has a great idea for useable scrap storage. She makes mostly A2 cards. So when she needs a mat to place on an A2 card she cuts a full sheet into quarters..uses one and stores the remaining 3 quarters into this box...labeled by color. This works really well if you use one brand of card stock. Check out more on her blog here.
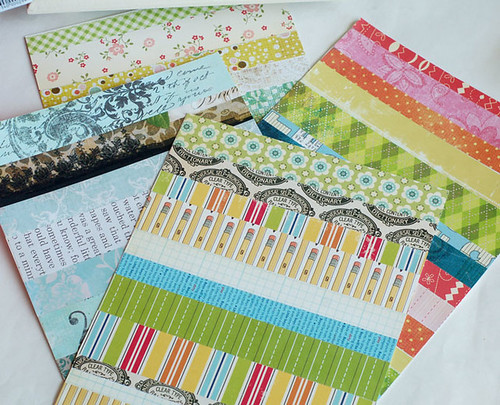
 I mentioned this in my mission organizational post about 6 x 6 paper storage but it's worth mentioning for scraps too. Betsy Veldman cuts down scraps into 6 x 6 sheets and stores them in these cute little plastic cubes you can get at the Dollar Tree. After cutting she still has a lot of leftover strips so then she .....

makes new paper by gluing the paper strips onto a sheet of 8.5 x 11" of card stock. Don't these look great..who knew soo many patterns could be mixed like that! Check out the wonderful cards Betsy made using her "new" sheets of paper here.
Okay that's scrap paper storage in a nutshell. I hope you find something that inspires you to get a handle on your scraps and helps you make use of all that paper you invested in. Be sure to come back again!

So do you keep all the scraps of paper that are left over after completing a project? Do you hate to throw away that 1 x 1 inch square just in case you might need it for something? Are you scraps in such disarray that is takes too much time to sort through them so you just grab a new piece of paper instead. Well then listen up because this is one thing in my craft room that is totally organized and I am totally happy with!
I have shared with you my methods for storing scraps before but I am going to cover it again here just in case you are new to my blog or "gasp" you have forgotten! LOL!
First up let's talk about solid card stock scraps. I love saving card stock scraps. I do a lot of paper peicing. In fact a card I made yesterday involved using that 1 x 1 inch square of red. So it is very practicle for me to save even little pieces of card stock. But...how to store such small pieces without them getting lost and still make them accessible....

Next up is the patterned paper. This has got to be the hardest type of scrap to store. Many papers are multi-colored making it hard to sort. So...when I came across Jennifer's brilliant idea I knew it was for me!


Here is what you need for my scraps storage:
Cardstock Scraps:
Labels for drawer colors (optional...drawers are clear so labels aren't really necessary)
Patterned Paper Scaps:
Paper Trimmer (optional.... makes cutting paper to the nearest inch easier)
I do have a few other methods for storing scaps I will share with you but I did not find a lot. Hopefully something will strike your fancy though.

Scrapfreak.com uses an over the door shoe rack to store scraps of paper. This would work hanging on a wall too I would think.
Rachel uses labeled magazine holders to store both patterned paper and solid scraps. Her sons have access to this too. This would be a great way for my kids to store their scrap papers. It would even help my daughter prep for Kindergarten. Right now we have all their papers in a big bin. Check out more of Rachel's wonderful scrap room on her blog here.

Denise made her own as she puts it "El Cheapo Clip It Up" using badge ID clips, page protectors, a dowel rod and cup hooks. It costs her less than $2.00! Amazing! Check out more info on her blog here.


makes new paper by gluing the paper strips onto a sheet of 8.5 x 11" of card stock. Don't these look great..who knew soo many patterns could be mixed like that! Check out the wonderful cards Betsy made using her "new" sheets of paper here.
Okay that's scrap paper storage in a nutshell. I hope you find something that inspires you to get a handle on your scraps and helps you make use of all that paper you invested in. Be sure to come back again!