Showing posts with label cards. Show all posts

Friday, April 19, 2013

Spring Sale Time!

OMG!  Has it really been almost 3 months since I blogged?  Please forgive me as things have been hectic here!  While I was busy though the flowers have popped up in my flower beds!  Spring is finally here!  Hubby just got done mowing the grass!  There is something so fresh and renewing about Spring.  Those heavenly flowers have a way of chasing away my Winter doldrums and makes me excited to craft again!  Just in case you are in a crafty mood I am having a store wide sale!  All my files are 40% off now through April 22, 2013.  Click HERE to go shopping.  Before you leave though I have some inspiring projects for you.


First up we have a project from Shelly M.  (she is no longer on my design team..boo..hoo...but she was when this photo was taken).  I love how she mixed stamped images with my die cut 3-D butterflies file.  

Elizabeth also played with my 3-D butterflies file.  I love the way she added stitching lines around the edge of the butterfly.  She also embossed patterned paper.  I have never tried this but I love the look! 

If you would like my butterflies to fly to your home too please click HERE or the preview below.


Thanks for stopping by!  I promise to do better at blogging!  So please stop by again!  Have a wonderful weekend!


Share:

Saturday, April 21, 2012

Sale Time!

My next couple of weeks are filled with events like birthdays, graduations, anniversaries, and Mother's Day. I have a ton of projects to make! Just in case your April and May are filled with activities like mine I decided to have a sale. I have many files that are useful for not only cards and scrabooking but also teacher gifts and decorations. You can find my store by clicking on the Ad above or by clicking here. I do not have all my files converted to MTC and Studio but if you purchase a file in any format I will be glad to convert it for you and send it to you through e-mail.  Just e-mail me at shellysart@verizon.net with your invoice.  Oh before you leave I have some inspiration for you!


Isn't this card just stunning!  Kelly (member of my design team) created this lovely card.  Here is what Kelly had to say about her card:


"I needed a card for a bridal shower and using 3 of Shelly's files, here is what I came up with. I used Card Base 10 (SS00238) for the base of the card. It uses Bazzill cardstock for the base, DCWV Old World Stack for the patterned paper and Paper Temptress mica/metallic paper for the rest, including the flowers. I used the Flowering Foliage embossing folder on the small rectangle. The wedding rings charm is from Wedding Charms (SS00084). I cut 4 of them from plain cardstock and layered them to make it thicker, then I cut one from silver vinyl to layer on top and make it look more like a real charm. Finally, I used Fringe Flowers (SS00228) to make the 2 flowers and topped one of them with a silver embellishment (an end cap used in jewelry making). 

I love all the details Kelly put into this card.  Layering 4 cardstock rings and then a silver vinyl layer over the top is a great technique to make these charms look more realistic!  I 'll have to remember that for the future.

If you would like to purchase any of the files Kelly used then please click on the previews below or on the highlighted words in Kelly's description.

Thanks for stopping by! Have a glorious weekend!
Share:

Friday, December 16, 2011

Papertrey Ink Make it Monday Challenge and Sale

Howdy,

I know we are all busy getting ready for that Christmas so I decided to just put my whole store on sale all month.  You can buy any of my designs the whole month of December 2011 for 30% off.  So if you are crafting away in the wee hours of the morning or the wee hours of the night my store is always open.  Please stop by click here

I absolutely loved the new Papertrey ink technique video.  It involves coloring embossed images with Copics.  I love finding more uses for these markers!  Check it out the video here if you missed it. I was busy making my Legal Pad Covers for Christmas gifts so I decided to incorporate this technique into one of these. 
Here is a close up of the colored embossed image.
The inside:
I used the Round and Round 2009 anniversary set from Papertrey Ink. I love the images in this set but often felt they would look better in multiple colors. I don't own any stamping markers so I was thrilled to find this technique and I love how this turned out! The tree branch is thin and hard to color but I think the uneveness of the coloring adds to the look of the bark.  I also used the PTI die mat stack 2 along with some spellbinders, grey baker's twine  and rhinestones to enhance the focal point.    Oh and the papers are from K and Company

Well I was on a role with these Legal Pad Covers so I decided to make another one to give to our hairdresser.
I used my 3-D Butterflies file accented with some rhinestones and some stiff paper twine for the a
antenna.  I used a bead cap and matching rhinestone to the lace.  My hairdresser is going to keep this by her computer as she said she is always wanting to write some stuff down but can't find any paper.

I'm totally addicted to making these things!  I'm making two more for Adoree's teachers.  Hopefully, one of these days I can make one for myself.  I just love what my design team member Kelly Stone did.  She made one to take to the grocery store.  The pocket holds coupons.  Check it out below.


inside:
Don't you just love it! Yeppers...I'm going to make one of these someday! I don't know if I could convince hubby to take a floral one to the store though. LOL!

If you would like to make a jr Legal Pad Cover yourself then please click on  previews below.

If you are still making Christmas cards...I have some great inspiration for you from CDT member Lisa Lindesmith! She used my Christmas Tickets to create a great background for her cards. The tree is an image she created herself. What great quick cards!

 If you would like to purchase my Christmas Tickets please click on the preview below.

Okay I've gotta run! Hope you are having fun preparing for the holidays! Have a fun weekend! Merry Christmas!
Share:

Monday, March 14, 2011

Membership Club previews, CDT projects, and puddle jumping.

Oh my goodness has it really been close to a month since I've blogged!  Yikes!  I'm sorry!  Well I haven't been twiddling my thumbs.  I have been busy getting files ready for my quarterly membership.  It is in full swing and I have given 4 files to membership participants thus far.   I'd like to show you what they received.

First up we have an infinity card decorated up for a birthday!   Have you ever seen a card like this?  It is very cool as it opens and opens and opens again and never seems to end.

In the file I have included the base to the infinity card and the exact rounded rectangles and squares to match each section of the base.  Then I have designed die cuts that fit perfectly in the spaces of the infinity card.   This card looks complicated but in reality it is just 4 pieces of paper.  You can see the cover above complete with a little mouse enjoying a bite of cake.   Then when you open the front two panels...you see this:

Next open the center panels up and outward and you see this:

The present is actually split in half allows the two centers to open like a book which reveals this:

I decided to add a simple Happy Birthday to the top panel and then a sentiment can be stamped and/or written in the box below.  If you open the panels outward again the card starts at the beginning and you can keep opening panels until you get bored.  Adults and kids alike can spend many minutes just playing with these cards.  The file is a great way to use up bits of coordinated papers too.


The next file offered is a shamrock box perfect for St. Patty's Day decor or treats.  You can tuck a battery operated tea light or stick up air freshener in the middle to decorate your home.  Give a lucky gift by tucking some treats inside.

Lastly I gave membership participants a foldable tag card.  This card will fit in a standard A7 envelope.

I'd like to share with you some photos of how I decorated the card for my MIL.  I hope she liked it!
front:
Inside top:


Inside bottom:
complete inside:

Let's see I used Copics to color Swiss Pixies: Rosalie with Roses stamped image. The sentiment is from Amy R: Spring Sentiments. I used shimmery paper which was kinda slick so I guess I should have stamped with Stazon ink...oh well live and learn. I replaced the scallop border with some ribbon and added a button with stickles and a clear dew drop added to the center. The flower is from my stash but I paired it with the leaves from my rolled up flowers file. I cut the leaves out of plain paper and used homemade glimmer mist to color them. I wanted to add a photo that could be removed to the inside top so I used my folded photo corners file to do just that. On the inside botoom, I stamped the sentiment on the scallop circle embellishment which I got from my card base 5 file.

So if you like any of the files you have seen above and would like to add them to your collection..please consider purchasing my membership. Right now this is the only way you can get these files.    In addition to the ones above you'll get at least 16 more.  I have files planned that are suitable for the card maker and scrapbooker.  It's a great deal at just $10.00 Click here to purchase.  I will put a slide show on the side of my blog so you can see what files are available through membership as I offer them.

Next up I have some great cards by CDT Lisa Lindesmith.  Lisa likes to cut many flowers at a time to use in multiple projects.  So here she cut my daffodil from my Think Spring file out of patterned grid paper and designed two cards using them. 


The doily came from I Scrap Design's freebie during customer appreciation day and the button card is a digital stamp.  I love the the button Lisa added to the center of the flower and the embossing pulls everything together quite nicely!


 This one uses the same daffodil with the provided center.  I love the stacked buttons and the scallop punch (Martha Stewart).  Lisa is very smart cutting multiple flowers to have on hand when she is ready to craft...don't you think?!

If you would like to purchase my Think Spring file...it's a great deal on sale for 30% off the entire much of March.  Click the words above the preview below to purchase.

Think Spring


Well the tulips are popping their leaves out of the ground and the birds are singing at my house.  The weather is finally warming up and it looks like Spring is indeed in the air!  Yeah!  Now to dig out my Spring clothes and hope it doesn't snow.  Doesn't that seem like the way things are...you buy an umbrella and it doesn't rain,  you buy a snow blower and it doesn't snow, you dig out Spring clothes and it snows...Mother Nature can sure be tricky sometimes huh!  Oh well the world just wouldn't be right without all our weather ups and downs now wouldn't it.

I know this blog post is long enough and I need to go make supper and a grocery list so I'll leave you with one fun photo.  Daddy took Adoree to a shoe store to look for work shoes for him but came back with rain boots for Adoree.   Rain boots aren't actually what I consider necessary foot wear so I haven't ever looked into buying any for my kids.  I have to admit though Adoree looked ultra cute in those pink boots with the hearts and she just loves them as you can see in the photo below.  I'm very happy Daddy bought them for her!


Thanks for stopping by and have a great week!  I promise I'll try to do better at blogging in the future!

Share:

Sunday, February 20, 2011

Customer Apprecition Day continues with 50% off all my designs and more flower projects

I love my customers!  To show my appreciation for buying my files time and time again I am giving you 50% off all my designs.  (Quarterly membership excluded) This includes digital cutter files, digital scrapbooking kits and digital stamps.  Click here to go shopping.  Before you leave though I  few more great flower projects to share.

First up we have a wonderful home decor item using yesterdays freebie flower  from CDT member Lisa Lindesmith.  Lisa can turn just about anything into something elegant looking!   Check out her stunningly decorated candle below.

Candles of course can't be burned with this decoration on but Lisa made the decoration easily removed by untying the ribbon.  I think this candle would be a very pretty gift.  In my house it probably would just sit and look pretty and not be burned at all.  It could easily be decorated to match any room of the house.    I can picture this as part of a spa gift set complete with matchingly decorated bubble bath and body lotion.  Check out Lisa's supplies below and instructions on how she transformed her flower. 


Here is what Lisa had to say about her flower:
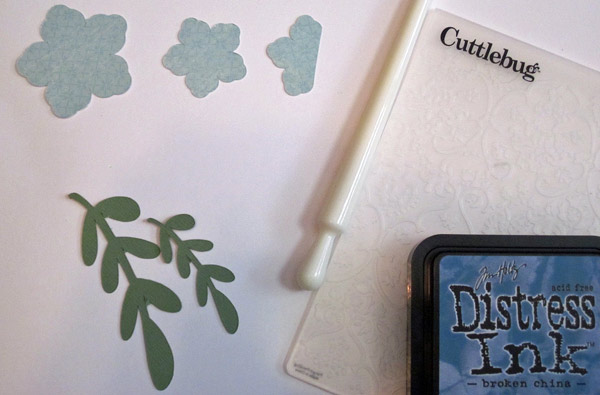
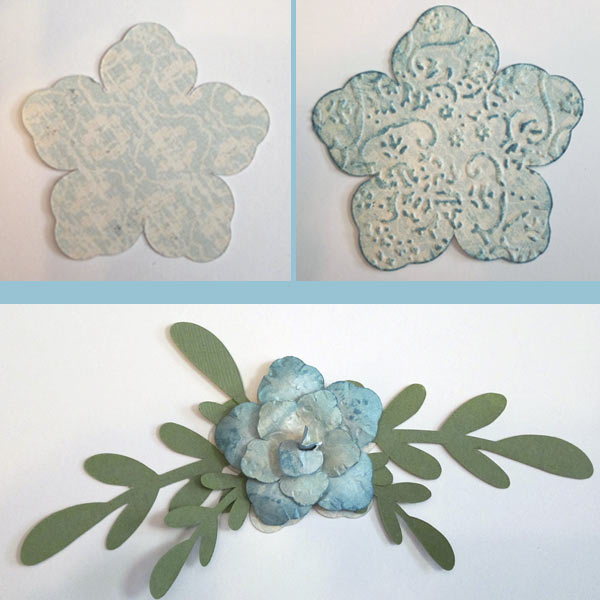
"For finished flower need one big, and two smaller flowers.  Cut one of the smaller into just 3 petals.  Use shaper to mold large and small flower petals back and centers in.  Curl 3 petals tightly to look like flower center.  Glue together and assemble with large and smaller sized leaves.  Candle is dollar store find wrapped with a ribbon from a xmas gift and the flower glued to the front."  
Lisa also mentioned to me that she embossed the flowers with a Cuttlebug embossing folder and inked the edges prior to using the flower shaper.  The white item in Lisa's supplies is the flower shaping tool. It is used to shape the petals and "soften the cardstock to allow it to bend and curve more easily.  I am adding this tool to my wish list!

Next up we have another project by Shelly M.  This time Shelly used fabric for her flower.  I have always wanted to try cutting fabric.  I even have the fabric blade for my KNK but have yet to do it.  Shelly's project is soo inspiring though I think she may just have convinced me to try fabric soon!  I'm sure you'll agree her card is fab..check it out below.   


I just love the the texture the fabric adds to Shelly's card.  She even cut the leaves out of fabric too.  Check out Shelly's supplies photo and how she made her flowers below.


"Fabric card - I used fabric bond to stiffen the fabric before I cut the flower. I then cut two more flowers, one slightly larger than the original flower. The smaller flower was "crumpled" to add dimension under the fabric flower. I also added a button (PTI) to the center and finished it off with some ribbon and feathers. The circle was also cut out of fabric (using nesties). I used Nesties and QK for the layers on this one."

If you don't have any fabric stiffener you can iron the fabric onto freezer paper, interfacing or adhere to cardstock with spray adhesive before cutting.


Next up we have a great acetate flower from Aussie Caz.  I just love these clear flowers!  Check them out in her card below:


I love the glistening gold centers too.  That sentiment is wonderful!    Amazing card Caz!  Check out Caz's supply list below and see what she had to say about how she transformed her flowers.

"I reduced the size of the flower a little although I left the centres at the same size. These were cut out of acetate. The flower backs were then run through the Cuttlebug machine using the "Swiss Dots" folder. I then painted the flowers using Jo Sonja "orange" folk art paint. I then rubbed this off with paper towel. The flower centres were stamped with gold ink and clear embossed using Ultra thick embossing enamel. This proved to be a problem as everytime I touched them, the embossing just lifted off the acetate.... the acetate needs to be sanded first to roughen the surface so that the UTEE will stick.

The leaves were cut from card and then had the edges inked.

I created a Card Template which I then cut out of card, inked the edges of and stamped a sentiment on the front using Stampin' Up Pumpkin Pie ink. The flowers were layered and attached to the card front using mini brads and then the whole front was attached to the card base using my Scotch ATG 700."

My design team is ultra talented!  I'm sooo lucky they want to design for me!  Be sure to stop by my blog tomorrow to see more fabulous projects using the freebie flower.  Oh in case you missed the flower  file you can still get it in yesterdays post.  Many of the freebies from the other designers are still available too so be sure to go blog hoping if you missed out on the fun yesterday. 


Some of the Paperthreads forum members inquired about the store not having a quarterly membership currently running.  I love making people happy and so by request I will start a quarterly membership club beginning next month.  It really is a great deal as you get at least 20 files (I will most likely throw in a few extra) for only $10.00.  That is a fraction of the price if you were to buy them individually.  Plus you get the files before they anyone else sees them.  How cool is that!  So hurry on over to my store and purchase my membership by clicking here.  I just know you won't regret you did.  Also, if there is anything in particular you would like me to design for the membership please let me know.

I'm sorry I was busy yesterday running the daffodil hunt game on the Paperthreads forum so I didn't have time to package up the blog candy.  I will have it ready tomorrow so please check back tomorrow. 

Enjoy the rest of your weekend! Thanks for being such great customers!

Share: