My absolute favorite stamp company is having 10 days of contests to celebrate their 9th year in business! You can see all of PTI's great products at their online store by clicking here. If you need some inspiration you can sure count on PTI's owner and design team to give you more than you need! Get started at Nicole's (the owner) blog here.
I am slowly working my way through the challenges. All entries must be in by the 15th of Feb so there is still time if you want to join in on the fun! Day 1's challenge is to create a card using one of the design team's favorite color combos. I chose the lovely combo by Melissa Phillips below:
I have never used this color combo before but will definitely use it more in the future! It is gorgeous! I absolutely love this layered stamp set by PTI called brushed blooms! One of the great things about this stamp set is if your stamping isn't perfect or splotchy it's okay. What ordinarily looks like mistakes with other stamps simply looks artistic with the design of this stamp set. I also love that you can achieve the depth I did by stamping the second layer in the same color ink as the first. Thus less ink colors are needed. I love when I can create a wonderful card with limited supplies!
Oh and did you know that you can ink your stamp up with Versamark ink and then without cleaning your stamp off dip it directly in your colored dye ink? Both inks combine and stay wet so you can add embossing powder to them. Ordinarily you can't heat emboss dye ink but if you coat your stamp with Versamark first then it will accept the powder. It doesn't harm your dye ink pads at all! I did this with the sentiment above. I don't have any colored embossing powder (other than gold and silver) so this is a great technique to learn!
I know you can't tell in the photo but I thought those little yellow flowers need something extra to make them pop and not get lost among the larger flowers. So I brushed them with some white Wink of Stella glitter brush marker. I couldn't find the clear Wink of Stella at Michael's but the white does work on lighter colors.
Supplies are listed and linked below:
PTI=Papertrey Ink
Howdy! Goodness it's been way to long since I've posted! So here I am to prove I haven't fallen off of the face of the earth! I have to use electric heat to heat up my craft room which is on the third floor of our house. It can get quite frigid up there and quite costly to heat! So now that it is finally getting warmer out I will be able to craft more which means you'll see me post more!
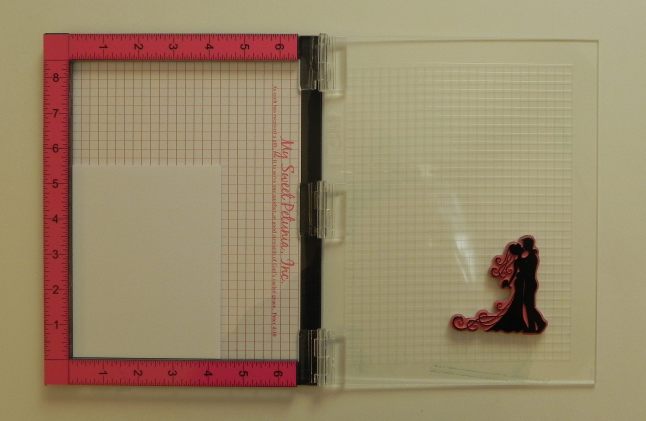
Aren't the colors just gorgeous! Perfect for the anniversary card I needed to make. Quite some time ago I had purchased Papertrey Ink's Guidelines Two stamp set. I figured it would be perfect for stamping my own patterned paper to use for color challenges. However, I found it very difficult to stamp the grid and get it lined up correctly. I also didn't care for the grid being part of the pattern. Misti to the rescue! What is Misti you may ask?! It is a stamping tool that becomes a replacement for acrylic blocks. It helps you line up stamped images so precisely that you can stamp in the same spot twice without any shadow. I can't really describe how amazing this tool is in words...so...here is what it looks like:
(Photo credit goes to Lisa Babitz
https://iplayedwithpapertoday.wordpress.com/2014/11/18/misti/)
And you can see videos of how it works on the inventor's blog here. I have only had the Misti for about a week but I truly believe Iliana is genius! I have always struggled getting stamps on straight especially sentiments. I also don't always get a good impression with my first try but with the Misti it's easy to ink up and restamp in the exact same spot. I could go on and on about this tool. It is amazing! It is expensive but so worth it! I highly recommend purchasing the grid paper and the magnets if you order this though.
Here is my card:
The background was all stamped using the Misti and I actually did 4 identical stamped panels so you will be seeing this stamped paper again in the future. (Another benefit of the Misti..makes it super easy to mass produce duplicate projects). I stamped the grid lines on transparency sheet several time and just taped them together until I got a grid large enough. I positioned the transparency in the "L" of the Misti and hinged it with a piece of tape. Making it easy to move out of the way for stamping. Hard to explain. If you are interested I'll take a few photos to show you how I did this just leave a comment to let me know.
Thanks for stopping by! Enjoy your week! Please come by again!
Gee look at the title posts...too many abbreviations huh?! Well it means Papertrey Ink's stamp-a-faire. I have been having soo much fun over the past few days watching all the inspiring tutorials and oohing and awing over all the amazing projects. I got quite a few cards done. I actually am ahead of the game for upcoming birthdays and anniversaries so..thank you PTI! Oh in case you missed the festivities..the tuts can be found still on Nichole's blog here.
The way stamp-a-faire works is you are given a challenge and if you complete the challenge you earn a badge.
Knots Badge- Ribbon Techniques Challenge
Betsy showed us an amazing technique using bitty dot ribbon curled into these wonderful flowers by using the heat of a candle flame. Betsy made it look effortless but I had a hard time getting the hang of how long to hold the ribbon near the flame. In fact I had a some of my ribbon singe. So I decided to go with that and turn my card into a shabby chic version of Betsy's wonderfully bright example. I stamped Turning a New Leaf in Memento rich cocoa ink. I added small flowers from Honey Bees in Memento Sweet Plum. The sentiment is from Everyday Classics anniversary set. I really need to invest in some of those super sized sentiments!
For this challenge we were limited to the following supplies:
STAMPS: Natural Beauties only (or another floral set as a substitute if needed)
PAPER: Stamper's Select White, Hawaiian Shores, Aqua Mist, Simply Chartreuse
RIBBON: Hawaiian Shores Bitty Dot
BUTTONS: Simply Chartreuse
I do not have Natural Beauties so once again I turn to Rosie Posie (the only PTI truly floral set I own). Well leave it to me to make a limited supply challenge complicated. I decided to use my Card Base 5 cutter filesimply because it had those two tabs draping from the top..a perfect place to set my buttons. I have always used two patterned papers when using this file in the past. So since our supplies were limited that meant I had to stamp my own background papers using only the Rosie Posie stamp set. So I did hexagons for the 1st patterned paper and for the next I used the leaves and center flower dots (absolutely love the way this one turned out!). Now looking at the completed card..I could have easily used a green solid paper in place of the first patterned paper. Oh well..I never do things the easy way!
Rainbow Badge- Tie-Dye Techniques
Nichole showed us some awesome ways to add tie-dye to our paper projects. The one I decided to make involves Copic markers and rubbing alcohol. This is soo out of my comfort zone. I don't do this bright hardly ever..but the technique was fun to do and I think this will be perfect for a teen's birthday! I don't have the marker colors on hand but I used the one listed in the store that coordinate with Pure Poppy, Hawaiian Shores, and Summer Sunrise. The sentiment is from an very old set called simply Paper Tray.
I showed Tyler the latest MIM video which involved rolling a die to determine specifics of what kind of card will be made. He thought it was really cool and wanted to try it! I don't often let my kids play with my good crafting stuff as they have their own things. But...he is 8 so I think it's about time I shared a little! So we got the sheet out and filled it out and got rolling. Amazingly enough he got some of the same things I did!
He got the following:
Horizontal card, sketch 2, Year of Flowers (main image), My Punny Valentine (supporting sentiment), Pure Poppy, Summer Sunrise, and Hawaiian Shores color combo and twine.
Before we began making his card..he saw the video for SAF by Heather making wonderful felt badge embellishments. Now he absolutely loves to stitch things with embroidery floss so he wanted to incorporate that into his MIM card. So we added a few more supplies to the MIM criteria and here is what he came up with.
I know I am a little partial being his Mom and all but I am soo proud of what he created!! He stitched the felt all by himself!! He wanted embossing since my card was embossed but knew he couldn't stamp on the lumpy cardstock so he decided to stamp the flowers and sentiment onto the same color of cardstock so they would blend in. See the one daffodil where he moved the stamp a little..well he says that's okay as it just make it look like it's blowing in the wind. I thought he'd want to add jewels to the centers of the flower but no he got out my yellow brads because that is what he envisioned. We almost forgot about the twine but he had the perfect way to add it as a grounding point for the daffodils. I think this is just amazing creativity for an 8 year old boy! He glued everything on himself even! So...I think Tyler deserves the DIY: Homemade embellishments badge. Don't you!?!
Here is a photo of him happily stitching away! Oh sorry he doesn't have a shirt on...he hardly ever wears a shirt in the summer!
Tyler had a set of dog tag type necklaces but the chain broke so he fixed it by adding yarn to make a chain. We were headed to the store and he had a shirt on so I told him I wanted to take a pic of him quick with his card. He decided to hang it on his necklace. Too cute!
Just look at that face! He is super thrilled with his card! Hmm...do I have a future scrapbooker? Maybe I should let him scrap some of his own pages since I'm sooo far behind! Now Adoree is beggin' to play with Mommy's stamps too. I promised her there would be another challenge tomorrow and she will have her turn! Sooo stay tuned!
I have until 12:00 noon to complete a few more projects for SAF so I hope to get at least one done if the kids let me! Thanks for stopping by! I hope you had a fab weekend! Please come back again!
Hello!
I'm sorry I know it's been ages since you heard from me. I have been busy as I'm sure many of you have been too. I will share with you some of what I have been busy doing. I did manage to get a new file...well two new files done too!
First up this week's Make It Monday challenge at Papertrey ink involved Nichole Heady sharing how she goes about designing a card. The video depicts how she uses the rule of threes to make her cards. I found it quite informative..check it out here. Nichole challenged us to use some of the color combos she posted. I fell in love with many of them but only had time to use one for now (saved them for later)...so I chose...
Don't you just love those yummy colors! In fact I love the shirt too..wish I owned it! LOL! Oh and I apologize once again for the bad photo..that is what happens when I craft at night! One of these days I'll get a light box!
I need to put an order in for ink since sadly I didn't have these colors but...I made it work! I decided to use my newest file Digi Card Template 3 and my digital Cosmo Cricket papers. I pulled papers from many different collections and recolored them using Photoshop to match my color combo. I had a great match on screen but once again the blues printed slightly greenish but it still looks pretty good to me. So I printed the background as one layer. Then I added the label and pennant from my Card Base 11: Hexagons. I stamped the inner label with the pansy from Papertrey Ink's year of flowers collection then heat embossed it with white embossing powder. The sentiment is also from PTI Year Round Puns stamp set. I then used embroidery floss to do the stars and added some pearl paint to the middle of the stars.
Hubby and I celebrated 15 wonderful years together yesterday...well really we aren't celebrating until tomorrow but we did exchange anniversary cards yesterday.
Once again I used my Card Base 11: Hexagons file. The papers are from the Sugared Collection by Basic Grey. What I love about this file is you don't need to place a whole bunch of single hexagons. I designed a series of overlays that stack to get the quilted effect! Easy! I didn't have enough patterns so I simple stamped some polka dots on the plain orange paper to serve as another pattern. The hearts are from my Floral Mom Tag 2 file. The numbers are from my number charms file. I colored them with a metallic copper paint pen and then added several layers of UTEE to make them look more like metal. The sentiment stamps is from PTI's Everyday Classics stamp set. I used my sew easy to help stitch the circular border under the sentiment.
If you would like to purchase any of the files I used please click on the previews to be taken directly to them in the store.
Adoree's preschool had a fiesta party today. It was soo much fun! They did games with a sombrero did crafts and even did the limbo with balloon inflated cactus. I just have to share this photo!
This just cracks me up! The teacher bought the kids stick on mustaches! Soo funny and soo cute!
My next couple of weeks are filled with events like birthdays, graduations, anniversaries, and Mother's Day. I have a ton of projects to make! Just in case your April and May are filled with activities like mine I decided to have a sale. I have many files that are useful for not only cards and scrabooking but also teacher gifts and decorations. You can find my store by clicking on the Ad above or by clicking here. I do not have all my files converted to MTC and Studio but if you purchase a file in any format I will be glad to convert it for you and send it to you through e-mail. Just e-mail me at shellysart@verizon.net with your invoice. Oh before you leave I have some inspiration for you!
Isn't this card just stunning! Kelly (member of my design team) created this lovely card. Here is what Kelly had to say about her card:
"I needed a card for a bridal shower and using 3
of Shelly's files, here is what I came up with. I used Card Base 10 (SS00238)
for the base of the card. It uses Bazzill cardstock for the base, DCWV Old
World Stack for the patterned paper and Paper Temptress mica/metallic paper for
the rest, including the flowers. I used the Flowering Foliage embossing folder
on the small rectangle. The wedding rings charm is from Wedding Charms (SS00084).
I cut 4 of them from plain cardstock and layered them to make it thicker, then
I cut one from silver vinyl to layer on top and make it look more like a real
charm. Finally, I used Fringe Flowers (SS00228) to make the 2 flowers and
topped one of them with a silver embellishment (an end cap used in jewelry
making).
I love all the details Kelly put into this card. Layering 4 cardstock rings and then a silver vinyl layer over the top is a great technique to make these charms look more realistic! I 'll have to remember that for the future.
If you would like to purchase any of the files Kelly used then please click on the previews below or on the highlighted words in Kelly's description.
Woo Hoo! I did it I created a card within a couple hours and am making the deadline. Okay now that I am done patting myself on the back I will tell you more about this challenge. PTI wanted us to pick our favorite project and also CASE ourselves by copying something from that project into a new project. So...here a greeting card I did in July of last year.
I used my Card Base 4 file for both cards. The only thing I changed are the focal stamp and the papers yet these cards look entirely different! I can't really say which one I like better actually!
Let's see:
Papertrey Products used:
Let Freedom Ring (sentiment)
Round and Round anniversary set focal image
Mat Stack 2 and coordinating die
I used Cosmo Cricket's early bird digital papers. It was nice because I could scale the digital papers to the size I wanted before printing. Inking the edges with some distress ink gave the papers a more store bought look. I added some Stickles to the berries. Oh and the brown scallop circle came from my Card base 5 file..I just resized it smaller to fit behind the mat stack 2 die. (Thanks for the tip Sandra to cut enough pieces for two duplicate cards...I remembered to do that this time...so all I have to do is assemble the other one to have a completed card in minutes!) Bakers twine, dew drops, and a jewel are the finishing touches.
If you would like to purchase my file so you can see for yourself how versatile this layout is please click on the previews below.
Before you go I'd like to share with you a elegant tea holder Creative design team member Joahnne made using my tea caddy file.
This is what Johanne had to say about her splendid creation: "I made the cutting file for the swirl getting inspiration from a stamp which I don't have the name. For the base of the box I used Langton watercolor - aquarelle 140lb paper. It cut great and was very strong to support this project. Also it comes in 16 X 12 inches which gives more space to work than many other paper. I covered it with Timepiece Dot from BoBunny and inked each joint with burgundy ink."
If you would like to purchase my tea caddy file please click on the preview below. I think this would be a perfect Valentine's gift paired with a decorative mug. The file comes with a matching sugar caddy you can make too!
Okay it's soo time for bed! I feel like we are living in a house infested with germs! Tyler has strep...he was diagnosed with it on the 13th of this month and someone managed to reinfect himself and was diagnosed with it again yesterday. We are hoping changing toothbrushes and trying a different antibiotic will get rid of this for good! I went to the docs today too as I have been battling sinus problems for the past 3 months. Good new is I don't have strep but if the nasal spray they subscribed doesn't help then I have to go to a specialist to get a sinus scan. My blood pressure is high too! UGH! Adoree and hubby have a runny nose off and on but so far not too bad. Time to bring out the Lysol and Clorox wipes in hopes they don't get sick too! So any of you living in a germ house?!
Night night!
I'm sorry I haven't been around much lately. Our Summer has been anything but lazy. I have been suffering for about 5 possibly 6 months now with foot pain. I have an abnormally large bone in my foot. Ordinarily this isn't a problem but I did something to irritate the tendon and now it's rubbing against the bone causing a lot of pain. The foot doc tried various things but nothing really helped. So the last resort was physical therapy. Thankfully it has made me feel sooo much better. Since Tyler got out of school..he and Adoree have accompanied me to physical therapy sessions 3 times a week. I also need to do exercises twice a day. It's all worth it though my foot feels 10x better than when I started therapy about a month ago. Bless those therapist! I had taken for granted before being able to walk without pain and never really realized how a strong foot is important. I couldn't believe how weak my foot was before starting the exercises. One of the hardest things for me to get used to is wearing shoes in the house...I need the arch support so I must wear them. It might be easier in the Winter but now that it's warm I'm just can not get used to wearing shoes all the time! I was thrilled though as we found sandals with built in arch supports in them at an Amish store for really cheap! I love these sandals and my feet thank me for wearing them! LOL!
After the 4th of July we decided to remodel our porch. At first it was just going to be a paint job but after taking a good look at the condition of the porch we decided to tear down the awning, replace floor boards, posts and put vinyl railing and soffit up. We have a rather large porch and not much DIY skills so this is a big deal for us! Even with all those renovations it still left a lot of wood that had peeling and crackled paint on it. So it is my job to get the wood ready for painting (hubby is going to help!) . We tried scraping and sanding but the crackled paint wouldn't budge. So we are now using a stripping gel. It is working somewhat but takes off thin layers at a time so that means tons of scraping and reapplying the stripping until we get a paintable surface. As I was telling hubby this is a very hard job..especially with my wimpy arms! I repaired the horsehair plaster walls, sanded, cleaned, primed and painted the entire room mostly myself for my craft room and that was nothing compared to all this scraping! I wish the temps would cool a little as this stripping gel is supposed to be used in temps ranging from 65-85 degrees and we have been hitting the 90s. I think I'll get out there tomorrow morning before it gets too hot and then take a break and not go back out until after supper. The gel is supposed to stay active for 24 hours so that should work out well. Any suggestions on paint colors? We have a white house and the posts along with the railing will be white but I want the porch and steps to be a different color. I'm leaning towards a light olive green but I just can't visualize it. Most of the porches I've seen are the hunter green and for some reason I'm not fond of that color. I love the brick red but I think that looks better with a beige house and hubby already informed me we are not painting the house! LOL!
While working on the porch I managed to take some breaks and finish up the PTI's Make it Monday challenge..however...I didn't managed to get it posted on my blog by the deadline! DRAT! I love PTI stamps and really wanted to enter that challenge to win some. Oh well I do love how my card turned out so I figured I'd share it with you anyway!
It really is a great technique. You make your own stamp pad using reinkers so you can color one stamp with multiple colors. I used distress ink reinkers to color the butterfly and leaves as that is one stamp. I had to mix yellow and blue to get green since I didn't have any green but I love how that gave a lot of shading to the leaves. I had plenty of ink left on my custom stamp pad to make several of these. I wish I would of had the hindsite to stamp more of these for future cards. Someone did mention you could possibly store your handmade stamp pad in a sealed bag for later use but I didn't think of that either. :(
Before I tell you a little more about my card...I'd like to share with you the video describing this technique. Remember this challenge is no longer active but they do have a new challenge up for this Monday here. I only have one PTI die that I used on the card above so I'll have to see if I can get creative with that die!
I started with my Card Base 4 file then added PTI stamps for the focal point. The butterfly circle came from the Round and Round Anniversary Set (not available for sale anymore) and the frame came from the Mat Stack 2 collection and a Nestabilities Scalloped circle was added behind that for a pop of color. The background paper was stamped with a french script stamp. The patterned paper was made with the following PTI stamps: Turning a New Leaf (love...love..love..this set!) and the separate butterfly the the Round and Round anniversary set. This is my first time stamping my own background paper and I thought for sure I would screw it up but I think it turned out pretty well! It is impossible to tell in the photo but I sprayed the yellow scallop circle, border and butterfly patterned paper with pearl glimmer mist. I love the shimmer it added! The tag is from my tags galore file. The sentiment is from PTI's Round and Round anniversary set. I added a few clear dew drops colored with a purple Copic marker and also some rhinestones to the sentiment. Oh and see that baker's twine....guess..what....I made that myself! Yep...all it took was my Dremel tool, a cup hook, crochet thread and embroidery floss. (If you want to see a demo of how I did this let me know and maybe after the porch is done I can get one made up). I do think I will use this color combo in the future. I'm not a big fan of the color yellow for some reason but I love it paired with the purple and green.
My CDT member Johanne also had fun with my Card Base 4 file.
I just love this color combo and the papers she used. The stickles add just the right amount of pizazz to this great card! It would be a great card not only for Valentine's Day but any time you want to let you loved ones know you are thinking of them. Here is what Johanne had to say about her lovely card:
I Love you from Barb Wire Designs (from the KNK complementary files CD)
Fancy Hearts(Free_Feb_007) a freebie from one of the group
Paper: Together Ruby from
Chatter Box
Stickles
Tim Holtz Distress Ink brushed
corduroy
So do you any of you want to come to my house and put a bed together? LOL! Adoree has been sleeping in Tyler's "crib". It is one that converts into a day bed but she is a rather active child and the springs have started to sag plus she is getting really tall. So we decided it's time to get her a big girl bed. Her room is very small so we wanted a bed that had storage in it that way we wouldn't have to try to squeeze a twin bed and dresser into her room. We found a great loft bed on Amazon. It came in three boxes and now needs put together! It is funny even the instructions say it's best to ask a friend to help! Hmm I wonder if hubby and I can do this without too much frustration! Wish us luck! Adoree is such a girlie girl! Tyler has always been perfectly happy with plain sheets. However, Adoree just begged to have the Princess and Fairy sheets. It's a good thing they were on sale at Kmart! Okay now that your eyes hurt from reading this long post...I will bid you goodnight!
Thanks for stopping by and come back again. If I get a chance I'll come back with some porch before and afters! At this rate though the after might not be until the end of the month!


 I have never used this color combo before but will definitely use it more in the future! It is gorgeous! I absolutely love this layered stamp set by PTI called brushed blooms! One of the great things about this stamp set is if your stamping isn't perfect or splotchy it's okay. What ordinarily looks like mistakes with other stamps simply looks artistic with the design of this stamp set. I also love that you can achieve the depth I did by stamping the second layer in the same color ink as the first. Thus less ink colors are needed. I love when I can create a wonderful card with limited supplies!