Showing posts with label flowers. Show all posts

Monday, July 30, 2012

Moxie Fab Hooked on Hexagons Challenge

Gasp!  Well look at that I am sharing a layout with you!  I know you all thought I only make cards!  I do scrapbook now and again..I just always forget to photograph my layouts.  This time I had a good excuse to take a photo.  I am entering this layout into the  Hooked on Hexagons Challenge in the Moxie Fab World.

I went to a crop this weekend and really wanted to included hexagons in one of my layouts.  I found the above sketch by Becky Fleck featured on Bella Blvd Studio Blog and fell in love with it!  It wasn't as easy to duplicate as I thought but...I do love how it turned out.  I used my Sew Easy and some embroidery floss to do the stitching.  I didn't bring my KNK with me to the crop so I used my friend's cutter to cut 2.5" hexagons.  I intend to replicate this layout again.  I will use my Card Base 11:  Hexagons cutter file to cut the hexagons as a single hexagon is included in the file.   I used Color Me Crazy flowers colored with Copics.  I added a bead cap and rhinestone to finish off the center.  I would think my Playful Flowers Leaves and Vines cutter file could easily be substituted.  The hearts are punches I borrowed at the crop.  The stitching really did take forever..I am thinking next time I might just use my pen tool in my KNK to draw some faux stitching lines or maybe even let the KNK make stitching holes as it was hard to get the Sew Easy to pierce straight holes.  I could totally see this layout done with snowflakes instead of flowers too.  Now to find a single winter photo I can use.  I normally take too many pics!  A single photo layout is rare for me!

In case you are in need of a hexagon...you can purchase my file by clicking on the preview below.  It's on sale through the end of this month (July 31, 2012) so hurry and grab this great deal!
In case you are in need of a flower cutting file..you can purchase my file by clicking the preview below.


Yikes it's time for lunch!  I've gotta go feed the kiddos!  Thanks for stopping by and please come back again!

Share:

Sunday, August 14, 2011

Papertrey Ink MIM #27 and gorgeous CDT project


Howdy,
Once again I am posting at the last minute before the Papertrey ink Make It Monday challenge deadline is up.  Good thing we are on the same time zone!  Oh well better late then never right....now on with the show!


First off I must apologize for the bad photo...I prefer taking photos in daylight but there isn't any of that right now!  LOL!  This is based on my sketch that I designed for my sketch challenge at Paperthreads this month.   I like the card overall but I did make some boo boos I had to cover up.  If I make this again I would only put three pennants under the ribbon and make the ribbon shorter.  I'd only do one cluster of leaves instead of two....but all in all it was a very fast card.  I used my newest flower file...loopy flower...for the focal point.  More about that later.   It's hard to tell in the photo but I colored the orange flowers with Copic glitter pens for a little sparkle.  I also misted the loopy flower with pearl glimmer mist.  I  have to say I do not have a steady hand and getting the stripes on the ribbon straight and even was very hard.  Nicole made it look soo easy!  You can see her technique video here.  

Papertrey Ink Stamps:
Turning a New Leaf , Mat Stack Two Collection  (pennant border under ribbon and sentiment), Honey Bees (orange flowers)


Turn this.....


into this....

That is exactly what I did with my Loopy Flower file.   I am not loving the paper swatch above.  It is quite abstract and as much as I'd love to be hip and modern...I'm just not.  I would only use this paper in small bits and I have a ton of it.   So in order to use some of it and other papers I don't care for I created this flower.  You can easily use it with patterned paper that has a white back to it because the white for the most part gets hidden.  It is very fun to cut the flower and roll up to see what emerges.  So why not make use of paper stash by buying my file here.   The file is on sale the rest of this month. 

Johanne, a member of my Creative Design Team,  did an awesome job with my sketch challenge by creating this gorgeous card.

 
The inside is equally as stunning...

Here is what Johanne had to say about her card:

"The Rolled Up flower file was perfect for this great sketch also from Shelly.I used plum embossing powder on the flower for the center and accent on the petals and also for the sentiment. I applied Twinkling H20 on the petal of the flower to give it a touch more color and some shine. I used dry embossing on the leaves to give a 3D effect , went over my marks with distress ink to enhance them and sprayed with glimmer mist.  Embossing powder was also used on the contour of the other elements of the card.  The paper is Jasmyne Twilight from Bo-Bunny again!!!  (I love that paper and bought so many.  I have to use it.)  The stamp for the sentiment is from Bonnidee.  For the inside of my card, I stamped the butterfly (Heather Stamping Haven) on vellum using embossing powder once again and colored it with Twinkling H20.  I stamped it twice and cut the second layer a bit smaller following the design and glued it over the first layer. The dotted lines were made with a stencil (Scallop Swirl TCW95 from The Crafter's Workshop).

Translation of the sentiment inside: Today is the beginning of a new year.  We, your friends, want to be part of this celebration and want to let you know that we love you very much.  Happy Anniversary!"

I am blowed away with Johanne's card!  I am mesmerized by the techniques she used.  I so want some Twinkling H2Os now!  Isn't that paper to die for!  I can see why Johanne bought lots of it!  Johanne sure does have an eye for detail doesn't she!?!  Anyone would be very lucky to get a card from her!  If you would like to roll up your own flowers please purchase my file by clicking on the preview below.
You know I never thought I'd see the day when Tyler and Adoree actually got along well and didn't fight.  It has happened quite often lately though.  While we were working on the porch Tyler and Adoree had to figure out how to occupy themselves.  Miraculously they did...well some of the time!  Tyler was being such a great big brother.  He willing (with out any prompting whatsoever from me) pulled Adoree up and down the sidewalk in the wagon Pop Pop had made them.  He volunteered to do it several times and Adoree enjoyed it!  She was hooting and hollering soo much the neighbor came out to make sure she wasn't hurt and crying! 

Tyler is such a good boy!  Even when his sister doesn't treat him soo nicely..he still likes to play with her.  There are days I wish we had only one kid as it's soo much easier to meet the needs of one but it's times like these that I am happy to have two...a boy and a girl...the perfect family! 

Okay it's time for bed!  We are trying to get the kids used to a school schedule again as they will be starting here soon.  That means I must get used to getting up early too!  Adoree is usually the first up sometime between 7 and 7:30 now and so I don't normally rise and shine (umm...I'm not a morning person and never "shine"...LOL) until she gets up.  Tyler will be going to a different school this year and may have to get the bus earlier.   Adoree will be going to preschool for 2 hours a day 3 days a week after Labor Day.  Unfortunately, we couldn't get her into the morning class.  So we'll have to eat lunch very early in order to get her to school on time.   Lots of changes coming up this school year.   But....on the plus side I will have a quiet kidless house for a few hours each week!  Yipee!  I love my kids but...also love peace and quiet!  LOL!

Goodnight!  Thanks for stopping by to see me!  I hope you have a fabulous week!


Share:

Monday, February 21, 2011

Customer Appreciation Day continues 50% off all my designs, the last of the flower projects, and blog candy!

I love my customers!  To show my appreciation for buying my files time and time again I am giving you 50% off all my designs.  (Quarterly membership excluded) This includes digital cutter files, digital scrapbooking kits and digital stamps.  This is the last day of the CAD sale!    Click here to go shopping.  Before you leave though I  few more great flower projects to share and be sure to check out the blog candy at the end of this post.

Can you believe it!   CDT Shelly M has a third flower project to share with you all.  I don't know how this lady does it as she has 3 young children and a very busy schedule.  Yet....time and time again she amazes me with her projects.  I'm sure you'll be blown away too by her stitched flower.  Check it out below.  A little description of how she did the flower is listed under the supplies. 

close up of stitching
supplies


Here is what Shelly had to say about her fabulous flower!
"I used QK "stitching" templates (as you can see the little round circle in the first picture) and hand stitched sponged the petals and used a brad for the center."


Next up we have some great crackle paint and shimmer mist flowers by CDT Elizabeth. I love crackle paint. I love the old aged look of crackle paint combined with the shimmer!


Elizabeth applied the spiced marmelade Distress crackle paint to the paper flowers and the rock candy clear distress crackle paint to the flower centers .  The best thing about this paint is it is a one step process.  Not like the messy 3 step ones I have tried in the past.  The heavier you layer the paint the bigger the cracks...if you want smaller cracks apply a light coat of paint.  You can vary the thickness like Elizabeth did and have a little bit of thick and thin cracks on your flowers.  You can purchase the paint at Paperthreads here.    You can also mix these paints to get the perfect color for your project.  You can't go wrong with the shimmer from shimmer mist or stickles on just about any project!  Gotta love some bling!

Okay that end our "one flower many looks" theme.  I hope you have enjoyed the projects my CDT and I have shared with you over the past few days.  I also hope this has give you some inspiration.  Isn't it amazing how paper can be transformed! 


Just a reminder my quarterly membership club will start in March.  If you purchase this club you will have access to at least 20 of my files...all new... (I'll most likely add a few extra) for a great value only $10.00.  Click here if you are interested in purchasing it.  Thanks to those of you who have already purchased the club.  It warms my heart to know you like my files!

Okay now on to the blog candy.  I kept debating what I wanted to do to make you earn chances at winning this blog candy.  I decided to make it easy!  Things in life are often too complicated and busy as it is so why should I add to the chaos!  All you need to do to win this blog candy is leave a comment on this blog post.  If you want you can give me some ideas of the types of files you'd like to see in membership but that is only optional and won't increase your chances of winning.  However, if you do make something with my flower freebie offered during CAD and e-mail a photo of it  to me I will enter your name three times into the drawing.  As promised anyone who entered my Zedonk blog candy in the past will automatically be entered into this drawing.  I will close the blog candy on Tuesday and pick the winner on Wednesday. 

Note:  I will be shipping free to the US only.  If you live outside of the US you may still enter but will be responsible to pay for your own shipping fees or you may take a gift certificate for $10.00 to the Paperthreads store instead of the blog candy.  


Here is what you will get if you win (everything coordinates for a complete scrapbooking kit):
6 sheets of 12 x 12 patterned paper (according to Adoree this is awesome paper! LOL)
1 alpha letter punch out sheet
1 embellishment punch out sheet
some clear dew drops
180 Making Memories flower shaped brads in 6 colors, 2 sizes
Making Memories in bloom mix (50 mini blossoms and 25 silver mini brads)
4 flower shaped ribbon silde brads
3 sheets of grungeboard (1 plain, 1 embossed diamonds, 1 embossed dots)
1 sheet of chipboard flower and leaf shapes
7 different ribbons and trims

I have one last photo to share with you.  I have cropped it into two photos so I won't get in trouble for showing too much skin.  Anyway, Adoree's pants kept falling down so she had this brilliant idea to put lollipops in the belt loops in hope it would act like a belt to keep her pants up.   She even had some in the back belt loops too.  Too funny!   I do feed the poor girl even though you can see her ribs.  Ahhh it would be nice to be young and eat anything I want without gaining weight! 


Just look at Adoree's hair!  She finally agreed to get her bangs cut so I think we are going to do that tonight.   Clips won't stay in because her hair is too thin.  I can't wait to see her eyes again!   Adoree is tired of the hair in her eyes too.  I am happy her hair is finally growing and she has stopped pulling it out.  Thank goodness for those gloves! 

Okay the kids are wanting to play in the snow so I'd better get them ready.  I hope you have enjoyed CAD and cashed in on some great sales and collected some awesome freebies along the way.  If you missed my freebie flower file you can still get it here but hurry as the file will only be available through today. 

Stay warm!  Think Spring!  Thanks for stopping by!
Share:

Sunday, February 20, 2011

Customer Apprecition Day continues with 50% off all my designs and more flower projects

I love my customers!  To show my appreciation for buying my files time and time again I am giving you 50% off all my designs.  (Quarterly membership excluded) This includes digital cutter files, digital scrapbooking kits and digital stamps.  Click here to go shopping.  Before you leave though I  few more great flower projects to share.

First up we have a wonderful home decor item using yesterdays freebie flower  from CDT member Lisa Lindesmith.  Lisa can turn just about anything into something elegant looking!   Check out her stunningly decorated candle below.

Candles of course can't be burned with this decoration on but Lisa made the decoration easily removed by untying the ribbon.  I think this candle would be a very pretty gift.  In my house it probably would just sit and look pretty and not be burned at all.  It could easily be decorated to match any room of the house.    I can picture this as part of a spa gift set complete with matchingly decorated bubble bath and body lotion.  Check out Lisa's supplies below and instructions on how she transformed her flower. 


Here is what Lisa had to say about her flower:
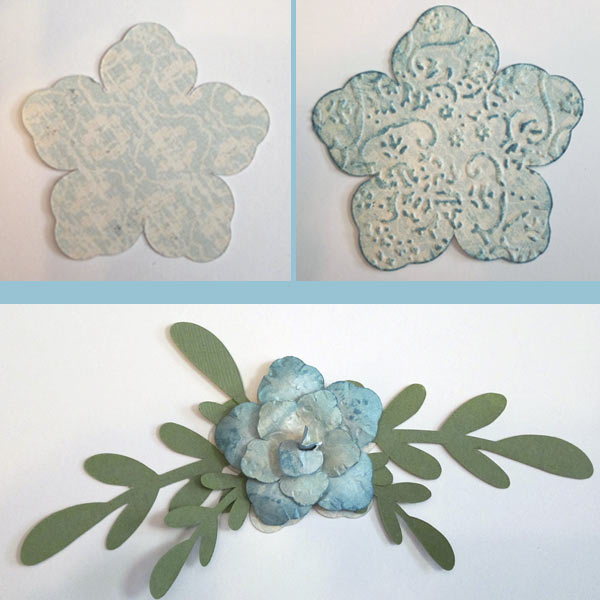
"For finished flower need one big, and two smaller flowers.  Cut one of the smaller into just 3 petals.  Use shaper to mold large and small flower petals back and centers in.  Curl 3 petals tightly to look like flower center.  Glue together and assemble with large and smaller sized leaves.  Candle is dollar store find wrapped with a ribbon from a xmas gift and the flower glued to the front."  
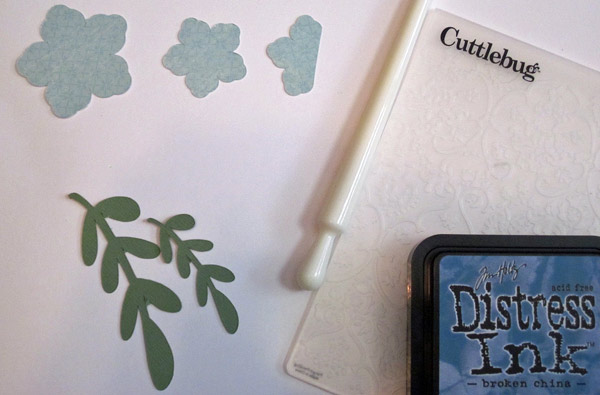
Lisa also mentioned to me that she embossed the flowers with a Cuttlebug embossing folder and inked the edges prior to using the flower shaper.  The white item in Lisa's supplies is the flower shaping tool. It is used to shape the petals and "soften the cardstock to allow it to bend and curve more easily.  I am adding this tool to my wish list!

Next up we have another project by Shelly M.  This time Shelly used fabric for her flower.  I have always wanted to try cutting fabric.  I even have the fabric blade for my KNK but have yet to do it.  Shelly's project is soo inspiring though I think she may just have convinced me to try fabric soon!  I'm sure you'll agree her card is fab..check it out below.   


I just love the the texture the fabric adds to Shelly's card.  She even cut the leaves out of fabric too.  Check out Shelly's supplies photo and how she made her flowers below.


"Fabric card - I used fabric bond to stiffen the fabric before I cut the flower. I then cut two more flowers, one slightly larger than the original flower. The smaller flower was "crumpled" to add dimension under the fabric flower. I also added a button (PTI) to the center and finished it off with some ribbon and feathers. The circle was also cut out of fabric (using nesties). I used Nesties and QK for the layers on this one."

If you don't have any fabric stiffener you can iron the fabric onto freezer paper, interfacing or adhere to cardstock with spray adhesive before cutting.


Next up we have a great acetate flower from Aussie Caz.  I just love these clear flowers!  Check them out in her card below:


I love the glistening gold centers too.  That sentiment is wonderful!    Amazing card Caz!  Check out Caz's supply list below and see what she had to say about how she transformed her flowers.

"I reduced the size of the flower a little although I left the centres at the same size. These were cut out of acetate. The flower backs were then run through the Cuttlebug machine using the "Swiss Dots" folder. I then painted the flowers using Jo Sonja "orange" folk art paint. I then rubbed this off with paper towel. The flower centres were stamped with gold ink and clear embossed using Ultra thick embossing enamel. This proved to be a problem as everytime I touched them, the embossing just lifted off the acetate.... the acetate needs to be sanded first to roughen the surface so that the UTEE will stick.

The leaves were cut from card and then had the edges inked.

I created a Card Template which I then cut out of card, inked the edges of and stamped a sentiment on the front using Stampin' Up Pumpkin Pie ink. The flowers were layered and attached to the card front using mini brads and then the whole front was attached to the card base using my Scotch ATG 700."

My design team is ultra talented!  I'm sooo lucky they want to design for me!  Be sure to stop by my blog tomorrow to see more fabulous projects using the freebie flower.  Oh in case you missed the flower  file you can still get it in yesterdays post.  Many of the freebies from the other designers are still available too so be sure to go blog hoping if you missed out on the fun yesterday. 


Some of the Paperthreads forum members inquired about the store not having a quarterly membership currently running.  I love making people happy and so by request I will start a quarterly membership club beginning next month.  It really is a great deal as you get at least 20 files (I will most likely throw in a few extra) for only $10.00.  That is a fraction of the price if you were to buy them individually.  Plus you get the files before they anyone else sees them.  How cool is that!  So hurry on over to my store and purchase my membership by clicking here.  I just know you won't regret you did.  Also, if there is anything in particular you would like me to design for the membership please let me know.

I'm sorry I was busy yesterday running the daffodil hunt game on the Paperthreads forum so I didn't have time to package up the blog candy.  I will have it ready tomorrow so please check back tomorrow. 

Enjoy the rest of your weekend! Thanks for being such great customers!

Share: