Friday, August 26, 2016

Make it Monday #258 Cover Plate Tags

This week's Make it Monday involves using cover plate dies to make tags.  Laurie shows us an easy way to add just about any cover plate to a tag in her marvelous technique video here. I also sought out the latest Colour Q challenge for my color scheme.

I just adore those colors together and couldn't wait to start creating!  I only have one cover plate die.  I absolutely love my butterfly cover plate so I was excited to have an excuse to use it!

I started by using my Clarity Stencil brushes to blend the ink colors onto the cover plate die cut.  I loved how the blue and red blended together accidentally to make purple!  Blending with these brushes is soo effortless... no streaks whatsoever is heavenly!  I decided I wanted to add some pizazz to the background of my tag so I used a technique Jennifer McGuire shared in her video here.  I used a paintbrush to flick splatters of water onto my tag and then immediately sprinkled on some glittery silver embossing powder which is then heat embossed.  It's amazing how the embossing powder clings so well to the water!  It is really quite sparkling in real life!  I dug out some fun fibers from my stash to add to the top of the tag.  I didn't feel like finding some stamps to fit in that small space not covered by the butterflies so I hand wrote "a gift for you" with a black fine tipped marker.

Supplies listed and linked below:

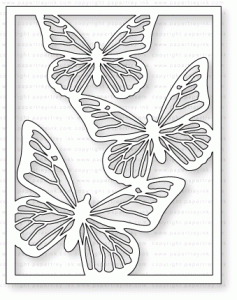
PTI Butterfly Cover Plate Die

Momento Rose Bud Dye Ink

PTI Scarlet Jewel Dye Ink

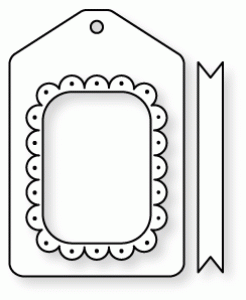
PTI Tag Sale #10 Die

Momento Pistachio Dye Ink

Momento Summer Sky Dye Ink
Thanks for stopping by! Please stop back again! Enjoy your weekend!

Share:

Thursday, August 25, 2016

Papertrey ink August 2016 Blog Hop Challenge

It's time again for the Papertrey ink monthly blog hop.  We are supposed to make a card using the inspiration from the photo.  Normally not long after looking at the photo I can picture in my mind what sort of card I wanted to do.  This time nada, zip...nothing!  So I sought out more inspiration.
I found the wonderful card above on Betsy's blog.  You can check out more details on her blog here.
I loved how the flowers tucked into the bold sentiment.  I also loved the artsy background.

I pulled the melon berry and berry sorbet colors from the photo and made my watercolored background.  I also took some fine linen ink and watered down white acrylic paint to produce splatters over my watercolored background.  The flowers were stamped in the same colors. I added a hint of navy as the centers of the flowers too.   The text block birthday die was cut with fun foam.  I accidentally used my white Wink of Stella glitter marker (instead of the clear) on the flowers.  However, I wasn't about to start over.  Luckily...The white maker gave the flowers a white washed look which actually worked well with my watercolored background.  A few iridescent sequins finishes the card.

Supplies listed and linked below:

PTI Text Block: Birthday Die

PTI Bitty Bouquets Stamps

PTI Bitty Bouquets Dies

PTI Berry Sorbet Dye Ink

PTI Melon Berry Dye Ink

PTI Fine Linen

Momento Nautical Blue Dye Ink

Zig Wink of Stella White Marker

White Fun Foam
Thanks for stopping by! Please come back again!
Share:

Sunday, August 21, 2016

Papertrey Ink Create Along With Us August 2016

This week at Papertrey Ink the challenge is to be inspired by a project the fabulous design team created during the release this week.  I loved Betsy Veldman's card below:
You can get the details on how she created this beautiful card on her blog by clicking HERE.   I was also inspired by the latest color challenge at the Colour Q.
I just loved the combo of red and green colors paired with the dark grey background.  So I pulled out my Color Pop Florals kit and got to work!

I was soo excited to use this color combo but it ended up looking like a Christmas card!  It never fails..anytime I use red and green together I end up with a Christmas card!  Oh well it is still pretty and I am sending this to a friend in need of "healing wishes."  I heat embossed the center of the flowers and leaves with white emobssing powder.  The wishes die cut word came from PTI's Big Basics:  Birthday.  I simply cut off the "birthday" word to just use the wishes die cut word. The "healing" comes from the PTI Colorful Words stamp set.

 I love this card design!  It works great with all the Color Pop kits or anytime you create your own stamped background paper.  This is the first time I used the little scallop feature of the Fishtail Banners dies  from Sunny Studio and I really love that little detail.  I did use the Clarity Stencil brushes with the stencils from the kit.  It did take a little while to build up this intense red color but I love the smooth finish.   They almost looked stamped instead of stenciled!

Supplies listed and linked below:

Make It Market Mini Kit: Color Pop Florals

PTI Colorful Words Stamp Set

PTI Big Basics: Birthday Die

Clarity Stencil Brushes

Versamark Emboss Ink Pad

Ranger White Embossing Powder
Thanks for stopping by! Please come back again!
Share:

Sunday, August 07, 2016

Papertrey Ink's SAF Remix 2016

Instead of having a Make It Monday technique video at Papertrey Ink this week they are having a Stamp-a-Faire Remix.  The challenge involves taking a card you had made during SAF that you don't exactly like that much and redoing it.  Nicole also gave us permission to make a card using one of the SAF technique videos we didn't get to participate in during the event.  I had to make some birthday cards so I decided to use Lizzie's wonderful video "Mastering Drips and Splatters" for my card.  I figured a splatter background would look similar to confetti for my birthday cards.

I absolutely loved Kay Miller's card using PTI's Paperclipping Birthday set.  You can see her gorgeous card here.  I decided to mimic my card after hers.  In fact I decided to make three cards using color schemes from various PTI's newsletters.


One thing I love about PTI is the versatility of the products.  The Paperclippings collection includes an overlay one piece type die cut with all the details connected together.  But there is also a stamp set in which the die cut pieces are separate.  I couldn't justify spending money for the whole collection.  But..I was still able to mimic Kay's card with the detail stamps and dies.  I also used some silver stars RAKed to me from a sweet PTI forum member.  I didn't feel like watercoloring as Kay did so I simply used my Clarity Stencil brushes to make a soft oval of color to act as a grounding piece for my stamped die cuts.  I think the splatters make a festive backdrop for this birthday card.  It almost looks like confetti.  The only thing I didn't like was how the colors became muted when splattered.  I made the last card to be a masculine card but the pure poppy ink I used to splatter turned pink.    Oh I almost forgot I added some clear wink of stella to the first two card for some sparkle.

Supplies Listed and linked below:

PTI Paper Clippings: Birthday Stamps

Clarity Stencil Brushes

Wink of Stella Clear Glitter Brush Marker

Thanks for stopping by! Please come back again!
Share: