Saturday, June 25, 2016

Papertrey Ink June Blog Hop Challenge

This month's inspiration for the Papertrey Ink blog hop comes from artist Yallena James.  Take a gander at this gorgeous sea scape!


I loved how many of the images are translucent.  I definitely wanted to mimic that in some way.  I was a little unsure of the colors though.  Those bold burgundy sea plants paired with the softer colors of the other plants.  Anyway, I gave it a go and was pretty pleased with the end result!

There were a lot of round shapes in the photo so I dug out my scallop card base die from the discontinued QK special delivery set to mimic the round features.  When I looked at the dark burgundy plants in the photo I immediately thought of the PTI Friendship Jar Flowers stamp set.  I had gotten it during release time because I soo loved all the cards the DT did with it.  I was anxious to use it but I have to say it's more difficult to use then I thought it would be.  I am a little OCD because I like flowers to have stems sticking directly under them.  This stamp set it designed so the greenery is one big stamp and only two stems are poking out to rest the flowers on.    The flowers are supposed to float around in the greenery.  I had  a big problem with this!  It took me several practice bouquets to find the arrangement I liked.  That being said I look forward to using this stamp set again because I do love the look of it!  I also want to experiment with adding flowers from other stamp set to the greenery.

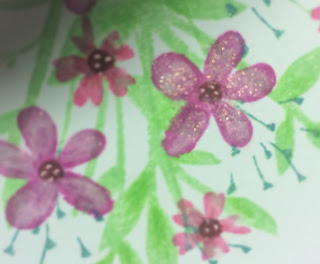
 Anyway, I did my flowers in Momento lilac posie and rose bud.  I wanted to pull in some of the teal color in the photo but was afraid it would over power my flowers.  So I stamped the frilly stem included in the stamp set with PTI vintage jadeit and then stamped over the very top with the Momento Teal Zeal.  I also wanted to add the dark burgundy color from the photo so I did all the flower centers and the sentiment in PTI scarlet jewel ink.  Small white dots using a gel pen added to the center of the flowers finishes off the card.

Oh I forgot I added some shading to everything with Prismacolor pencils. I swiped over each flower with a white wink of stella marker.  This not only added shimmer to the flowers but also made them more translucent and aided in the shading.  I tried to take a close up photo to show you what I am talking about (click on the photo to make it larger):


Supplies are listed and linked below:

PTI Frienship Jar Flowers

PTI Vintage Jadeite Dye Ink

PTI Scarlet Jewel Dye Ink

Momento Lilac Posies Dye Ink

Momento Teal Zeal Dye Ink

Momento Rose Bud Dye Ink

White Gel Pen

Prismacolor Pencils

Zig Wink of Stella White Marker

Thanks for stopping by! Please come back again!

Share:

Friday, June 24, 2016

Papertrey Ink's Make It Monday #253 and Colour Q #347

Hello!  Are you enjoying your Summer?  It seems to be going by soo fast for me! I haven't been crafting much since I have been on a mission to reorganize my craft room.  I finally got all my stamps, dies, and inks organized.  I will share some photos with you once I get the whole room done.  I went up to my craft room today to do some more organizing and decided to get creative instead.

I made a card using the latest MIM challenge over at Papertrey ink.  It features Reverse Stenciling.  Betsy made a wonderful video telling us just how she made her beautiful card from start to finish.  Check it out HERE.   I love using stencils so I am happy to have an excuse to sit down and play with them.  I have to say though PTI's stencils are the best...very sturdy plastic and easy to clean.

I sought out the latest Colour Q challenge for inspiration also

I have to say this color scheme is totally outside of my comfort zone.  I was shockingly pleased with my card though.

I loved Betsy Veldman's card below so I decided to mimic hers.  She more info about her card on her blog


I love the arrangement of florals surrounding the top of a die cut circle.  I definitely want to try this card again with multiple colors like Betsy did.  Dawn designed this stamp set so beautiful flowers seem to magically appear before your eyes.  The solid image get stamped first then the whimsical outline gets stamped over that.  I love how you don't need to line things up perfectly for it to look good!

In the video Betsy used a brayer to do her reverse stenciling.  I did not have a brayer so I did a slightly different technique but the end result is the same.  I laid down my stencil over the white cardstock and then applied a thin layer of rubber cement over the stencil.  I waited for it to dry then brushed on a very soft layer of ink using Clarity stencil brushes.  The rubber cement resists the ink. When finished applying the ink simply rub off the rubber cement leaving the white areas exposed.    Let me tell ya these brushes are wonderful...it's super easy to apply a very soft light layer of ink without any streaks or unblended areas!

I didn't have the circle Betsy used so I used a scallop frame from the very old Quickutz Special Delivery Kit...which is no longer available.  I stamped and die cut all the flowers from the Floral Sketches set.  I added a few wisps of vellum cut with Wplus9 Under the Misteltoe dies.

Oh and see the lighter peach flowers.  I actually used the PTI Melon Berry Ink I used the for the biggest flower.  Using my MISTI I stamped the flowers with the melon berry ink twice then I stamped directly over that using a white pigment ink.  I did two layers of white using the heat gun to dry each layer.  The heat is very important because the white ink just sits on the surface of the paper and takes forever to dry.  I then stamped the detail layer with PTI Smokey Shadow ink heat drying it again...otherwise the ink would just smear.  I love the ability to get lighter colors of ink using my existing ink collection.  Gotta love a money saving technique like that! I can't wait to experiment with more color using the white pigment ink layers on top!
 

Supplies listed and linked below:


PTI Floral Sketches Stamp Set

PTI Modern Background Stencils

Clarity Stencil Brushes


WPlus9 Under the Mistletoe Dies

PTI Melon Berry Dye Ink

PTI Smokey Shadow Dye Ink

Momento Rich Cocoa Dye Ink

Momento London Fog Dye Ink
Thanks for stopping by! Please come back again!
Share:

Sunday, June 12, 2016

Papertrey Ink Make It Monday #252: Shadowing with Copic Markers

In case you missed it Danielle has a wonderful video showing how to use Copic markers to add shadow to your die cuts.  You can see the video HERE.

I used Papertrey Ink's Inspired:  Faith stamps with die cut and PTI's Paperclipping:  Thinking of You stamp set and dies.  A few small clear sequins finishes the card.
Thanks for looking!  Please come by again!


Share:

Wednesday, June 01, 2016

Tutorial: Stamping on Die Cuts and Layering Stamps using the MISTI

Hello!
A while ago I posted a card I did for Papertrey Ink's blog hop using The Sweet Life Stamp Set.  It was similar to the card below.  You can see the original by clicking HERE.

I promised a tutorial on how I did the stamp layering on the die cuts using the MISTI.  So here it goes... Please note this is not my original idea!  Cindy O mentioned this technique on the Papertrey Ink forum and I thought it was simply BRILLIANT so I just had to try it.  Thanks soo much Cindy!   Also Understanding Blue posted a video tutorial using acetate for layering in this video.  I just thought I would give you a picture tutorial of how I combine both of these methods to get beautifully stamped rose die cuts.

I will provide you with a collage of key instructions then elaborate below the photo.  I figured this will give you a quick overview in case you don't want all the chatter! :) Oh and you will notice many different colors used in this tutorial.  I stamped several roses and took the best photos out of the numerous ones I took for the tutorial.  You may click on any of the photo collages to enlarge them. 

 I realize with the invention of hollow dies this part of the tutorial might not be necessary but the Sweet Life stamp set contains solid dies and I have many more solid dies then hollow in my stash.

1.  I look at the size of my die and cut a piece of cardboard larger than the die.  This gives me a place to use the magnets in the MISTI to hold on to the  negative space of the die cut.  I use cereal boxes and other boxes I normally throw in the burn trash.  This cardboard is just the perfect thickness and you don't have to waste your good cardstock plus it give me a contrasting color.  You can of course just save the negative space of the die cut you intend to stamp on to use as your template.  (Note:  Since there are three layers to this flower I cut 3 identical cardboard pieces..one for each layer...well actually 4 but the 4th is optional..explained later!)

2.  Take a piece of copy paper and stamp your first layer onto it.  I use scrap paper that has writing on the one side.  DO NOT use cardstock it will be too thick.  Be sure to use a darker color of ink.  The darker ink will help you line up the image in step 5. 

3. Now take the stamped image and center it in the negative space of the die cut making sure there is equal spaces all around.  Stick a piece of micropore or washi tape to keep it in place on the front.

4.  Turn it to the back and tape the copy paper in place.  Remove front tape.  This template will be used over and over again.


5.  Now take the template you made in steps 1-4 and position it into the left hand corner of the MISTI.  Be sure it is snug up against that L corner shape of the MISTI.  Place your stamp on top of the template lining up the stamped image with the stamp.    (Note:  The wrong side of the stamp should be facing up.)  Close the lid of your MISTI to pick up the stamp.

6.   Die cut your die from the cardstock you would like to stamp on.  Keeping the template snug up against the L shape of the MISTI position die cut into negative space on the template. 

7.  Stamp your image (1st layer) onto the die cut.  You should have a perfectly stamped die cut with an even border all around the edge!   The next time you use this stamp you can simply start at step 5 since this template is reusable.

You can also use the steps above to add a second layer stamp to the die cut.

Repeat steps 1-7 for the second layer.  Since the second layer is centered on your template it should stamp perfectly over the 1st layer on your die cut.  After stamping, keep this die cut in the template as you will need it for the 3rd layer of stamping. 


You can try to do the exact same steps as aove for the third layer of stamping but honeslty I didn't have much luck doing that.  There is too much room between the negative space and edges of the stamp to center well.  It took me several attempts but this is the method I have found to work best for the 3rd layer.  If you know of an easier way.  Please..please...please share it with me!

Below are the instructions for the third layer of stamping and this corresponds to the photo above:

1. First take a piece of acetate large enough to cover the template made in the second layer of stamping.  Tear off a piece of removable  tape and attach it to the side of the acetate making a hinge.  (Note:  I used the Stamp-a-ma-jig sheet and wide painter's tape).  Position the third layer stamp towards the middle of the MISTI lid.  Stamp in black on your acetate.  Stamp as many times as you need to make sure you get a good dark image. Now take the template you made in step two with the die cut still tucked in the negative space.  Slide it under your stamped acetate aligning it up so the roses look perfect.   DO NOT move the actual stamp.   Place magnets or tape on top to hold the template in place.  Use the hinge to pivot the acetate out of the way and apply magnets to the bottom of your template.  I prefer the side hinge versus the top hinge but do whatever you like the best..eithr will work.  The hinge is explained in Understand Blue's wonderful video Here.   (Note:  The hinge isn't absolutely necessary here but it does help to keep the acetate in place wonderfully and prevents you from moving the template accidentally when you remove the acetate)

2.  Stamp the 3rd layer on top of the 2nd layer.  Viola!  A perfectly aligned beautiful rose!  Now you could stop here and just use the acetate every time you use the third layer.  However, I wanted a template I could use time and time again like in the other steps.

3.  I kept the 2nd layer template in place after stamping my rose.   I then die cut a copy paper die and placed it into the template.  DO NOT use cardstock it will be too thick.  Stamped the 3rd layer on this.  Remove the copy paper die cut.  Now take a blank negative space die cut and position the stamped copy paper die cut into this negative space.  Add tape to the front to hold it in place. 


4.  Tape the die cut in place on the back of the negative space die cut.  Now remove the front tape.  You can use this template for the third layer by positioning the stamp wrong side up and aligning it over the stamped image just as in step 5 above.  (Note:  I glued together two cardboard pieces for this layer so I have a bigger "lip" on the negative space to hold my die cut in.  This isn't necessary but I found it is helpful in keeping the cardstock die cut from slipping out of the negative space)

Goodness I sure do hope this doesn't all sound Greek to you!  This really is much easier than I am making it sound!  Please just give it a try and if you have any trouble just contact me at shellysart at verizon dot com.  I'll try my best to explain things better.

Below are the other cards I created:

Here are the colors I used for my roses and leaves.  I will not be linking these products because I don't want to make this post even longer!

Red Roses:
All PTI Berry Sorbet, Pure Poppy, Winter Wisteria (didn't like this color) stamped over with Scarlet Jewel
Leaves: Memento Pistachio

Purple Roses:
PTI Lulu lavender, PTIWinter Wisteria, Momento Elderberry
Leaves: Momento Pistachio

Yellow Roses:
PTI Lemon Tart, Meomento Dandelion, Momento Cantaloupe
Leaves: PTI Green Parakeet

Sentiment is from PTI's Think Big Favorites #2 

I hope you enjoyed the tutorial!  Thanks for stopping by!  Please come back again!
Share: