Sunday, March 29, 2015

Case This Sketch #116 and Colour Q #284

Hello everyone!  Are you enjoying the Spring weather?!  I am loving hearing the birds and seeing the bulbs push their vibrant green leaves out of the ground BUT...I just wish the temps would get a little warmer.   If this keeps up the Easter bunny will have to wear a coat!

 I apologize but I had so much furn with the PTI challenge involving stamping your own patterned paper (discussed in my last post) that I just had to try it again.   I decided to use :

http://casethissketch.blogspot.com/2015/03/case-this-sketch-116.html
and

http://colourq.blogspot.com/2015/03/colourq-challenge-284.html


That way I wouldn't have to rack my brain figuring out a style and color for my card set.  I can get to the fun part...decorating!


I have to apologize for the poor photos.  I have a light box but am trying to figure out the best position for the lights in my room.


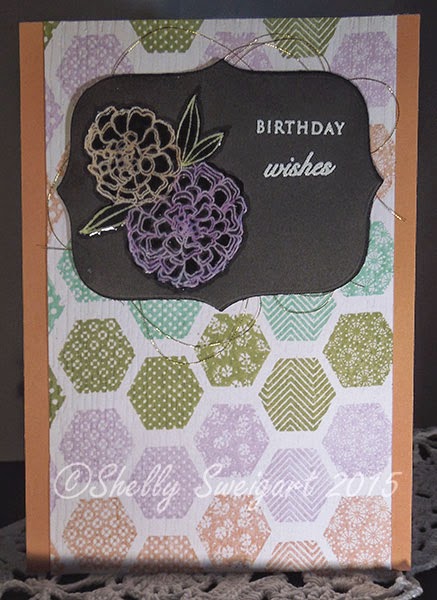
I used PTI's Make It Monday #45: Coloring Embossed Images with Copics. Yes it is an older video but one of my favorite techniques! I haven't felt like coloring detailed images with shading and such as you are supposed to with Copics so this technique makes my Copics feel less neglected and me more creative! 

I used PTI's Year of Flowers collection and Mat Stack Two to complete my card set.  I added a layer of glossy accents to the flowers to really make them pop!  I also tried a new embellishment.  Some messy gold thread behind the focal image.  I love the texture it adds without adding a lot of bulk!  I think I need to find some in silver too!

Time to run!  Thanks for stopping by and be sure to visit again!  Those of you in my part of the world...stay warm!

Share:

Monday, March 23, 2015

PTI Make It Monday: #206 Stamping and Mixing Patterns

Have you checked out the latest MIM video from Danielle?  It's wonderful!   It involves stamping various patterned papers and using a mix of patterns in one project.  You can see it here.


I needed a sympathy card ASAP so this challenge was the perfect opportunity for me to make a quick card.  I used my go to sympathy sentiment.  I found it on Pinterest and don't know who to give credit to but you can find it here.   I sized the sentiment at 2.5" x 2".    I had soo much fun making my own patterned papers!  I used Recollections card stock which didn't stamp smoothly at all.  Thanks to the Misti though I was able to stamp triple to get a semi-decent image.  In this instance the splotchiness added to the rustic colors. 

I chose a color palette from the PTI Feb 2015 release.  I actually stamped two sets of these so I have plenty to use for future cards. 
:

Here are the stamps I used:

Papertrey Ink:
Happy Hexagons
Turning a New Leaf
Honey Bees
Bells and Boughs
Everyday Classics (anniversary set)

Martha Stewart:
Scallop border

I used the latest Fusion Card Challenge Sketch:
I liked the colors in the fusion photo but didn't think they would work well for a sympathy card.

The hexagon background paper actually stamped fairly quick with the aide of a tip from Betsy Veldman.  She showed us how to line up the hexagon stamps to stamp rows of one color easily building the background.  You can see it here


It's hard to see in the photo (click to make it larger).  I stamped the row of hexagons on my stamp-a-ma-jig image sheet.  I then added some micropore tape to make a hinge to move the image sheet out of the way for stamping on my card.  Instead of moving my stamps I moved my card up and down using the image sheet as a guide.  Oh and I put down some post it tape on the left of my Misti to give me a guide to line up my card against since I would be stamping over the edge of the card.
 

Thanks for stopping by!  Please come back again!

Share:

Sunday, March 22, 2015

Make It Monday #205 Confetti Cluster Stamping

This weeks Make it Monday features using those tiny stamps that often get neglected to make a cluster of images in any shape you choose.  Check out the awesome video tutorial by Lizzie Jones here.   I just love how this techniques puts those little stamps in the limelight for once.

I absolutely loved Michelle's card featuring a big round cluster stamped balloon.  Check it out here.  But I needed a masculine birthday card and I didn't want to copy her card exactly so thus the card/card set above was born.

I used the following Papertrey Ink stamps:
Spots and Dots (vault)
Paper Tray (vault)-small patterned dots and straight line shaped into balloon string
Mehndi Medallion Mini Stamp Set
Honey Bees
Think Big Favorites #12
Balloon bow ??

I also used Quick kutz dies and I designed the "happy" cutting file.  I cut it in two layers and glued them together for some dimension.    It was soo hard not to add some bling to these cards!  I knew the minute I did that though they wouldn't be masculine cards anymore. 

Before I go I'd like to mention that I finally got some matte medium that Jennifer McGuire has been raving about and I put it in one of the Fineline applicator bottles from Amazon.  I really loved how the glue gave me a little time to slide and position my "happy" letters on top of each other perfectly.  The fine tip made a great thin line too.  The glue gives a very strong hold. A little goes a long way so it's worth the money spent.  I definitely prefer this over the glue pen or Xyron.  If you'd like to see more info about these products...Jennifer just did a great video.  Check it out here

I discovered one more thing (while doing the MIM technique) that is so great about the Misti stamping tool and I must share it with you.

In this MIM video they suggest drawing a pencil line to guide you where you wanted to stamp your tiny stamps.  I used the image sheet from my stamp-a-ma-jig and traced my oval guide on there.  I know it's a little hard to see in the photo (click on it to view it larger).  I positioned the sheet in the left hand L corner the same way I did with my cards.  That way I could position the sheet here each time before positioning my stamp.  I made  this whole set of cards in minutes with no pencil lines to erase.  I also stamped my tail and bow onto the image sheet just to make sure I like the position of these items before committing them to the card. A quick wipe with a baby wipe cleaned all this off the image sheet.   Thanks to the Misti.. I definitely see more card sets in my future!  I have sold a few here and there too so the more I make..the more likely I'll have some to sell or at the very least add to my stash!  My goal this summer to is make some to send to the soldiers for operation write home. 

Thanks for stopping by!  Please come back again!


Share:

Sunday, March 15, 2015

Color Throwdown #333 Anniversary Card

Howdy! Goodness it's been way to long since I've posted! So here I am to prove I haven't fallen off of the face of the earth! I have to use electric heat to heat up my craft room which is on the third floor of our house. It can get quite frigid up there and quite costly to heat! So now that it is finally getting warmer out I will be able to craft more which means you'll see me post more!

 I decided to participate in the latest Color Throwdown challenge #333.

 Aren't the colors just gorgeous!  Perfect for the anniversary card I needed to make.  Quite some time ago I had purchased Papertrey Ink's Guidelines Two stamp set.  I figured it would be perfect for stamping my own patterned paper to use for color challenges.  However, I found it very difficult to stamp the grid and get it lined up correctly.  I also didn't care for the grid being part of the pattern.  Misti to the rescue!  What is Misti you may ask?!  It is a stamping tool that becomes a replacement for acrylic blocks.  It helps you line up stamped images so precisely that you can stamp in the same spot twice without any shadow.  I can't really describe how amazing this tool is in words...so...here is what it looks like:


(Photo credit goes to Lisa Babitz
https://iplayedwithpapertoday.wordpress.com/2014/11/18/misti/)

And you can see videos of how it works on the inventor's blog  here.   I have only had the Misti for about a week but I truly believe Iliana is  genius!  I have always struggled getting stamps on straight especially sentiments.  I also don't always get a good impression with my first try but with the Misti it's easy to ink up and restamp in the exact same spot.  I could go on and on about this tool.  It is amazing!  It is expensive but so worth it!  I highly recommend purchasing the grid paper and the magnets if you order this though. 

Here is my card:

The background was all stamped using the Misti and I actually did 4 identical stamped panels so you will be seeing this stamped paper again in the future.  (Another benefit of the Misti..makes it super easy to mass produce duplicate projects).  I stamped the grid lines on transparency sheet several time and just taped them together until I got a grid large enough.  I positioned the transparency in the "L" of the Misti and hinged it with a piece of tape.  Making it easy to move out of the way for stamping.  Hard to explain.  If you are interested I'll take a few photos to show you how I did this just leave a comment to let me know. 

Thanks for stopping by!  Enjoy your week!  Please come by again!


Share: