Howdy!
I'm sooo excited I just have to share! My last post shows the card I made to participate in Papertrey Ink blog hop. A random number generator picked 3 lucky winners from the 131 participants. Guess what I was one of those lucky winners! I get to pick out one free PTI stamp set of my choice! Woo Hoo!
Okay now back to the next topic in my mission organization series: Ink Pads. Stamping has been one of those hobbies that comes and goes for me. About 6 years ago (I think) I discovered the joy of manual die cuts and paper pieicing and thus I started to neglect my stamps. So I ended up selling all of them. Then Copic markers came out and once again my passion for stamping was ignited. I have started collecting again but I really don't have a lot of stamp pads. Nevertheless I know some of you have all sorts of colors and types so I will try my best to help you organize your stash of ink!
 Once again you must view my metal shelving unit since that is where my ink pad are stored. Note: Click on photos view them larger.

Sorry I should have moved those black "things" so you can better see my ink storage. I'll go over what those black things are at a later date. It took me several trips but I finally came across this old wooden cassette tape holder at the Good Will store. I just knew it would be perfect to store my large ink pads in! See it is quite empty...plenty of room for more! I am thinking of trying PTI's new ink pads. I have mostly distress inks. I made labels with a label maker and smeared some ink across the label so I can easily see which color I need. I considered storing them upside down but noticed Tim Holtz doesn't store them that way..surely he knows the best way to store his ink! I keep the corresponding foam pad right next to the ink on the same shelf. The other ink pads on there are a white and black pigment ink pad, memento black and embossing pad.
 I thought long and hard about which type of ink pads to purchase since I wanted something that would work well with my rubber, clear stamps and also with my Copics. So that is why I decided to go with the Memento Dew Drops. This way I could get lots of colors for a very cheap price. I might get the full sized pads of the colors I use most often. For the others I will get reinkers. I love the cat's eye fluid chalk for inking edges but they are too soft for stamping most of the time. These are stored in another little treasure I found at the Good Will for a couple bucks. I'm not sure what it was used for originally but it's great for all kinds of crafting items. It kinda reminds me of a printer's tray. This sits behind my desk and all I have to do is swivel my chair to grab these items. Patter Cross had a brilliant idea to take a small stamped image and attach it to the back of the stamp pad so you know what color each pad is at first glance. So..I copied off of her and it is working quite well for me!

Isn't that wooden ink pad holder just wonderful! Well if you are at all handy...Amanda has a step by step tutorial telling you how to make your own. Check it out here.
 Okay so you say you don't have any power tools. No problem! Karen made the fabulous ink pad holder above using foam board. Check out her step by step tut here.

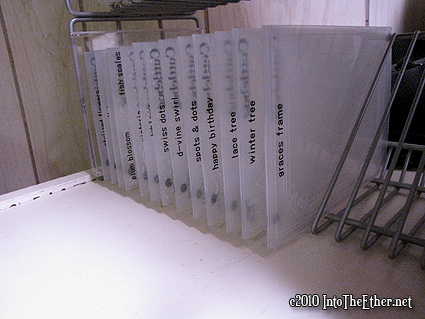
If you are looking for a portable way to store your ink pads..check out Heather's storage idea. She took a plastic container and made "shelves" within the container to store her inks on. Check out the deets here.

If you have wall or door space the above idea is for you. Sandi used a hanging jewelry organizer for her inks. Check out more info here.
 Above is another option from Rosita if you have spare wall space. She used a CD/DVD storage rack to store her distress inks. For more info click here.
 Christie Hund had a wonderful idea of storing small ink pads in cigar boxes. She decorated them up to match her craft room! Brilliant! For a video tut on how to do your own click here.
 This isn't exactly DIY but I thought it was too unique not to share. Unhinged Creative sells these. They come with lids for traveling. They also have Cat's Eye fluid chalk and Stickles storage containers too. Click here to see their store.
Many of us have numerous foam pads for each color of distress ink but don't necessarily have lots of handles to store them on. So therefore the dilemma comes with how to store each foam pad so they don't get mixed up. You can put a piece of velcro on the back of the ink pad but then the pads don't sit nice.
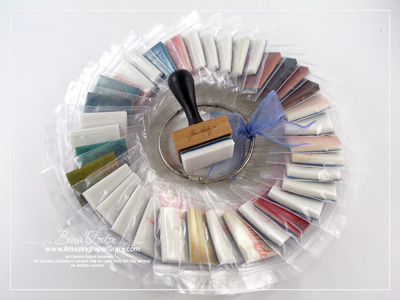 I love Becca's solution..she simply placed each pad in it's own bag and hung them on a ring. Check out more info here.
 Britta Swiderski had a great idea to print out a poster to store the foams on using velcro. She even included the chart for us to download. Click here for a video depicting her distress ink storage and also more info on the chart.
Okay so that's ink pad storage in a nutshell. I hope this helped you figure out how to organize your ink pad stash so you can make the most out of your stamps. Please check back on Monday for the next organizational post.
Before I go I have to share a fun little thing Adoree said to me today. See I told her I needed to make some Valentine cards. She told me that she couldn't make any. I asked her why and she told me she didn't have any Valentine embellishments! Okay so she is only 4 so I'm wondering if she knows what embellishments are. I didn't need to ask because she proceeded to tell me that she calls the things she puts on her cards embellishments. Ha...too funny and soo smart! Yep..she'll be scrapbooking her own pages before too long!
Thanks for stopping by! Don't be a stranger and come around again okay! Have a fab week! Hopefully, I'll have some Valentine's to share with you soon!

I'm sooo excited I just have to share! My last post shows the card I made to participate in Papertrey Ink blog hop. A random number generator picked 3 lucky winners from the 131 participants. Guess what I was one of those lucky winners! I get to pick out one free PTI stamp set of my choice! Woo Hoo!
Okay now back to the next topic in my mission organization series: Ink Pads. Stamping has been one of those hobbies that comes and goes for me. About 6 years ago (I think) I discovered the joy of manual die cuts and paper pieicing and thus I started to neglect my stamps. So I ended up selling all of them. Then Copic markers came out and once again my passion for stamping was ignited. I have started collecting again but I really don't have a lot of stamp pads. Nevertheless I know some of you have all sorts of colors and types so I will try my best to help you organize your stash of ink!


Sorry I should have moved those black "things" so you can better see my ink storage. I'll go over what those black things are at a later date. It took me several trips but I finally came across this old wooden cassette tape holder at the Good Will store. I just knew it would be perfect to store my large ink pads in! See it is quite empty...plenty of room for more! I am thinking of trying PTI's new ink pads. I have mostly distress inks. I made labels with a label maker and smeared some ink across the label so I can easily see which color I need. I considered storing them upside down but noticed Tim Holtz doesn't store them that way..surely he knows the best way to store his ink! I keep the corresponding foam pad right next to the ink on the same shelf. The other ink pads on there are a white and black pigment ink pad, memento black and embossing pad.

Items needed for my Ink Pad storage system:
Wooden cassette tape holder with sectioned slots for large ink pads
Wooden tray with sectioned slots for small ink pads (printer's tray would work great)
I have to say I was greatly disappointed in my search to find frugal DIY ink pad storage options. I did find a handful of ideas which I will share with you in a few seconds. There are however lots of wonderful premade holders if you have the money. Simply google ink pad storage and you'll find several lovely units and some even store markers too.
Isn't that wooden ink pad holder just wonderful! Well if you are at all handy...Amanda has a step by step tutorial telling you how to make your own. Check it out here.
If you are looking for a portable way to store your ink pads..check out Heather's storage idea. She took a plastic container and made "shelves" within the container to store her inks on. Check out the deets here.
If you have wall or door space the above idea is for you. Sandi used a hanging jewelry organizer for her inks. Check out more info here.


Okay so that's ink pad storage in a nutshell. I hope this helped you figure out how to organize your ink pad stash so you can make the most out of your stamps. Please check back on Monday for the next organizational post.
Before I go I have to share a fun little thing Adoree said to me today. See I told her I needed to make some Valentine cards. She told me that she couldn't make any. I asked her why and she told me she didn't have any Valentine embellishments! Okay so she is only 4 so I'm wondering if she knows what embellishments are. I didn't need to ask because she proceeded to tell me that she calls the things she puts on her cards embellishments. Ha...too funny and soo smart! Yep..she'll be scrapbooking her own pages before too long!
Thanks for stopping by! Don't be a stranger and come around again okay! Have a fab week! Hopefully, I'll have some Valentine's to share with you soon!