
Howdy,
It's mid September and I think we are finally falling into a routine. Yeah! Both kids know that we need to catch the bus and with a few reminders they get ready and we haven't missed it yet. Keeping our fingers crossed we don't miss it in the future. I am a night owl and often stay up late to get my work done for the store while the kids are sleeping. My body has faithfully woke me up every morning no matter how late I have gone to bed. Isn't it amazing my body knows to do this! I am always fascinated by the workings of the human body!
For the Frugal Friday special today I am offering my dotted fun sentiments file for only $1.00. Hurry though this price will expire at midnight EST 9/17/2010. This font goes for just about any occasion so you'll get your money's worth by purchasing it. Please click on the words above the preview to purchase but don't go yet as I have some awesome projects by my CDT to share. I also will give you a peek into my sketch binder too and a freebie.
Dotted Fun Sentiments

CDT member Kelly Stone has made some awesome cards using these sentiments. Please check them out below.
 Kelly also used my bracket fun file. Click on the words above the preview to purchase them.
Bracket Fun

 Click words above the preview if you'd like to purchase my Year Round Floral Shaped Card.
Year Round Floral Shaped Card

 Click on the words above the previews to purchase the files Kelly used in this great card.
Playful Flowers, Leaves, and Branches

70's Beaded Borders

 Whew! Kelly sure was busy making some fabulous cards wasn't she? Kelly wasn't the only one getting creative. Aussie Caz joined in too with this great layout showcasing my hinged tabs and featuring her son Nicholas. Caz is a pro at designing sketches and she is giving away the sketch and KNK cutter file and layered PSD (digital scrappers) for this layout on her blog today. Scroll down to see the preview. Thanks Caz! Click here to get to her blog. But don't leave yet I have a freebie for you too! Oh and Caz is in Aussie Land so check back if her freebie isn't there yet...she may still be snoozing!


Don't you just you love the photo of Nicholas from behind!?! I absolutely love that perspective! These hinged tabs are on sale the whole month of September. They are sooo versatile as you can use them on cards, journals, and calendars. It would be great to use them to hide hidden journaling or extra photos on a layout. They actually fold over your items with a separate piece for the label that slips inside. Click the words above the preview to purchase the tabs before they go off of sale.
Hinged Tabs

I'd like to thank all of you who left wonderful comments about my scrappin' desk. I thought it was a pretty cool space but it's great when others think so too. I am not an organizational expert by any means but I am happy to share with you what works for me in hopes it will give you some inspiration in finding a system that works for you. To continue with the organizational theme I will share with you the way I store my sketches below.
I fell in love with using sketches when designing my layouts when I first was introduced to them about 7 years ago I think. I have been collecting them every since. I soon needed a way to store them so I could find what I needed., I discovered it was easiest for me to sort my sketch by the number of photos so I developed a system based on that. I will share my system with you as crude as it may be in hopes you might get some inspiration from it.
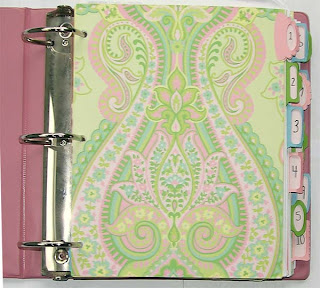 This is a photo of my sketch binder open. I don't need to show you the front cover because I haven't decorated or marked it in any way. I figured it's the only pink binder I have so there is no need to label it yet! I took inexpensive sheets of white 8.5 x 11 pieces and covered them with scrapbooking patterned paper. Then attached my hinged tabs on the sides in coordinating colors. I used all the different shapes since I liked the variety. I labeled each tab with the numbers 1-13+. This represents how many photos the sketch is indented for. I hand drew them in but you could use your pen tool before cutting. Okay now to show you what is behind each divider.
 Behind each tabbed divider is a colored sheet of copy paper. I print out the PDF of Becky Fleck's Page Maps. (I just love this site they have the most awesome sketches and they are all FREE...thanks Becky for sharing your talent!) I cut the PDF apart sorting the layouts by the number of photos. If you click on the photo you will see this page will go behind the 4 tab since each of these sketches are meant to work with 4 photos layouts. I also like to write in the date the sketch was posted so I can give credit and refer people to the website so they can print it themselves. I do occasionally put sketches by other authors on these pages but I make sure to note where I got the sketch from.
 My favorite magazines are Creating Keepsakes and Scrapbooks ETC because they provide an insert with sketches. I simply rip out the page in the magazine that contains the layout I like then I snip the sketch and use plain paper paste to attach it to the magazine page. I three hole punch these pages and they go into my binder after the appropriate tab. This page is filed under my #5 tab. Look they even tell you what size to cut some of the embellishments and papers in this great sketch!
 Okay so sometimes the layouts you like aren't going to fill the whole magazine page. I simply cut out the layout and the sketch in the same manner but I glue it on the back of the magazine page still filed under the appropriate tab. See on the back of some of the whole magazine pages you have filed will be ADs or layouts you don't like so I just cover these up. I am careful to still make a note of the magazine issue these sketches came out of.
This isn't an exact science as I said it is crude. But it works for me! All I have to do is see how many photos I want to scrap and turn to that tab. If you are bothered by the jagged torn edges when you rip the pages out you could use a paper trimmer to cut the edges. You also don't have to use the back of magazines pages if you find it distracting you can just use copy paper for these sketches as well. Sometimes you will run into a magazine page that has layouts on both sides you like...I am fortunate in that my printer also copies so I just copy the one side and file it away in the same manner. Most of my pages in this binder have a sketch to go with them but not all of them do. I file layouts that don't have sketches by counting the number of photos and filing it in the same manner too. It really saves on thumbing through a million magazines and also there isn't a need to store countless magazines with this system either. I have another binder for techniques I like some of which came from magazines so I very rarely save a magazine in tact! So I hope this helps someone organize their layout ideas. If you can think of any ideas on how I can improve my system I am all ears!
Wow! Could this blog post be any longer? Well thanks for hanging in there. Your eyes must be sore after reading all that! So to make it up to you I am giving away this freebie. A lady from the Scal hints group needed something to go with a pedicure layout. I remembered this file I created a long time ago and thought it would be perfect. . I dug it out and now it's better than ever. I hope you enjoy it!

Click here to download. Included in the zip are AI, GSD, KNK, SVG, and WPC format along with instructions.
Oh and I haven't forgotten about the blog candy I promised you. I am attending a retreat next week and am trying to get ready for that. I'm afraid I haven't had a chance to get any blog candy together. I am hoping when I return from the retreat I will have some time to get new files into the store for you. So.....when I reach 200 files (I'm currently at 185) I will give away a blog candy that I promise will be worth waiting for!
Thanks so much for stopping by and visiting with me today! I hope you have a grand weekend!

It's mid September and I think we are finally falling into a routine. Yeah! Both kids know that we need to catch the bus and with a few reminders they get ready and we haven't missed it yet. Keeping our fingers crossed we don't miss it in the future. I am a night owl and often stay up late to get my work done for the store while the kids are sleeping. My body has faithfully woke me up every morning no matter how late I have gone to bed. Isn't it amazing my body knows to do this! I am always fascinated by the workings of the human body!
For the Frugal Friday special today I am offering my dotted fun sentiments file for only $1.00. Hurry though this price will expire at midnight EST 9/17/2010. This font goes for just about any occasion so you'll get your money's worth by purchasing it. Please click on the words above the preview to purchase but don't go yet as I have some awesome projects by my CDT to share. I also will give you a peek into my sketch binder too and a freebie.
Dotted Fun Sentiments

CDT member Kelly Stone has made some awesome cards using these sentiments. Please check them out below.

Bracket Fun


Year Round Floral Shaped Card


Playful Flowers, Leaves, and Branches

70's Beaded Borders


Don't you just you love the photo of Nicholas from behind!?! I absolutely love that perspective! These hinged tabs are on sale the whole month of September. They are sooo versatile as you can use them on cards, journals, and calendars. It would be great to use them to hide hidden journaling or extra photos on a layout. They actually fold over your items with a separate piece for the label that slips inside. Click the words above the preview to purchase the tabs before they go off of sale.
Hinged Tabs

I'd like to thank all of you who left wonderful comments about my scrappin' desk. I thought it was a pretty cool space but it's great when others think so too. I am not an organizational expert by any means but I am happy to share with you what works for me in hopes it will give you some inspiration in finding a system that works for you. To continue with the organizational theme I will share with you the way I store my sketches below.
I fell in love with using sketches when designing my layouts when I first was introduced to them about 7 years ago I think. I have been collecting them every since. I soon needed a way to store them so I could find what I needed., I discovered it was easiest for me to sort my sketch by the number of photos so I developed a system based on that. I will share my system with you as crude as it may be in hopes you might get some inspiration from it.


This isn't an exact science as I said it is crude. But it works for me! All I have to do is see how many photos I want to scrap and turn to that tab. If you are bothered by the jagged torn edges when you rip the pages out you could use a paper trimmer to cut the edges. You also don't have to use the back of magazines pages if you find it distracting you can just use copy paper for these sketches as well. Sometimes you will run into a magazine page that has layouts on both sides you like...I am fortunate in that my printer also copies so I just copy the one side and file it away in the same manner. Most of my pages in this binder have a sketch to go with them but not all of them do. I file layouts that don't have sketches by counting the number of photos and filing it in the same manner too. It really saves on thumbing through a million magazines and also there isn't a need to store countless magazines with this system either. I have another binder for techniques I like some of which came from magazines so I very rarely save a magazine in tact! So I hope this helps someone organize their layout ideas. If you can think of any ideas on how I can improve my system I am all ears!
Wow! Could this blog post be any longer? Well thanks for hanging in there. Your eyes must be sore after reading all that! So to make it up to you I am giving away this freebie. A lady from the Scal hints group needed something to go with a pedicure layout. I remembered this file I created a long time ago and thought it would be perfect. . I dug it out and now it's better than ever. I hope you enjoy it!

Click here to download. Included in the zip are AI, GSD, KNK, SVG, and WPC format along with instructions.
Oh and I haven't forgotten about the blog candy I promised you. I am attending a retreat next week and am trying to get ready for that. I'm afraid I haven't had a chance to get any blog candy together. I am hoping when I return from the retreat I will have some time to get new files into the store for you. So.....when I reach 200 files (I'm currently at 185) I will give away a blog candy that I promise will be worth waiting for!
Thanks so much for stopping by and visiting with me today! I hope you have a grand weekend!


